The Repos (repositories) store the streaming logs securely. A single repo consists of one or more repo-paths with their respective retention policies. The retainment of the logs in the repos depend on the policies set. The number displayed under Retention (days) is the cumulative number of days for all the repo-paths associated with the repo.

Repos
Warning
Make sure that you only select the appropriate repos while configuring a new dashboard.
To sort the columns in ascending or descending order, move your cursor to the column you want to sort. You will see a down arrow; click it and select Sort Ascending or Sort Descending.

Sorting Columns
To filter the columns you want in the UI, click the MORE dropdown, click Columns, and select the columns you want.

Filtering Columns in the UI
You can replicate a repo of one Logpoint to a repo of one of its Distributed Logpoints in real time. These repos are known as High Availability (HA) Repos. You can use the HA Repos to access the logs even when one of the Logpoint instances (or repos) is not available.
The HA repos replicate logs from one Logpoint to multiple Logpoint machines, ensuring logs remain available even if one Logpoint becomes unavailable. However, this replication only applies to logs collected after the HA repos configuration.
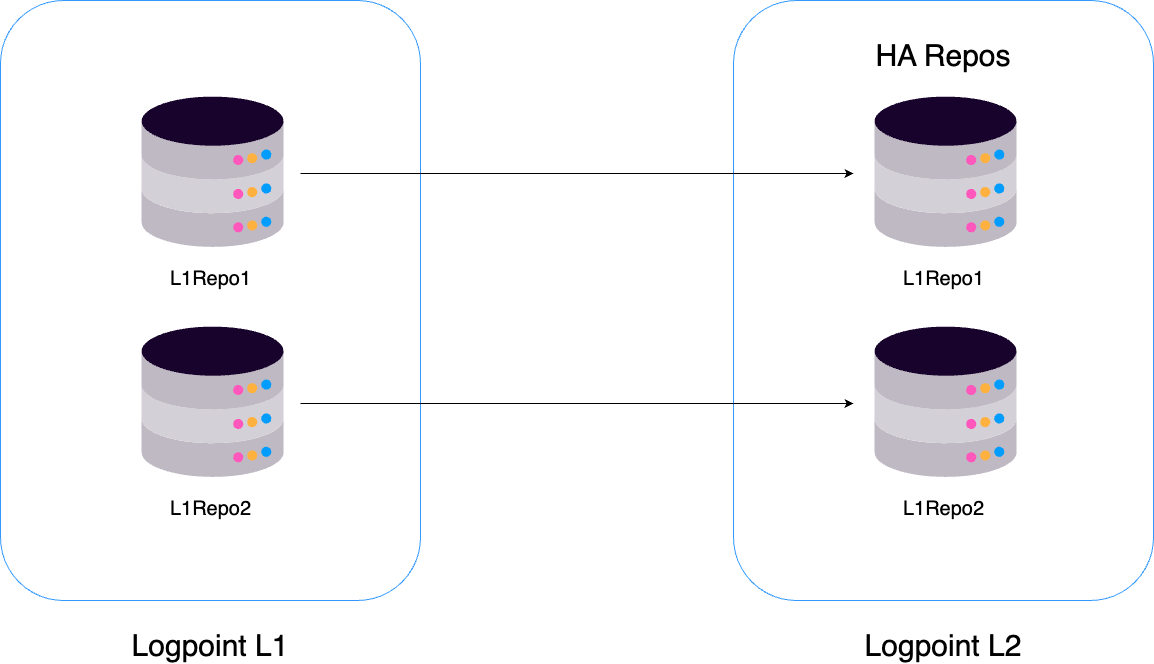
High-Availability Repos
In the above diagram, the repos R1 and R2 belong to Logpoint L1. When you add Logpoint L2 as the Remote Logpoint of L1 and configure them for high availability, the system replicates the repos of L1 to their corresponding repos in L2. The logs ingested after this configuration are stored in both the repos. If you configure HA Repo for R1 and R2, their relevant HA repos L1R1 and L1R2 are replicated in Logpoint L2.
Go to Settings >> Configuration from the navigation bar and click Repos.
Click ADD.

Adding Repos
In REPO INFORMATION, enter a Repo Name. Select a Repo Path and the preferred Retention (day) period.
The length of the Repo Name must be less than 29 characters.
The number of Retention (day) must be greater than two.
Click the plus icon to add another repo path if you are archiving logs in secondary storage. To add new paths in the Repo Path dropdown, use the repodir add li-admin command. For more details, go to Logs Retention.
Use Availability to setup High-Availability Repos.
4.1. Select a Remote Logpoint where you want to replicate the repo. It displays all the distributed (remote) Logpoints connected to your Logpoint, and you can select a remote Logpoint to replicate the repo.
4.2. In Available for (day), select the retention period for the High-Availability repo. If you select five days, the logs will be removed from High-Availability repo after five days.
Click Submit.
Click the ? symbol near the top-right corner for context-sensitive help.
Retention specifies the number of days for which logs are kept in storage before they are removed. You can add multiple Repo Path to transfer older logs from primary to secondary storage according to their retention period. This frees up space in primary storage for the newer logs.
For example, you can define two repo paths for repo as /opt/immune/storage/tier1 and /opt/immune/storage/tier2 and select the Retention (day) as five days and fifteen days, respectively. Then, Logpoint stores the collected logs in the first path for the first five days. Then, they are moved to the second path and stored for fifteen days. The total retention period for the repo is twenty days. After twenty days, the logs are deleted from the database.
Logs are stored in folders, each with a maximum capacity of 5 million. When a folder reaches this capacity or its retention time exceeds, it becomes immutable, meaning no additional logs can be added. Once a folder is immutable, it is moved from primary to secondary storage, ensuring that all logs within it are moved.
Logpoint moves the logs daily at 1 AM GMT.
The exported file contains the repo configuration, i.e., its name, the repo-paths, and the retention policies.
Go to Settings >> Configuration from the navigation bar and click Repos.
Select the repositories to export.
Click EXPORT.
Save the exported pak file.
You can create HA repos for one Logpoint in only one of its Distributed Logpoint. On the Distributed Logpoint, you can change the base repo-path from the system settings. You can specify the HA repos when creating a repo on the local machine. If the imported pak file contains an existing repo name, a dialog box appears that allows you to enter the new repo name.
Go to Settings >> Configuration from the navigation bar and click Repos.
Click IMPORT and browse to the repository file.
Click Upload.
Go to Settings >> Configuration from the navigation bar and click Repos.
Click the Repo Name of the required repo and update the information. You cannot edit the name of a repo.
Click Submit.
Before deleting a repo, make sure that it is not in use.
Go to Settings >> Configuration from the navigation bar and click Repos.
Click the Delete ( ) icon under Actions.
To delete multiple repos, select the repos. Click More and choose Delete Selected.
To delete all the repos, click More and choose Delete All.

Deleting Repos
Click Yes to confirm deletion.