In Logpoint, you can maintain a collection of values as a List. You use or apply the list’s values as criteria when performing a log search. For example, if you create a list named ACTIONS_LIST having the values of the field action, you can use the query action in ACTIONS_LIST in the search bar to view all the logs containing the actions defined in the list.
You can also use the list to correlate the values in dashboard, reports, and alerts.
Logpoint supports two kinds of lists: Static List and Dynamic List.
Note
Use a Static List when you need to create a pre-defined list that doesn’t change.
Use Dynamic List when you need to create a list that periodically populates and changes values.
Static List is the collection of pre-defined values. You can use the static list to search those values.
For example, if you need to store a list of blocked IP addresses, you can define a list named IP_BLACKLIST and populate it with the blacklisted IPs. Whenever you need to check if there is a blocked IP Address, you can use the syntax device_ip in IP_BLACKLIST.
This list remains unchanged until you add or remove list items.
Go to Settings >> Knowledge Base from the navigation bar and click Lists and Tables.
The page displays the existing lists and tables. To switch between the lists and the tables, You can select Lists or Tables option from the drop-down menu at the top left.
Click Add.

Adding a list
Select Static List.
Provide the Name and List of Values. You can also select the Vendor provided lists from the Also Include From Vendor table.
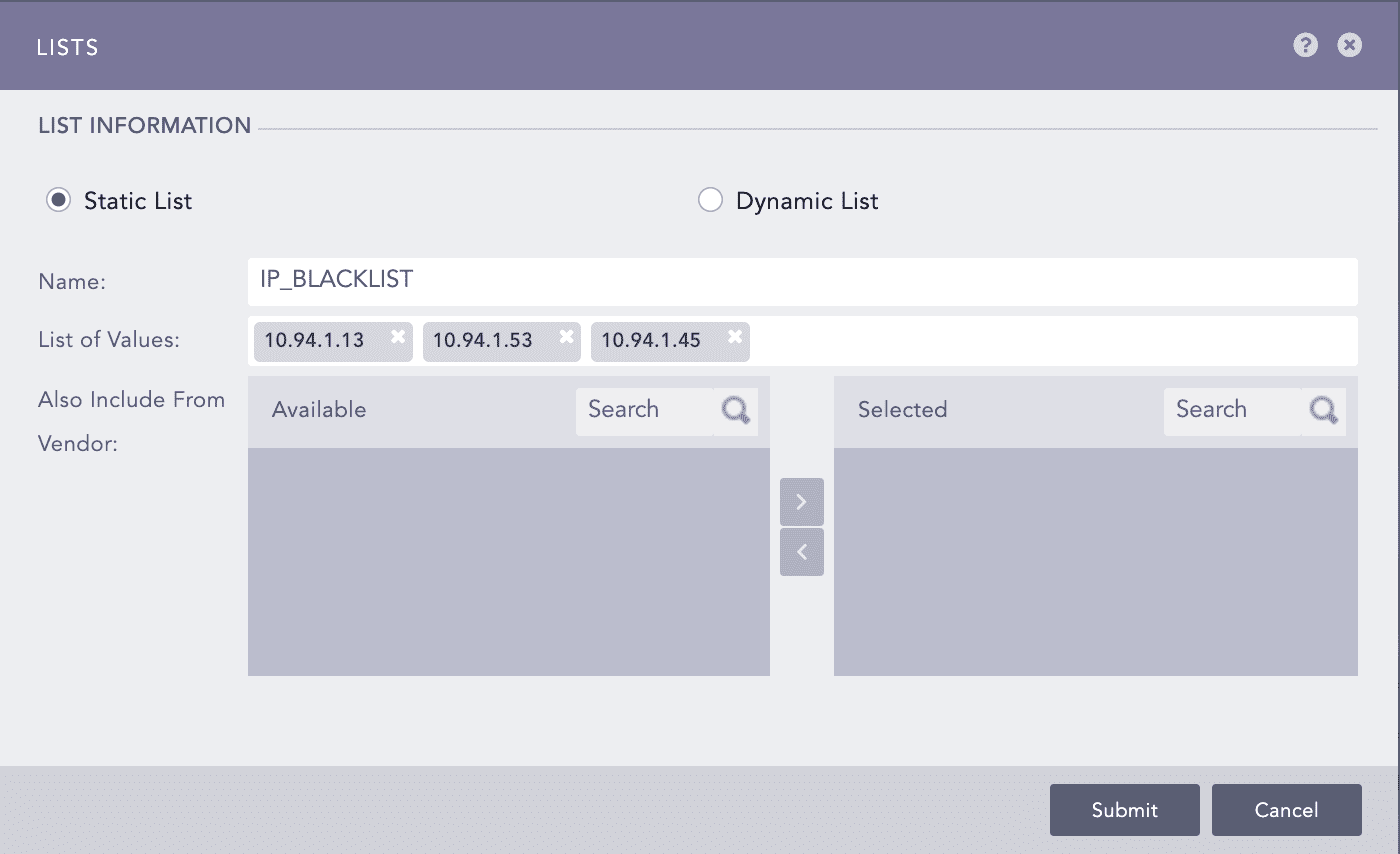
Adding a static list
Click Submit.
A Dynamic List contains specific values from runtime events and stores them for a limited or an unlimited period. Unlike a static list, the values are not pre-defined. You use the toList process command to define which values to search for. You can also use this process command to update an existing dynamic list during a search or update alerts and dashboards at scheduled intervals.
For example, if you want to maintain a list of all the users in a system, you can create a dynamic list USERS and execute the toList process command to populate the list. Whenever new users log into the system, you can execute the process command to update the list values.
Go to Settings >> Knowledge Base from the navigation bar and click Lists and Tables.
The page displays the existing lists and tables. To switch between the lists and the tables, You can select Lists or Tables option from the drop-down menu at the top left.
Click Add.
Select Dynamic List.
Provide Name and Age Limit. Age Limit is the expiration time for the values in the list, i.e., the values expire after the time specified in the Age Limit.
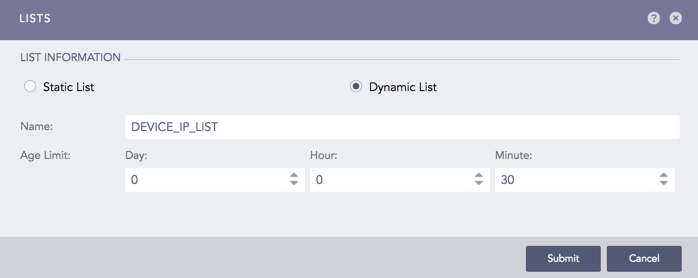
Adding a dynamic list
Note
The age limit must be at least 30 minutes. If you do not want the values to expire, set the age limit as 0.
Click Submit.
The toList process command populates the dynamic list with the field values of the search result.
Syntax:
| process toList (list_name, field_name)
Note
This process command takes two arguments: the list name and the field name. It prompts an error message if you provide more than two arguments or an incorrect list name.
Example:
device_ip=* | process toList(device_ip_list, device_ip)
The above example populates the dynamic list device_ip_list with the values of the field device_ip from the search result.

Defining values in the dynamic list
If you execute the same process command with a different field name, it adds the values of the field to the existing values in the list.
For example, if you execute the query device_ip=* | process toList(device_ip_list, device_ip), then execute device_ip=* | process toList(device_ip_list, device_name), the process command adds the values of device_name to the values present in the list device_ip_list.

Adding values in the dynamic list
Select the list you want to export.
Click Export.

Exporting a list
Save the exported package.
Click Import.
Browse to the exported .pak file.

Importing a list
Click Submit.
Note
Lists and Last Updated are not included in a dynamic list import so the list behaves like a newly created one.
Go to Settings >> Knowledge Base from the navigation bar and click Lists and Tables.
Click the Delete icon under the Actions column next to the relevant list.
A delete confirmation dialog box appears on the screen. Click Yes to proceed.
Tables are used to store the data that you can use to enrich the logs. You can search the data stored in the table using a search query.
For example, if you create a table named “USERS”, you can use the query Table “USERS” in the search bar to view the data of the table.
A Dynamic table stores the specified field and field values during the runtime for a limited or an unlimited period. You must use the toTable process command to define the values from the search result in the dynamic table. You can update the dynamic table by executing the toTable process command through search or scheduled intervals in alerts and dashboards.
The application adds the dynamic table as an enrichment source. Go to Settings >> Configuration from the navigation bar and click Enrichment Sources to view the dynamic table. You can use it in the enrichment policy as other enrichment sources. Refer to the Enrichment Policies section for more details.
Go to Settings >> Knowledge Base from the navigation bar and click Lists and Tables.
The page displays the existing lists and tables. To switch between the lists and the tables, You can select Lists or Tables option from the drop-down menu at the top left.
Select the Tables option from the drop-down.

Selecting Table option from drop-down
Click Add to open the Table panel.
Provide Name and Age Limit. Age Limit is the expiration time for the values in the table, i.e., the values expire after the time specified in the Age Limit.
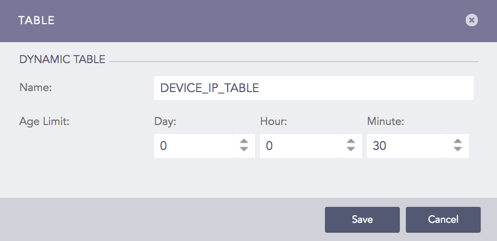
Adding a dynamic table
Note
The age limit must be at least 30 minutes. If you do not want the values to expire, set the age limit as 0.
Click Save.
The toTable process command populates the dynamic table with the fields and field values of the search result.
Syntax:
| process toTable (table_name, field_name1, field_name2,...., field_name9)
Note
This process command takes a table name and 1-9 field names as arguments. It prompts an error message if you provide more than ten arguments or an incorrect table name.
The toTable process command does not support the fields log_ts, col_ts, sig_id, msg, and col_type.
The dynamic table defines its column names based on the field names passed in the toTable process command.
Example:
device_ip=* | process toTable(device_ip_table, device_name, device_ip, action)
The above example defines two columns- device_name and device_ip for the dynamic table device_ip_table and populates the table with their values from the search result.
Click the View Table Data icon under the Actions column of the dynamic table to view the values of the table. You can also view the table data by executing the query Table “DEVICE_IP_TABLE” in the search bar.

View Table Data icon of the dynamic table

Viewing the values of the dynamic table
Note
If you want to update the table, make sure to pass the same number of arguments with the same data type in the toTable process command as before.
If you pass different field names of same data type, make sure the order of the data type is the same as before.
Warning
In the data privacy enabled system, the toList and toTable process commands process the encrypted fields only if you have the full access to the data privacy fields, i.e., if the granting user grants access to view all the values of all the data privacy fields.

