You can configure Universal REST API Fetcher using its log source template. The template has pre-defined settings and configurations to fetch logs. However, some fields must be entered manually.
Click CONFIGURE in the navigation bar.
Under Entities, click LOG SOURCES.
Click Create Log Source.
Select Universal REST API Fetcher.
Select a Pool and Logpoint to configure the fetcher.
In source, you can add details about the REST APIs, from where the Universal REST API Fetcher fetches logs for accurate identification, data formatting, and timestamping.
Click Source.
Enter the Name.
In Base URL, enter the API URL.
Enter Request Timeout (secs) for the API request.
In Retry After(secs), enter the time to wait after an error or timeout.
Enter the frequency at which data is retrieved in Fetch Interval (min).
Select the Charset and Timezone.
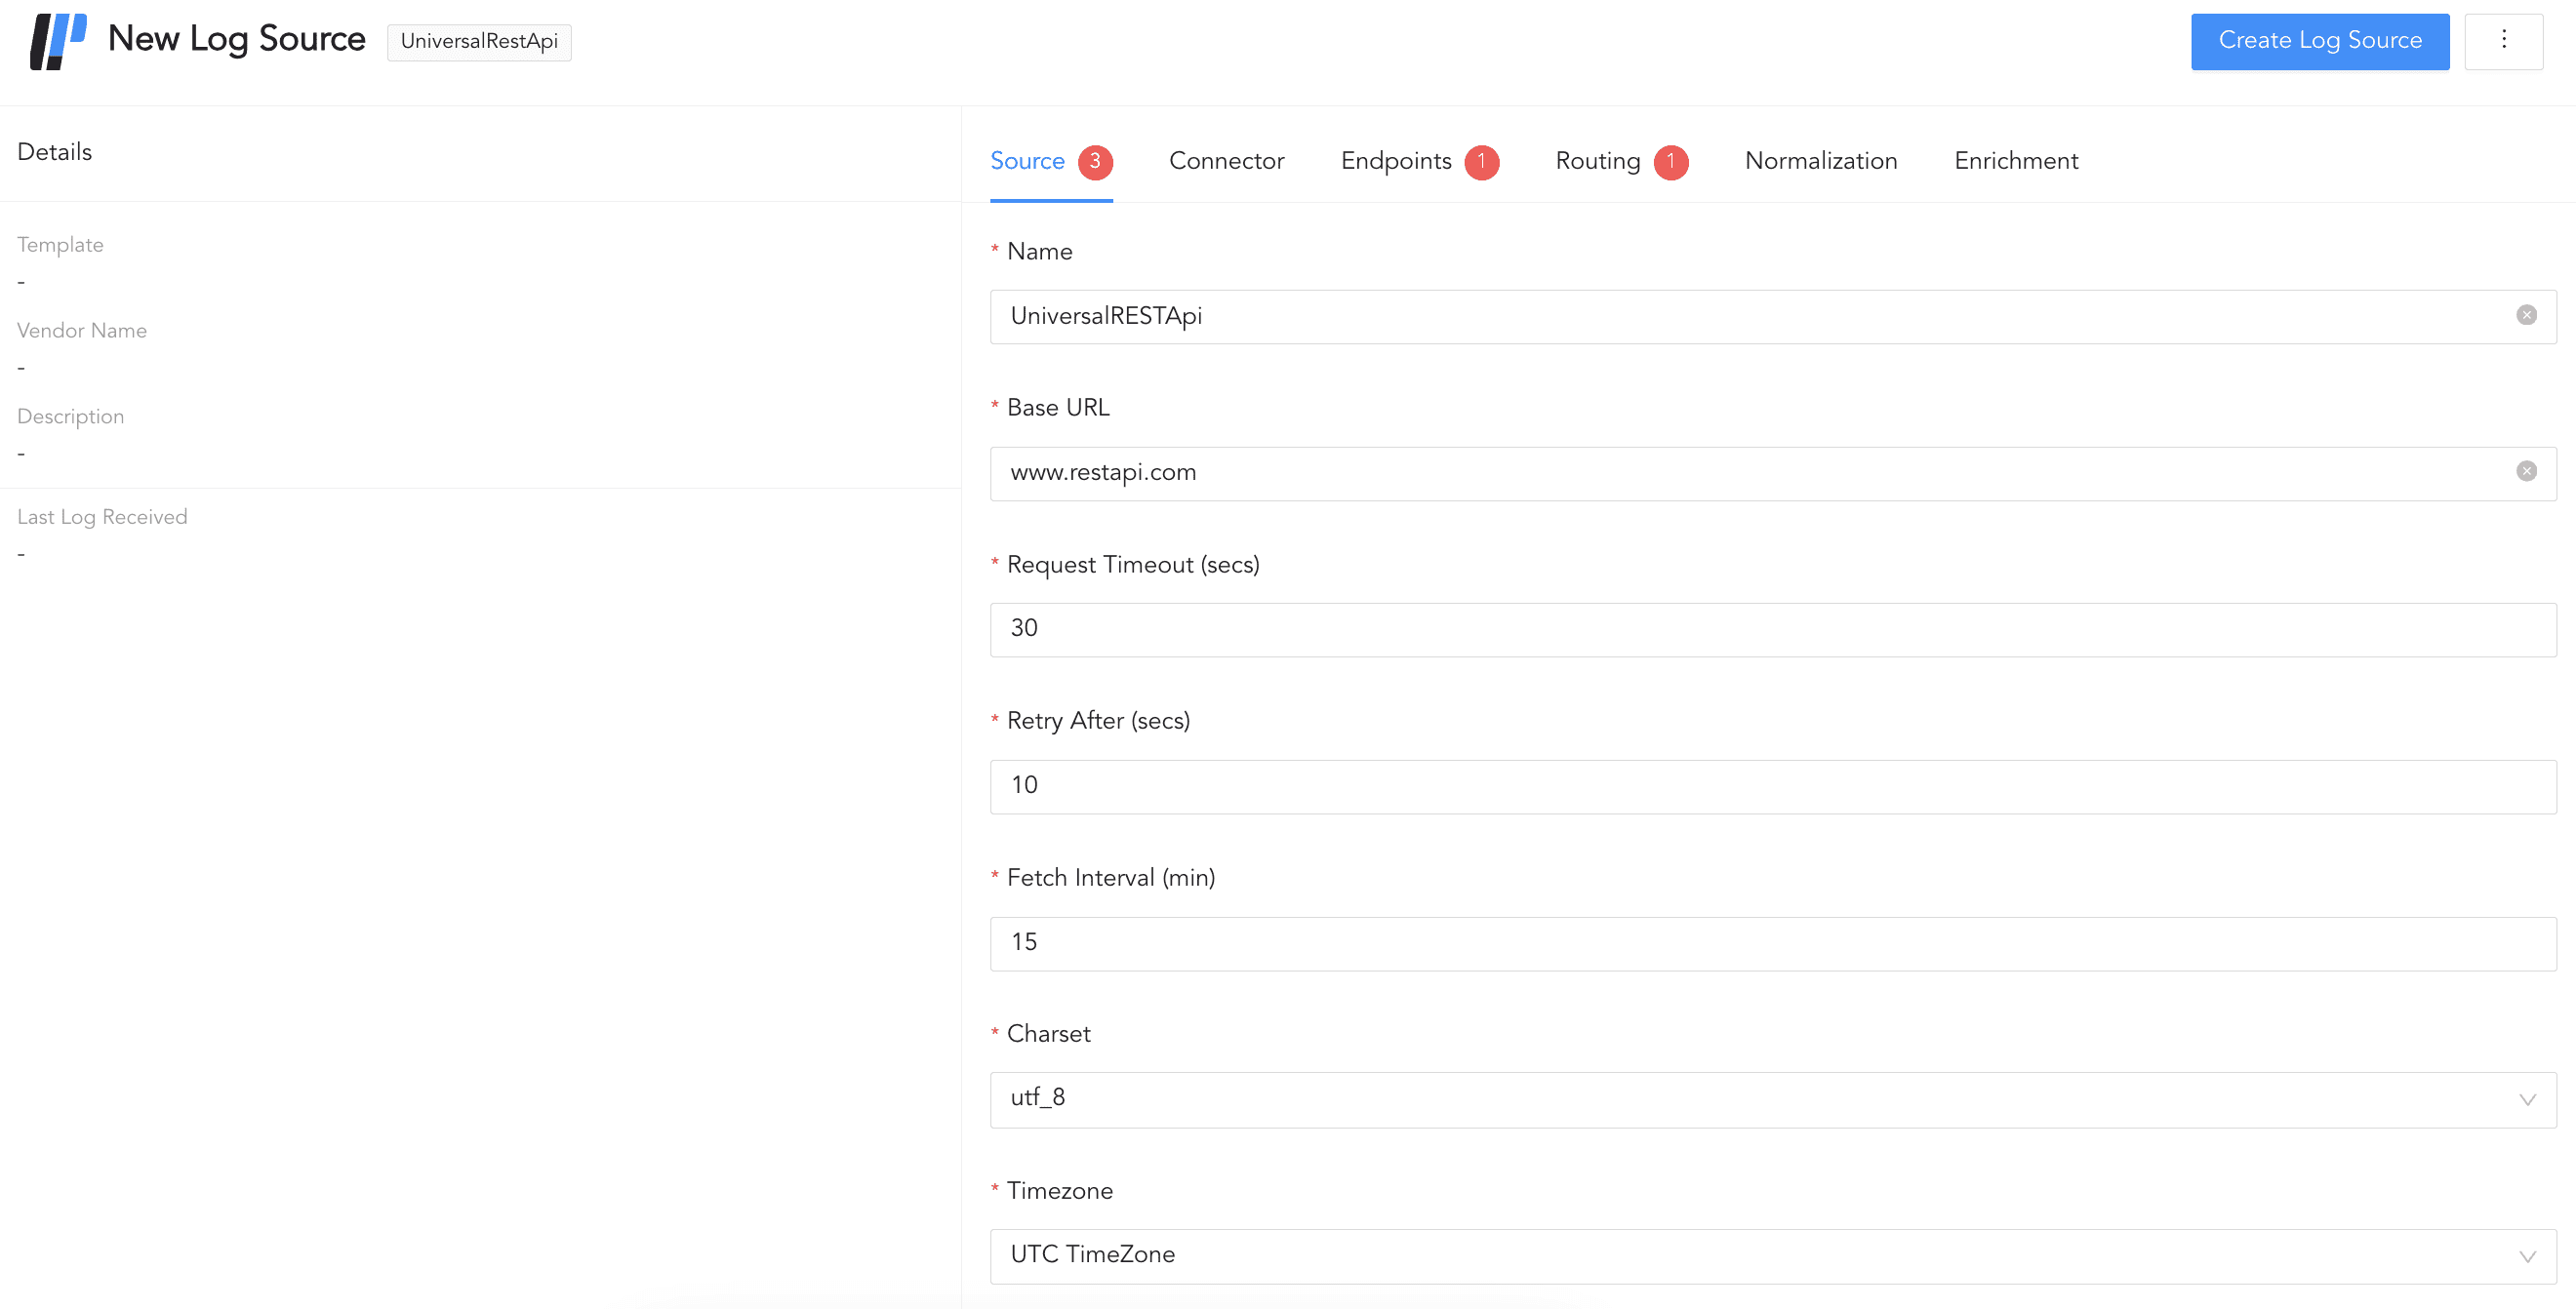
Configuring Source
In connector, you can configure how Universal REST API Fetcher and REST APIs communicate with each other.
Click Connector.
Select the Product. It displays the integrations supported by Universal REST API Fetcher.
Select the Authorization Type.
3.1. Select No Auth if no authentication is required.
3.2. Select Basic to use a username and password to authenticate.
3.2.1. Under CREDENTIALS, enter the Username and Password.
3.3. Select OAuth2 to authenticate using OAuth authentication.
3.3.1. Under OAUTH 2.0 BASIC INFORMATION, enter the Token URL of the server.
3.3.2. Select either Client Credentials or Password Credentials as the Grant Type.
3.3.2.1. If you select Client Credentials, enter the OAuth secret password in Client Secret.
3.3.2.2. If you select Password Credentials, enter the OAuth Username and Password.
3.3.3. In Client ID, enter the OAuth application ID or client ID.
3.3.4. In API Key Prefix, enter the prefix to add to the authorization header before the API Key or Token.
3.3.5. In Client AUthentication, select whether to send the client credentials as a basic auth header or in the body.
3.3.6. Enter the extra parameters key and its value in ADDITIONAL BODY FOR OAUTH 2.0.
3.4. Select the API Key to authenticate using an API Key.
3.4.1. In Secret Key, enter API Key. This API key is used in the authorization header.
3.4.2. In API Key Prefix, enter the prefix to add to the authorization header before API Key or Token.
3.5. Select Digest to authenticate using digest access authentication.
3.5.1. Under CREDENTIALS, enter the Username and Password.
3.6. Select Custom to authenticate using integration that applies custom authentication mechanisms and request handling.
Enter the custom headers in Headers as a key-value pair.
Enable Enforce HTTPS certificate verification to enable a secure connection.
Select Enable Proxy to use a proxy server.
6.1. Select either HTTP or HTTPS protocol.
6.2. Enter the proxy server IP address and the PORT number.

Configuring Connector
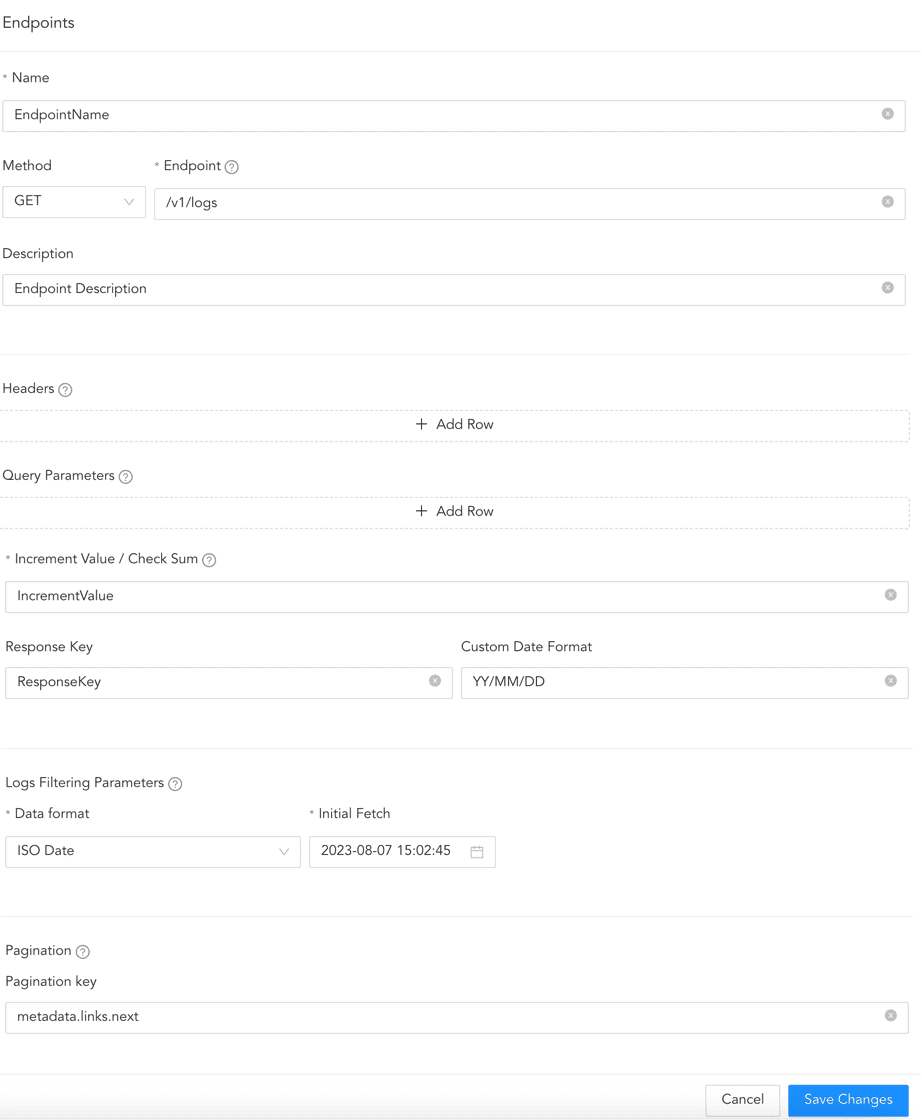
In endpoints, you can configure details about the REST APIs endpoints.
Click Endpoints and + Add Row.
Enter the endpoint’s Name.
Select the request Method to call the endpoint.
3.1. If you select POST, enter the Post request body in JSON format.
For example:
- {
“filters”: [
{
“fieldName”:”<field>”,
“operator”: “<operator>”,
“values”: “[value]”,
}
], “search”: “<value>”,
“sortingFieldName”: “<field>”,
“sortDirection”: “<sort direction>”,
“limit”: “<limit>”,
“offset”: “<page number>”
}
Important
If your Post request body consists of an incremental value and the value is a date, then the value of values must be [{{Start}}].
Enter the Endpoint part of the previously added Base URL.
Enter a Description for the endpoint.
In Headers, click + Add Row and enter the custom headers in Headers as a key-value pair. The header parameters cannot be log filtering fields, such as start_date or end_date.
In Query Parameters, click + Add Row and enter the request parameter’s Key and Value.
For example, if you are using the OData query filter, such as /api/alerts?$filter=(severity eq ‘High’) or (severity eq ‘Medium’), you must enter $filter as Key and (severity eq ‘High’) or (severity eq ‘Medium’) as Value.
Query Parameters are sent in the request URL.
Important
If you need to provide the starting or end point of the log fetch, then they must be specified in either the Query parameters or Post request body. They must also be specified using Jinja template keywords, such as {{Start}} or {{End}}.
For example:
Post request body
{“filters:
[
{
“fieldName”:”StartTimestamp”,
“operator”: “equals”,
“values”: {{Start}}
},
{
“fieldName”:”EndTimestamp”,
“operator”: “equals”,
“values”: {{End}} }
] }
Here, the field name StartTimestamp indicates the starting point of fetch, and EndTimestamp indicates the end point of fetch. These values are incremented dynamically in subsequent fetch attempts.
Query Parameters
StartTimestamp -> {{start}}
EndTimestamp -> {{end}}
In Increment Value / Check Sum, enter the increment field from the response of the RESTful API.
For example, if the increment field is event_date and it is inside Events, then enter Events.event_date. The field is saved in CheckSum, a database that uses the field to record until data is fetched. This ensures there is no log duplication as Universal REST API Fetcher checks the CheckSum every time before fetching any new data.
Enter the Response key, which is an identifier to locate and parse logs within an API response.
Enter a Custom Date Format for API response. Universal REST API supports all date formats.
Some of them are:
Date Type
Format
Example
UTC
%Y-%m-%dT%H:%M:%SZ
2023-04-27T07:18:52Z
ISO-8601
%Y-%m-%dT%H:%M:%S%z
2023-04-27T07:18:52+0000
RFC 2822
%a, %d %b %Y %H:%M:%S %z
Thu, 27 Apr 2023 07:18:52 +0000
RFC 850
%A, %d-%b-%y %H:%M:%S UTC
Thursday, 27-Apr-23 07:18:52 UTC
RFC 1036
%a, %d %b %y %H:%M:%S %z
Thu, 27 Apr 23 07:18:52 +0000
RFC 1123
%a, %d %b %Y %H:%M:%S %z
Thu, 27 Apr 2023 07:18:52 +0000
RFC 822
%a, %d %b %y %H:%M:%S %z
Thu, 27 Apr 23 07:18:52 +0000
RFC 3339
%Y-%m-%dT%H:%M:%S%z
2023-04-27T07:18:52+00:00
ATOM
%Y-%m-%dT%H:%M:%S%z
2023-04-27T07:18:52+00:00
COOKIE
%A, %d-%b-%Y %H:%M:%S UTC
Thursday, 27-Apr-2023 07:18:52 UTC
RSS
%a, %d %b %Y %H:%M:%S %z
Thu, 27 Apr 2023 07:18:52 +0000
W3C
%Y-%m-%dT%H:%M:%S%z
2023-04-27T07:18:52+00:00
YYYY-DD-MM HH:MM:SS
%Y-%d-%m %H:%M:%S
2023-27-04 07:18:52
YYYY-DD-MM HH:MM:SS am/pm
%Y-%d-%m %I:%M:%S %p
2023-27-04 07:18:52 AM
DD-MM-YYYY HH:MM:SS
%d-%m-%Y %H:%M:%S
27-04-2023 07:18:52
MM-DD-YYYY HH:MM:SS
%m-%d-%Y %H:%M:%S
04-27-2023 07:18:52
In Logs Filtering Parameters, select the parameters to filter the incoming logs.
11.1. Select a Data format.
11.1.1. Select ISO Date to represent data using the International Standards Organization (ISO) format of “yyyy-MM-dd”. Example: 2017-06-10. If you select ISO Date, then its value must be in the string format in the Post request body.
11.1.2. Select UNIX Epoch to represent data using the UNIX epoch time format. It is a system for measuring time as the number of seconds that have elapsed since January 1, 1970, at 00:00:00 UTC (Coordinated Universal Time). Example: 1672475384.
11.1.3. Select UNIX Epoch (ms) to represent data using the UNIX epoch time format with milliseconds precision. It is a system for measuring time as the number of milliseconds that have elapsed since January 1, 1970, at 00:00:00 UTC (Coordinated Universal Time). Example:1672475384000.
11.1.4. Select Custom Format to define your own format for representing the data. The custom format can be created using Date/Time patterns.
11.1.5. Select a Unique ID to represent data using an unique ID. If you select Unique ID here, then its value must be in the number format in the Post request body.
12.2. Select an Initial Fetch date. Logs are fetched for the first time from this date.
In Pagination Key, enter the location of the following page URL from the response if the API supports pagination.
For example, if the data from the RESTful API looks like the following, the pagination key is metadata.links.next.
"metadata": {

"links": {

          "self": "https://api.com/audit_logs",

          "next": "https://api.com/audit_logs?offset=500"

        }

        }
Click Save Changes.
Configuring Endpoint
To edit the endpoint configuration, click the ( ) icon under ACTION and click Edit. Make the necessary changes and click Save Changes.
To delete the endpoint configuration, click the () icon under ACTION and click Delete.
In routing, you can create repos and routing criteria for Universal REST API Fetcher. Repos are locations where incoming logs are stored and routing criteria are created to determine the conditions under which these logs are sent to repos.
To create a repo:
Click Routing and + Create Repo.
Enter a Repo name.
In Path, enter the location to store the incoming logs.
In Retention (Days), enter the number of days logs are kept in a repository before they are automatically deleted.
In Availability, select the Remote logpoint and Retention (Days).
Click Create Repo.
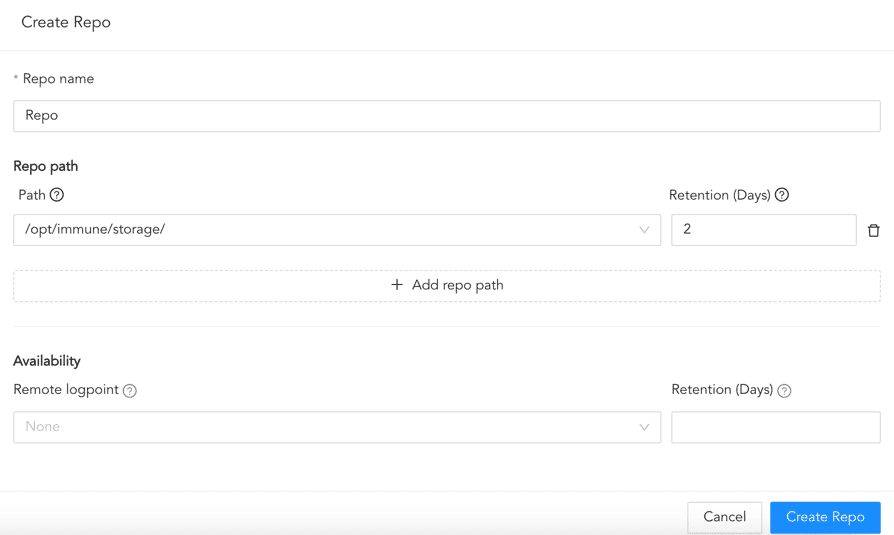
Creating a Repo
In Repo, select the created repo to store logs.
To create Routing Criteria:
Click + Add row.
Enter a Key and Value. The routing criteria is only applied to those logs which have this key-value pair.
Select an Operation for logs that have this key-value pair.
3.1. Select Store raw message to store both the incoming and the normalized logs in the selected repo.
3.2. Select Discard raw message to discard the incoming logs and store the normalized ones.
3.3. Select Discard entire event to discard both the incoming and the normalized logs.
In Repository, select a repo to store logs.
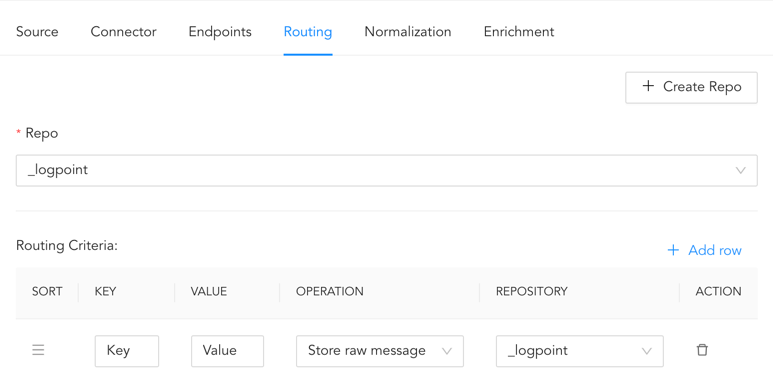
Creating a Routing Criteria
Click the ( ) icon under Action to delete the created routing criteria.
In normalization, you can select normalizers for the incoming logs. Normalizers transform incoming logs into a standardized format for consistent and efficient analysis.
Click Normalization.
Select a Normalizer from the list and click the swap( ) icon.
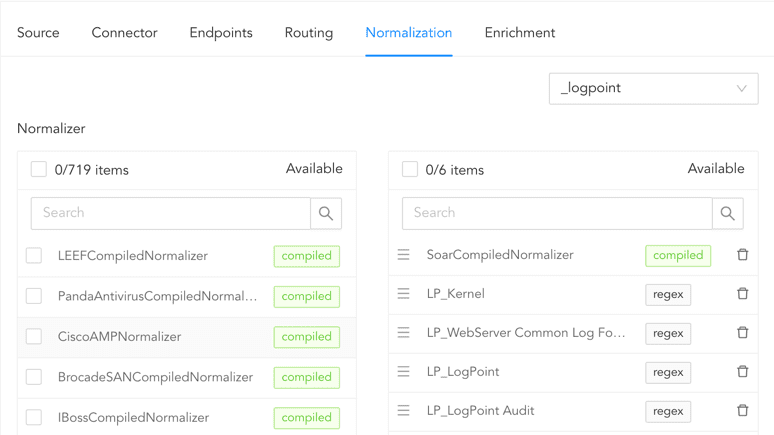
Adding Normalizers
In enrichment, you can select an enrichment policy for the incoming logs. Enrichment policies are used to add additional information to a log, such as user information, device type or geolocation.
Click Enrichment.
Select an Enrichment Policy.
Click Create Log Source to save the configurations of Source, Connector, Endpoints, Routing, Normalization, and Enrichment.
You are redirected to TASKS, which displays the Universal REST API Fetcher configuration progress.