Fetchers fetches logs from a remote location. You can use built-in fetchers to retrieve logs from devices or servers that do not send logs. Enter relevant parameters to configure the fetchers and use Test to check if the fetcher is working correctly.
Logpoint has the following built-in fetchers:
The Windows Management Instrumentation (WMI) Fetcher retrieves Windows device logs.
Configuring WMI Fetcher in Logpoint
Go to Settings >> Configuration from the navigation bar and click Devices.
Click the Add collectors/fetchers icon under Actions.
Click WMI Fetcher.
Enter the Username and Password of Windows configured for the WMI Fetcher.
Warning
If the Windows user is in a domain, the username must be in the format, domain/username (domain@username is invalid).
Enter the frequency at which data is retrieved in Fetch Interval (minutes).
Select Parser.
In Facility, select the code used to specify the system that has the log.
Select Severity.
Select a Processing Policy.
Select an encoding format from Charset.

Configuring WMI Fetcher in Logpoint
Click Submit.
Configuration of Windows system for WMI
Before using WMI, you need to configure Windows device settings. To configure:
Go to Control Panel >> Administrative Tools >> Components Services in Windows device.
On Components Services window, expand Component Services >> Computers.
Right-click My Computer and select Properties.
Select COM Security.
Click Edit Limits in Launch and Activation Permissions.
Click Add.
Click Advanced.
Click Find Now.
Select a user and click OK.
The username is displayed in the name field in Select Users or Groups.
Click OK.
In Launch Permission, select Remote Launch and Remote Activation.
Click OK.
Configuration of Windows system for WMI with non admin rights
To configure a user with non-admin rights to forward windows logs into Logpoint using WMI Fetcher:
Create a new user from Administrative Tools >> Active Directory Users and Computers in Windows device.
Add users to the following groups.
Distributed COM users
Performance monitor users
Event log readers
Open WMI Control console.
3.1. Click Start.
3.2. Click Run.
3.3. Type wmimgmt.msc.
3.4. Click OK.
Right-click on WMI control and click Properties.
Click Security and click Add.
In Select Users, Computers, or Groups, enter the name of Performance monitor users.
In Security, under Permissions, select permissions. Add the following:
Remote Enable
Read Security
Assign the user to use Component Services.
Go to Component Services under Administrative Tools.
On Components Services, expand Component Services/Computers.
Right-click My Computer and select Properties.
Select COM Security.
Grant Access Permissions (Remote Access) and Launch and Activation Permissions (Remote Launch and Remote Activation) to the newly created user.
FTP Fetcher fetches logs from the relative file path of the FTP server. You can configure FTP Fetcher from Log Source or Devices. We recommend you configure it from log source as it provdes a centralized User Interface for all the configurations.
FTP Fetcher consists of the log source template, FTP Fetcher, which has pre-defined settings and configurations to fetch logs. However, some fields in the template must be configured manually.
To configure FTP Fetcher from Log Source:
Go to Settings >> Log Sources from the navigation bar and click + Add Log Source.
Click + Create New and select FTP Fetcher.
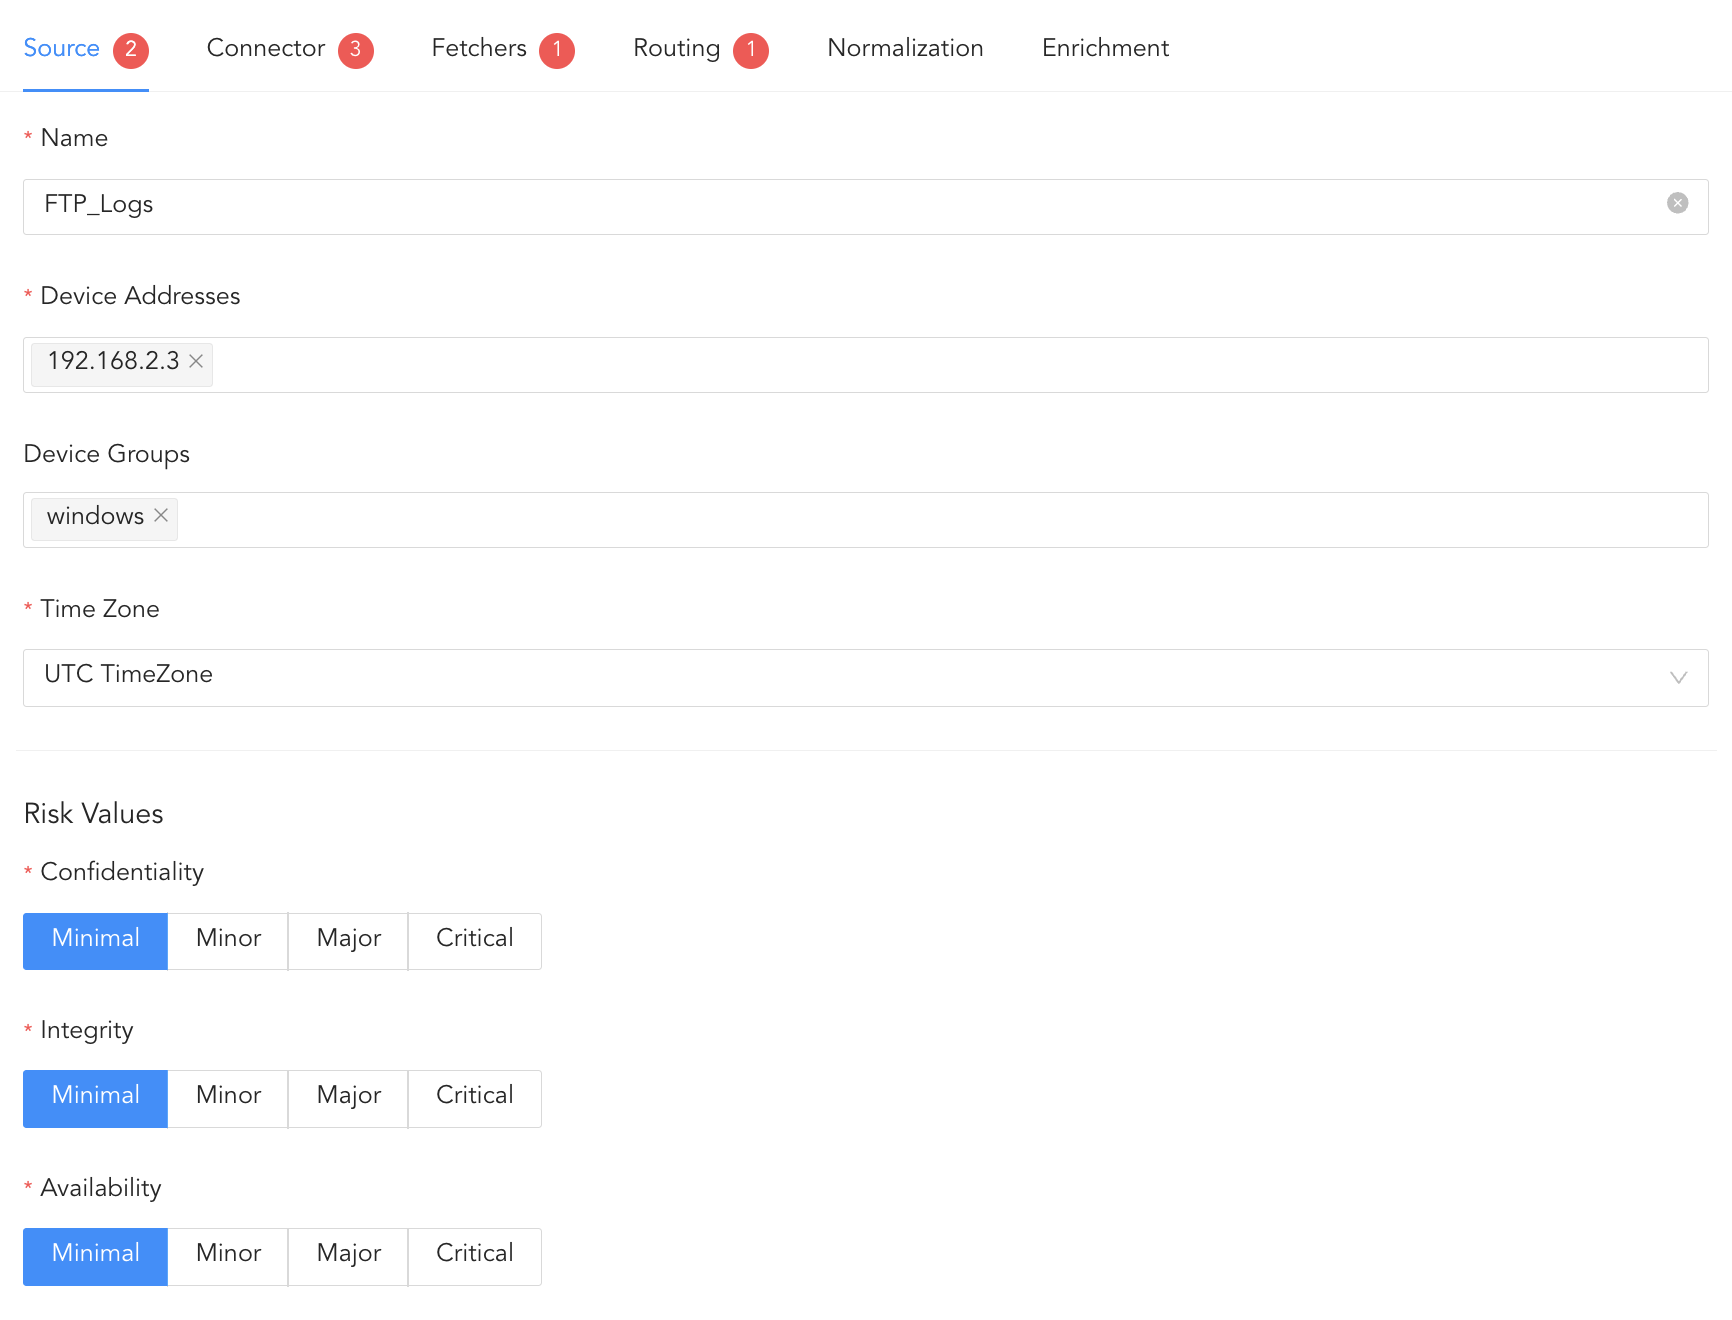
In source, you can add details about the FTP server from where the FTP Fetcher fetches logs.
Click Source.
Enter the Log Source’s Name.
Enter the IP addresses of the device whose logs are to be monitored in Device Addresses.
Select Device Groups.
Select the Time Zone.
Select the risk values for Confidentiality, Integrity, and Availability.
Configuring Source
In connector, you can configure how the FTP Fetcher and the FTP server communicate with each other.
Click Connector.
Enter the Username and Password of the FTP server.
Enter Port on which the FTP server is running. The default port is 21.
Enter the frequency at which data is retrieved in Fetch Interval (min). If logs are not received for two consecutive intervals, the log source is marked as inactive in Last Log Received under Settings >> Log Source.
If you are using a Distributed Logpoint, select Distributed Collector from the dropdown.

Connector
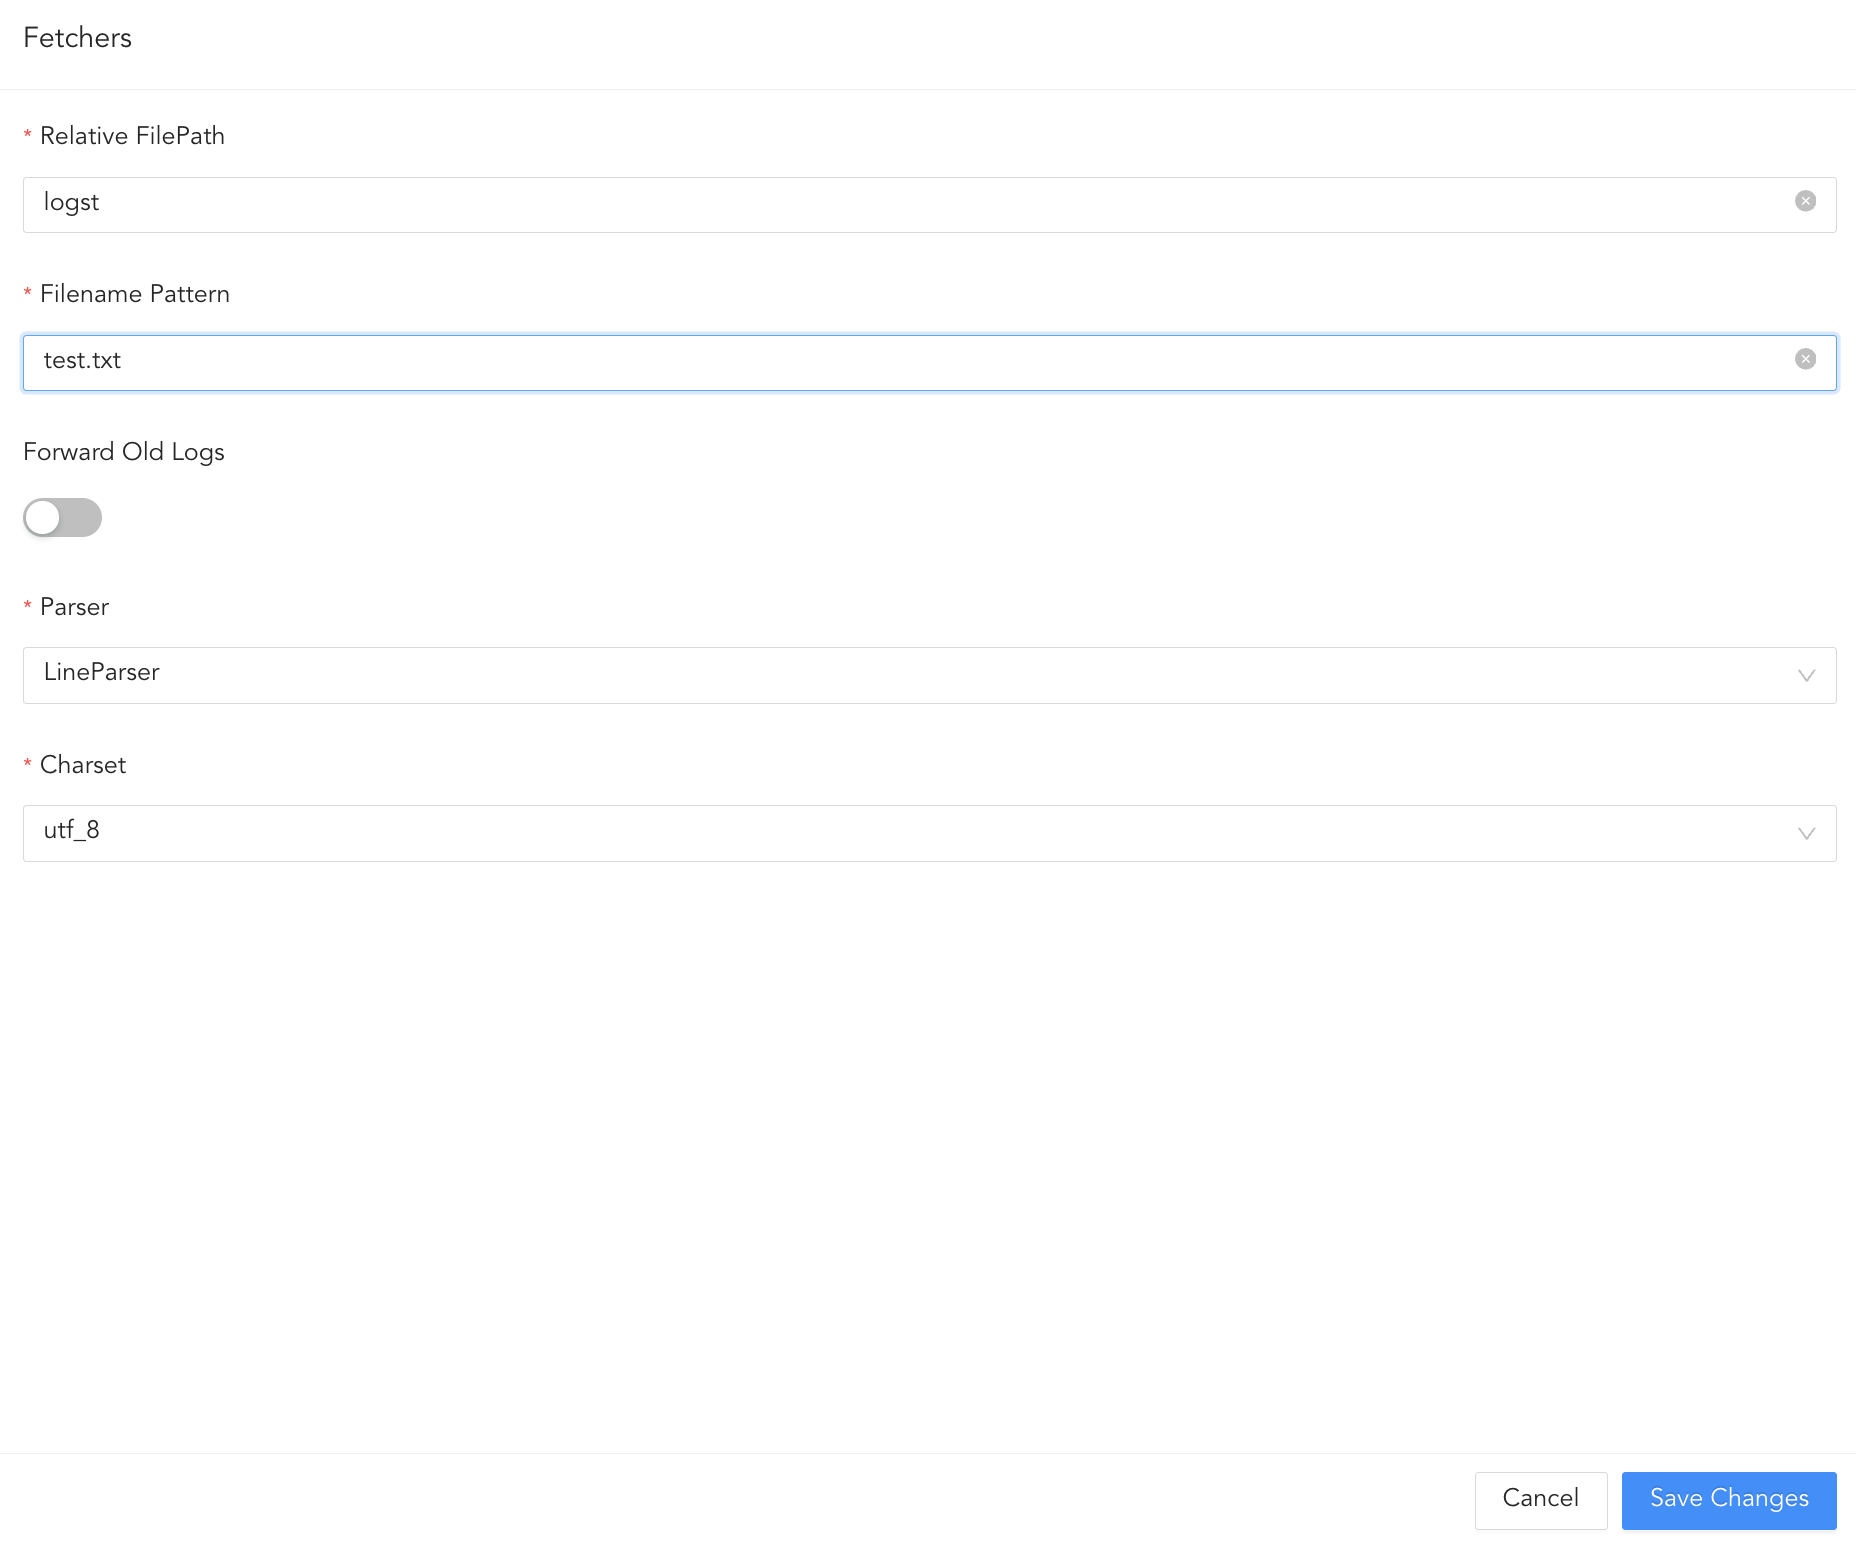
In fetchers, you can configure the file path from where logs are fetched.
Click Fetchers.
Enter the Relative FilePath and the Filename Pattern to specify from which files to fetch logs.
Select Forward Old Logs to fetch logs from the file before configuring the log source.
Select a Parser to parse the logs.
Select the Charset.
Adding Fetcher
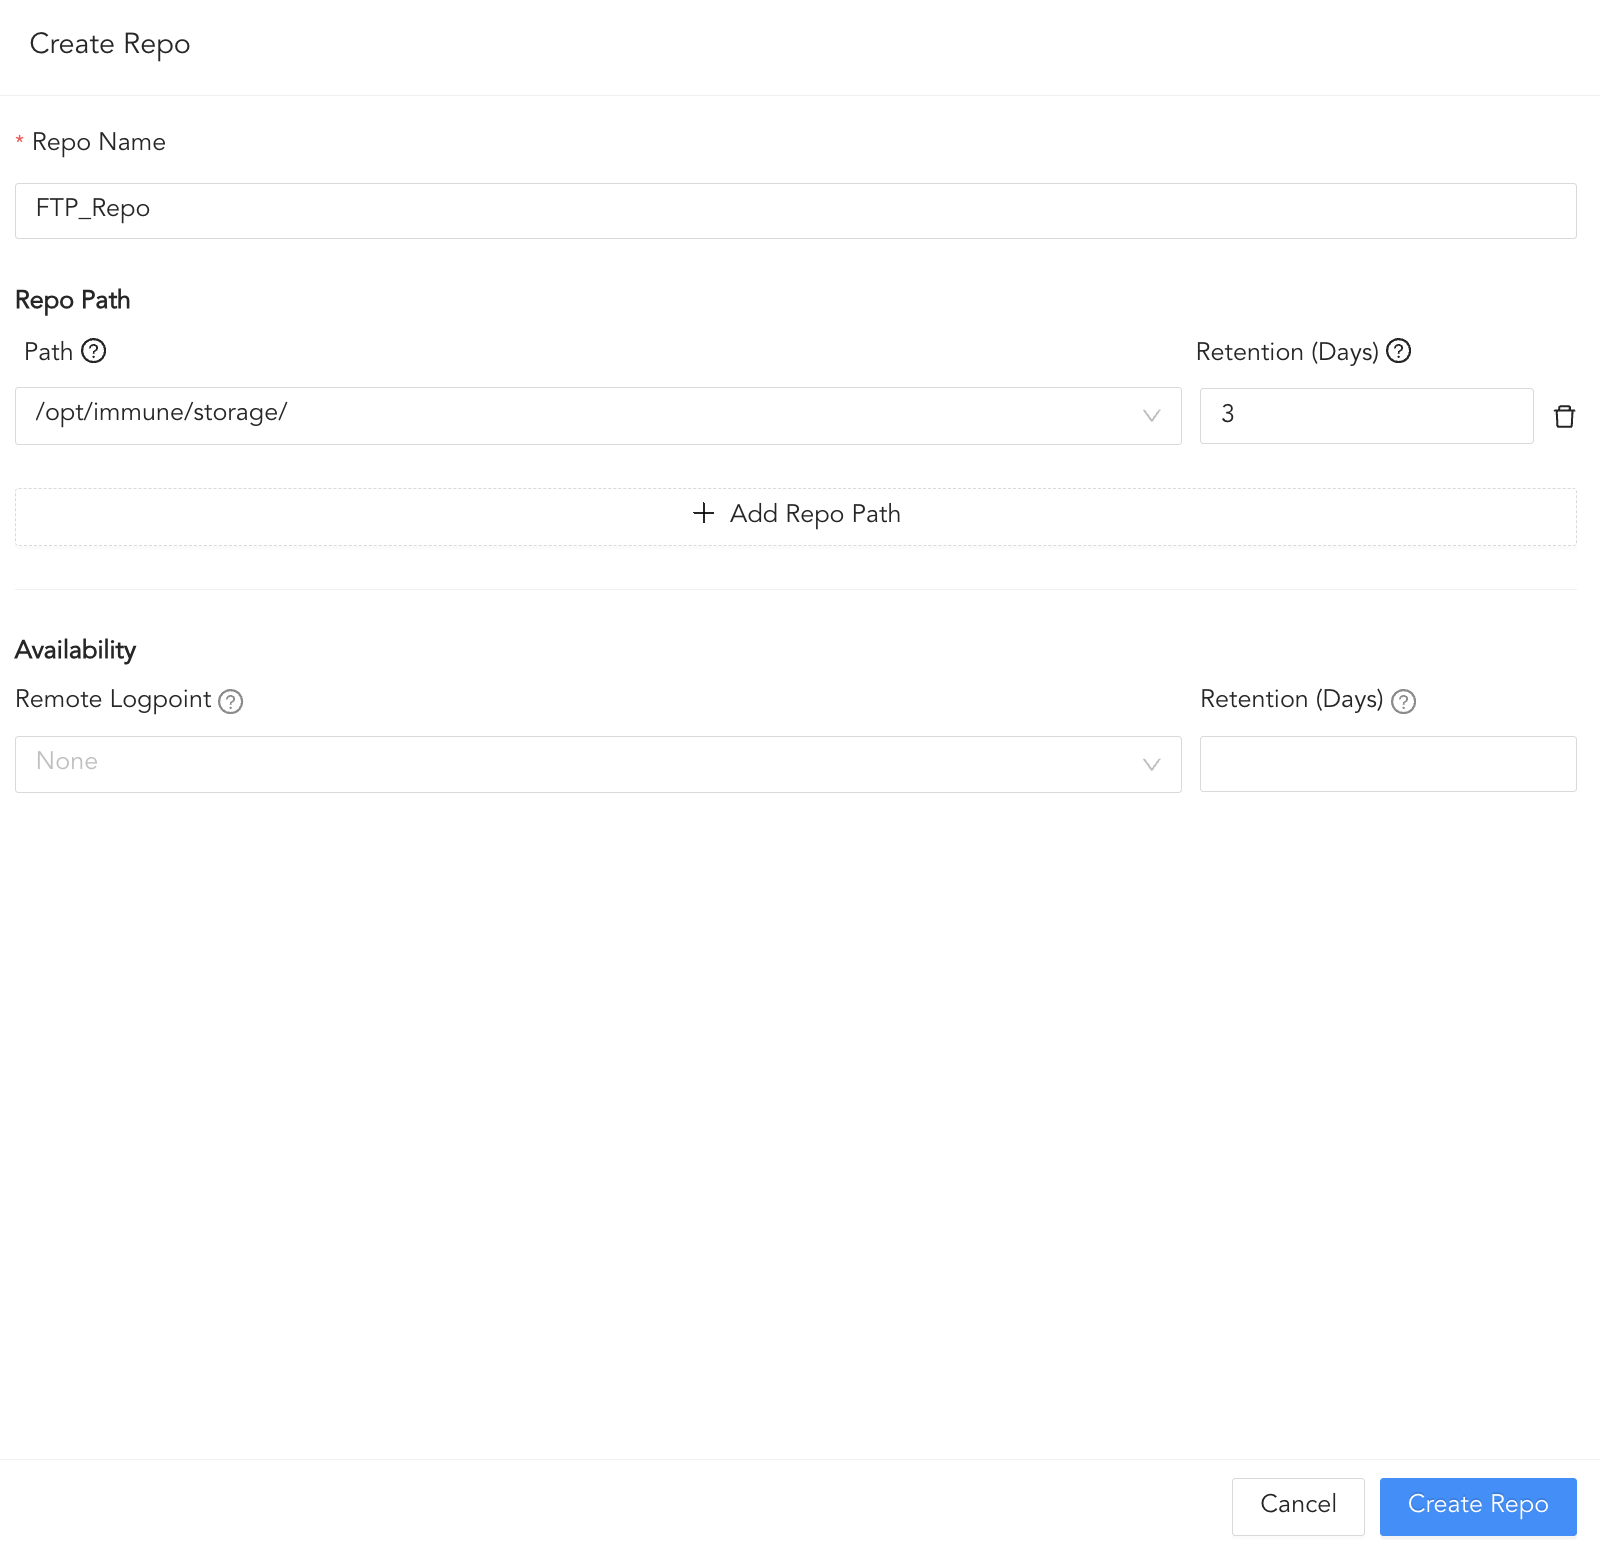
In routing, you can create repos and routing criteria for FTP Fetcher. Repos are locations where incoming logs are stored and routing criteria is created to determine the conditions under which these logs are sent to repos.
To create a repo:
Click Routing and + Create Repo.
Enter a Repo name.
In Path, enter the location to store incoming logs.
In Retention (Days), enter the number of days logs are kept in a repository before they are automatically deleted.
In Availability, select the Remote logpoint and Retention (Days).
Click Create Repo.
Creating a Repo
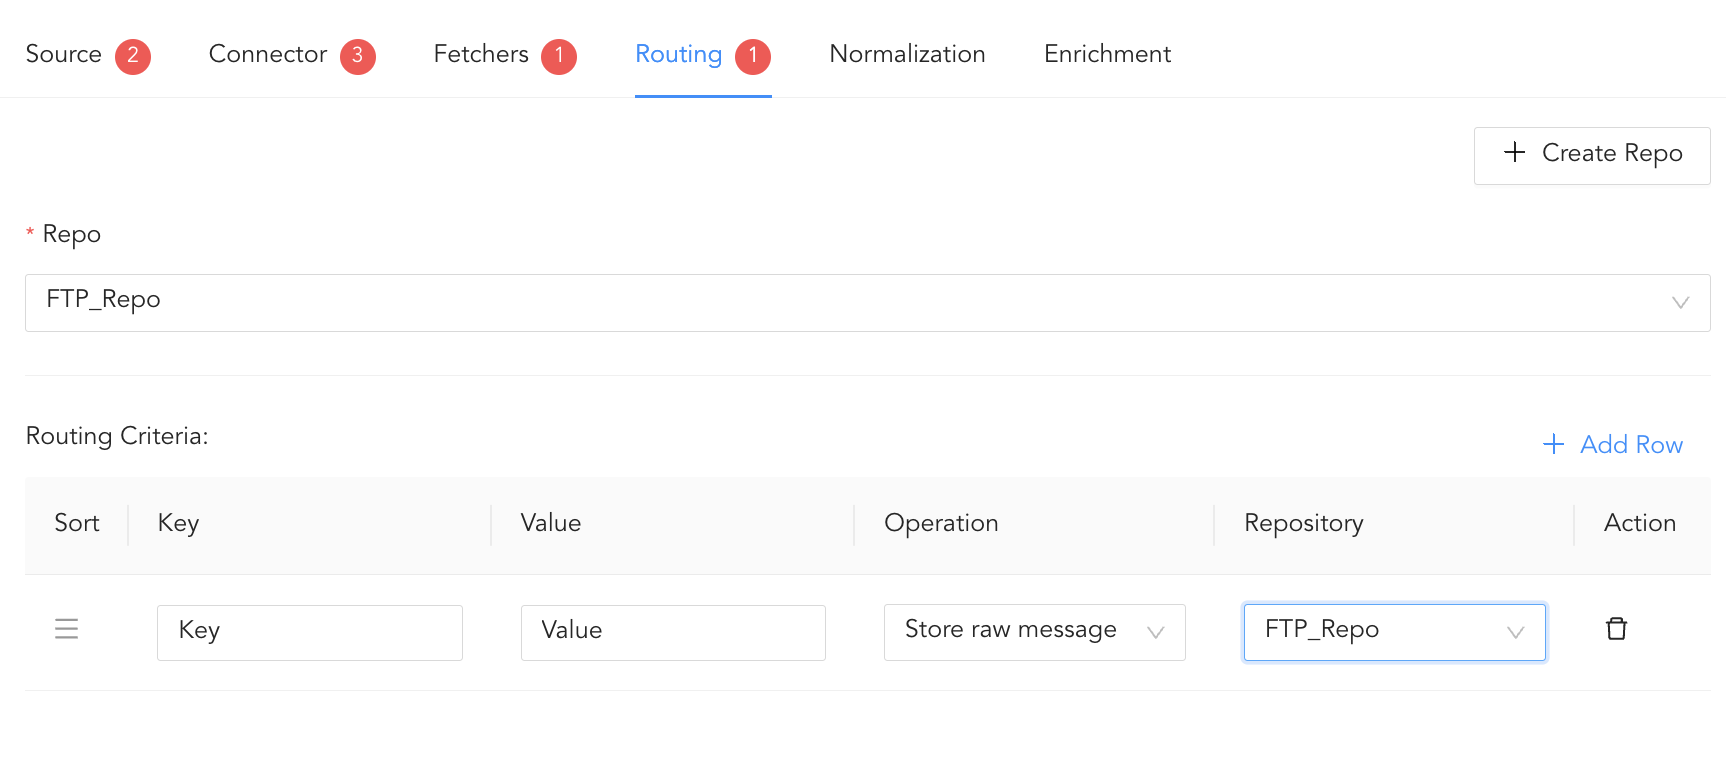
In Repo, select the created repo to store logs.
To create Routing Criteria:
Click + Add row.
Enter a Key and Value. The routing criteria is only applied to those logs which have this key-value pair.
Select an Operation for logs that have this key-value pair.
3.1. Select Store raw message to store both the incoming and the normalized logs in the selected repo.
3.2. Select Discard raw message to discard the incoming logs and store the normalized ones.
3.3. Select Discard entire event to discard both the incoming and the normalized logs.
In Repository, select a repo to store logs.
Creating a Routing Criteria
Click the ( ) icon under Action to delete the created routing criteria.
In normalization, you can select normalizers for the incoming logs. Normalizers translate a raw log message into Logpoint taxonomy.
Click Normalization.
You can either select a previously created normalization policy from the Select Normalization Policy dropdown or select a Normalizer from the list and click the swap( ) icon.
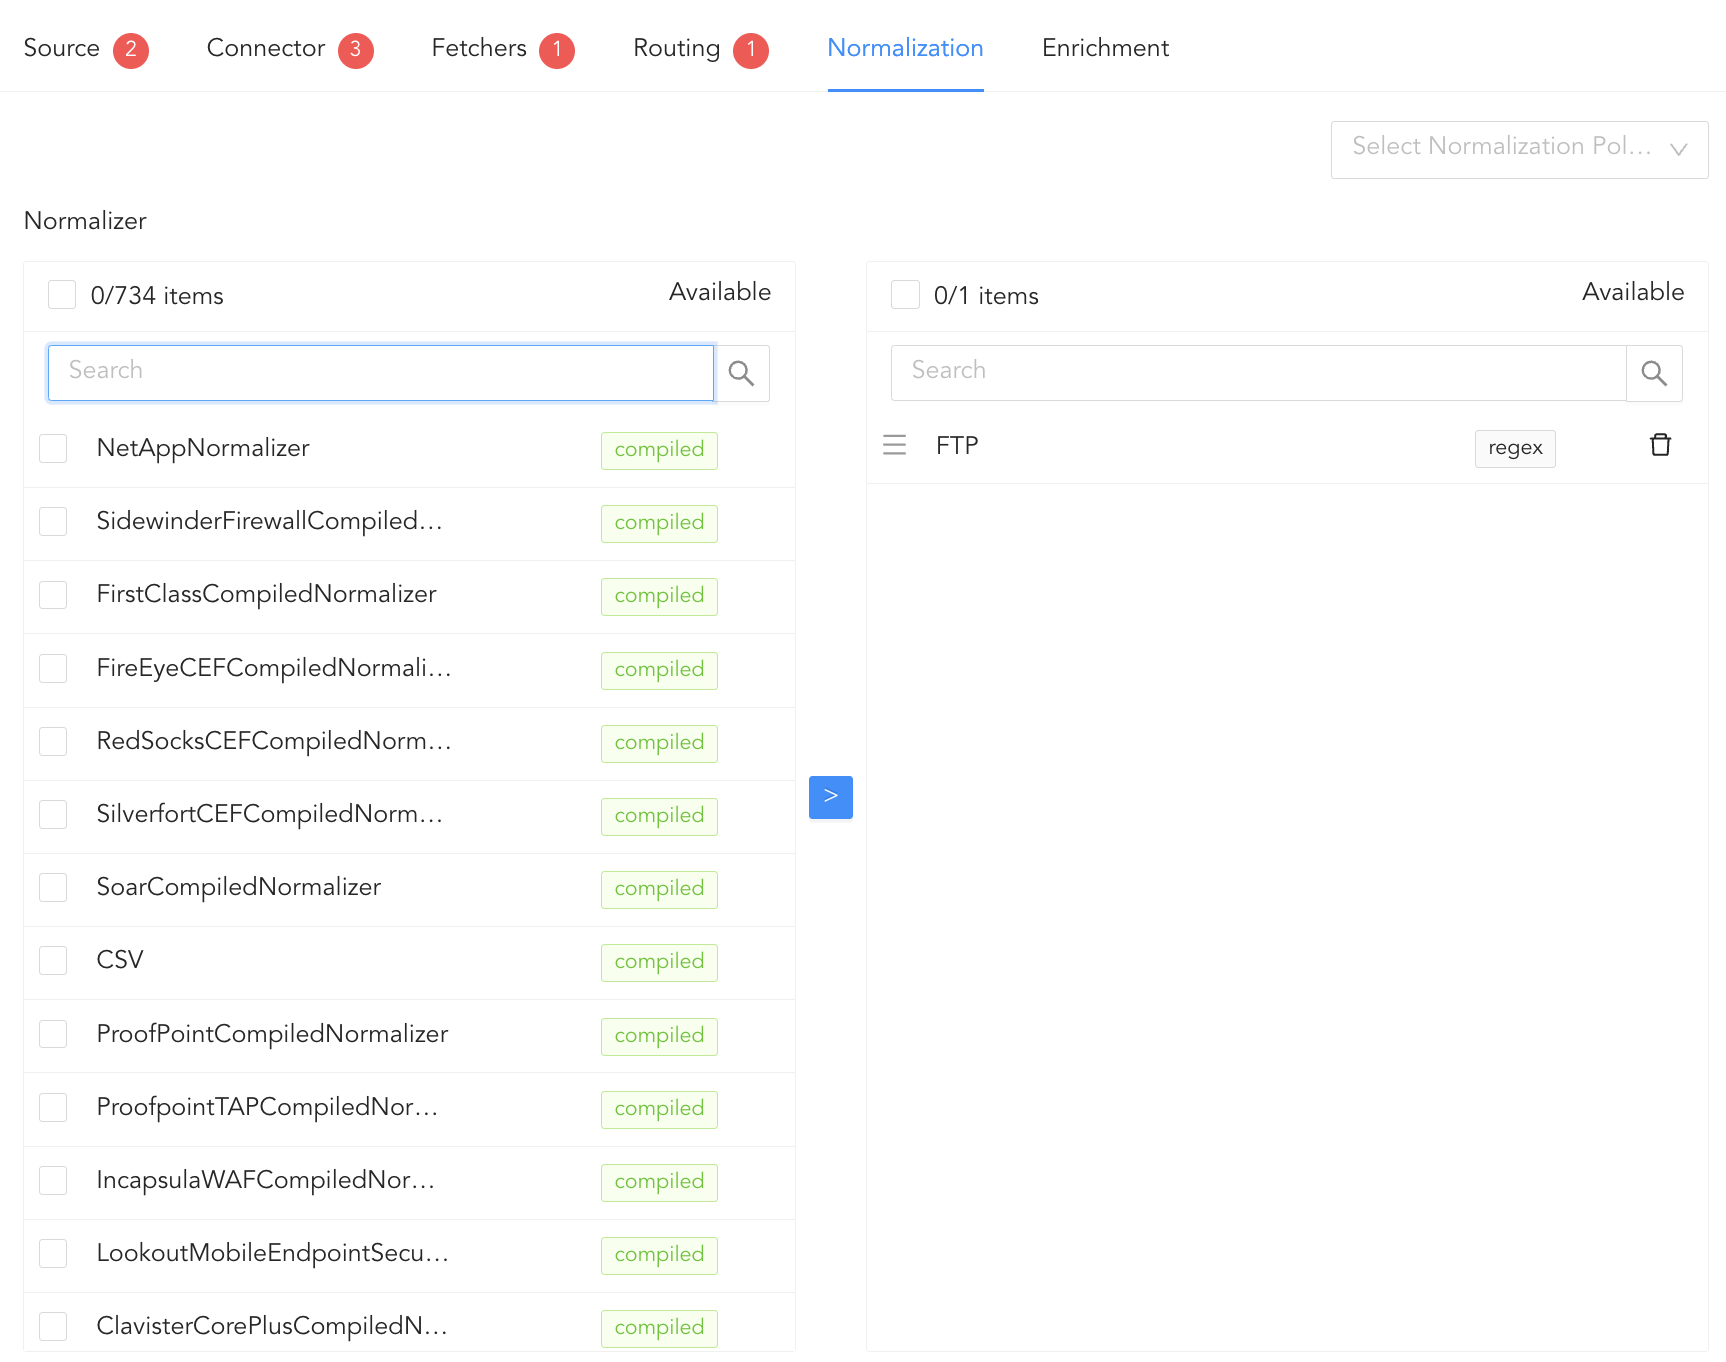
Adding Normalizers
In enrichment, you can select an enrichment policy for the incoming logs. Enrichment Policies are used to add additional information to a log, such as user information, device type or geolocation.
Click Enrichment.
Select an Enrichment Policy.
Click Create Log Source to save the configurations of Source, Connector, Fetchers, Routing, Normalization, and Enrichment.
Go to Settings >> Configuration from the navigation bar and click Devices.
Click the Add collectors/fetchers icon under Actions.
Click FTP Fetcher.
Click ADD.
Enter Username and Password.
Enter Port on which the FTP is running. The default port is 21.
Enter the Relative FilePath and the Filename Pattern to specify from which files to fetch logs.
Select Forward Old Logs to fetch logs from the file before configuring the log source.
Enter the frequency at which data is retrieved in Fetch Interval (min).
Select a Parser to parse the logs.
Select a Processing Policy, and a Charset.

Configuring FTP Fetcher
Click Submit.
SCP Fetcher fetches logs from the log files in a remote host using the SSH connection. You must enable SFTP (SSH File Transfer Protocol) in the remote server to fetch logs using the SCP Fetcher.
Configuring SCP Fetcher in Logpoint
Go to Settings >> Configuration from the navigation bar and click Devices.
Click the Add collectors/fetchers icon under Actions.
Click SCP Fetcher.
Click Add.
Enter a Username for the fetcher.
Enter the Relative FilePath and the Filename Pattern to specify from which files to fetch logs.
Select Forward Old Logs to fetch logs from the file before configuring the log source.
Enter the Port number used by the SCP to listen to the remote server. The default SCP port is 22.
Enter the frequency at which data is retrieved in Fetch Interval (min).
Select a mode of Authentication: Password or SSH Certificate.
If you choose Password, you will need to enter or type what the password is.
If you choose SSH Certificate, Logpoint automatically generates a certificate key for you.
Copy the password or the SSH certificate key, as it is required later for the user validation.
Choose a Parser, a Processing Policy, and a Charset.

Configuring SCP Fetcher in Logpoint
Click Submit.
SNMP Fetcher allows you to make SNMP queries to network devices to get the responses into the Logpoint. You can then use these responses as event logs for further analysis.
SNMP Fetcher needs SNMP Policy to make the SNMP Walk query. SNMP Policy is a set of OIDs and their query time intervals.
SNMP Fetcher makes an SNMPWALK query. The query uses SNMP GETNEXT requests to get the logs from a network entity. An object identifier (OID) is used while making this query. The OID specifies all the branches of OID tree for fetching. All variables in the sub-tree below the given OID are queried, and its values are presented to the user.
Before configuring SNMP Fetcher, you need to create SNMP Policy.
Creating an SNMP Policy
Go to Settings >> Configuration from the navigation bar and click Devices.
Click the Add collectors/fetchers icon under Actions.
Click SNMP FETCHER.
Click Policy and click ADD.
Enter the Name of the policy.
Enter a list of OIDs and their respective Fetch time (in minutes).

Addition of an SNMP Policy
Click Submit.
Configuring SNMP Fetcher in Logpoint
Go to Settings >> Configuration from the navigation bar and click Devices.
Click the Add collectors/fetchers icon under Actions.
Click SNMP Fetcher.
Select the SNMP Version of the server.
For Version1/Version2 (v_12) enter Community String.
For Version3 (v_3) enter Username, Authorization Key, and Private Key. Enter the Authentication Protocol and Privacy Protocol of the SNMP server from where Logpoint fetches the log.
Enter the Port number.
Select the previously created SNMP Policy. You can also apply a policy from plugins.
Select a Processing Policy to apply over the logs.
Select an encoding format from the Charset dropdown.

Configuring SNMP Fetcher in Logpoint for v_12
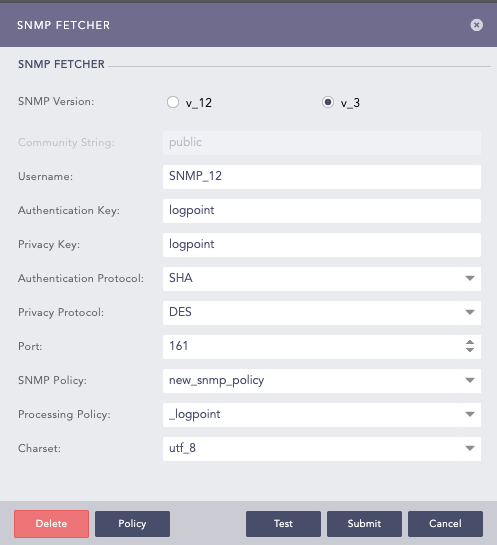
Configuring SNMP Fetcher in Logpoint for v_3
Click Submit.
Security Device Event Exchange (SDEE) is a network protocol used by security devices to communicate. You can forward network statistics from the SDEE devices into the Logpoint via the SDEE Fetcher.
Configuring SDEE Fetcher in Logpoint
Go to Settings >> Configuration from the navigation bar and click Devices.
Click the Add collectors/fetchers icon under Actions.
Click SDEE Fetcher and configure its essential parameters.
Enter Username and Password.
Select a Processing Policy, and a Charset.
Select Certificate Verification to ensure Logpoint enables connection by verifying SSL/TLS certificates.
Browse to upload a server certificate. If no certificate is uploaded, Logpoint uses a standard certificate by default.

Configuring SDEE Fetcher in Logpoint
Click Submit.