Deploy and Install
The installation process depends on where you deploy Logpoint.
There are five different ways to deploy On-prem SIEM:
If it is not the latest version, we recommend you upgrade Logpoint to the latest version after you deploy it. To upgrade or install a patch, go to Upgrades and Patches. Before installing patch, check the product versions compatibility in the Compatibility Matrix.
Installation
After deployment, you must:
Verify access or connect to the deployment. How you verify access depends on the deployment type.
Setup the Logpoint server or instance. A Logpoint server or instance can be:
Standard or Compliance mode — preconfigured dashboards and repositories for access management, incident management, and perimeter security monitoring. Dashboards come with ready-to-use widgets for compliance, and repositories are mapped to specific source types (firewalls, servers).
Custom Configuration — you setup dashboards and repositories yourself.
Collector — retrieves logs from sources, buffers them, normalizes logs into key-value pairs, applies static enrichment, and forwards to a Logpoint Storage Node.
Syslog Forwarder — collects and normalizes logs (including from syslog collectors) and forwards them to Logpoint via TCP port 514.
Configure each relevant interface (DHCP or Manual/static). See network-specific sections per deployment type below.
Customize storage partitions during installation using automatic partitioning or customize partitions (create GPT partitions, LVM groups, logical volumes).
ISO File or Image
For a fresh installation, download the latest Logpoint ISO file from Product Hub and download the latest Logpoint ISO.
The installation process completely cleans the disk, ensure that you back up your files before proceeding.
Prepare and boot
Prepare a bootable medium (USB drive or virtual drive for VMs) using the latest Logpoint ISO.
Boot your system using the bootable medium. Warning messages may appear during the first boot; these can be ignored.
Configure network connections
By default, Logpoint uses IPv4 protocol with Automatic (DHCP) configuration. You may manually set up network interfaces or proceed with default configurations.
For multiple-interface systems, enable and configure additional interfaces manually. Go to configuring network interfaces for more information.

Click Done.
Storage partitioning (automatic or manual)
To manually customize storage, click Reset during installation. Automatic partitioning default layout:
boot
/boot
1GB
swap
8GB``
The remaining space is used for the following volumes:
root
/
40GB
application
/opt
20GB
app_store
/opt/immune/app_store
20GB
storage
/opt/immune/storage
All remaining space
Start installation and reboot
Click Done and Continue to confirm disk cleanup and start installation.
When prompted, click Reboot Now. If installation fails, erase all disk data before reinstalling.
After installation, eject the boot disk or select hard drive as boot device in Boot Manager to avoid re-running the installer.
Initial login and password change
Log in on the console with:
Immediately change the password using the
passwdcommand. Password requirements:
Minimum 15 characters.
Include a lowercase letter, an uppercase letter, a digit, and a special character.
At least four characters must differ from the old password.
Use
ifconfigcommand to view the IP address. Enter the IP in your browser to access the Logpoint UI.UI login (first time):
Change password and click Save.
Open Virtualization Appliance (OVA)
The Logpoint open virtualization appliance (OVA) allows you to launch a Logpoint virtual machine in the VMWare ESXi server v7.0.3 or later.
With the Logpoint OVA, you can use:
Virtualization to transform data centers into simplified cloud computing infrastructures and use flexible and reliable IT services. VMware vSphere virtualizes and aggregates the underlying physical hardware resources across multiple systems and provides pools of virtual resources to the data center.
Managed Infrastructure to utilize large collections of infrastructures such as CPUs, storage, and networking as a seamless and dynamic operating environment without worrying about the complexity of a data center.
Deploy OVA
Go to Product Hub and download the .ova file.
Log into vSphere client.
Click the Host and Cluster icon.
Select the resource pool to install the OVA.
Right-click the resource pool and select Deploy OVF Template.
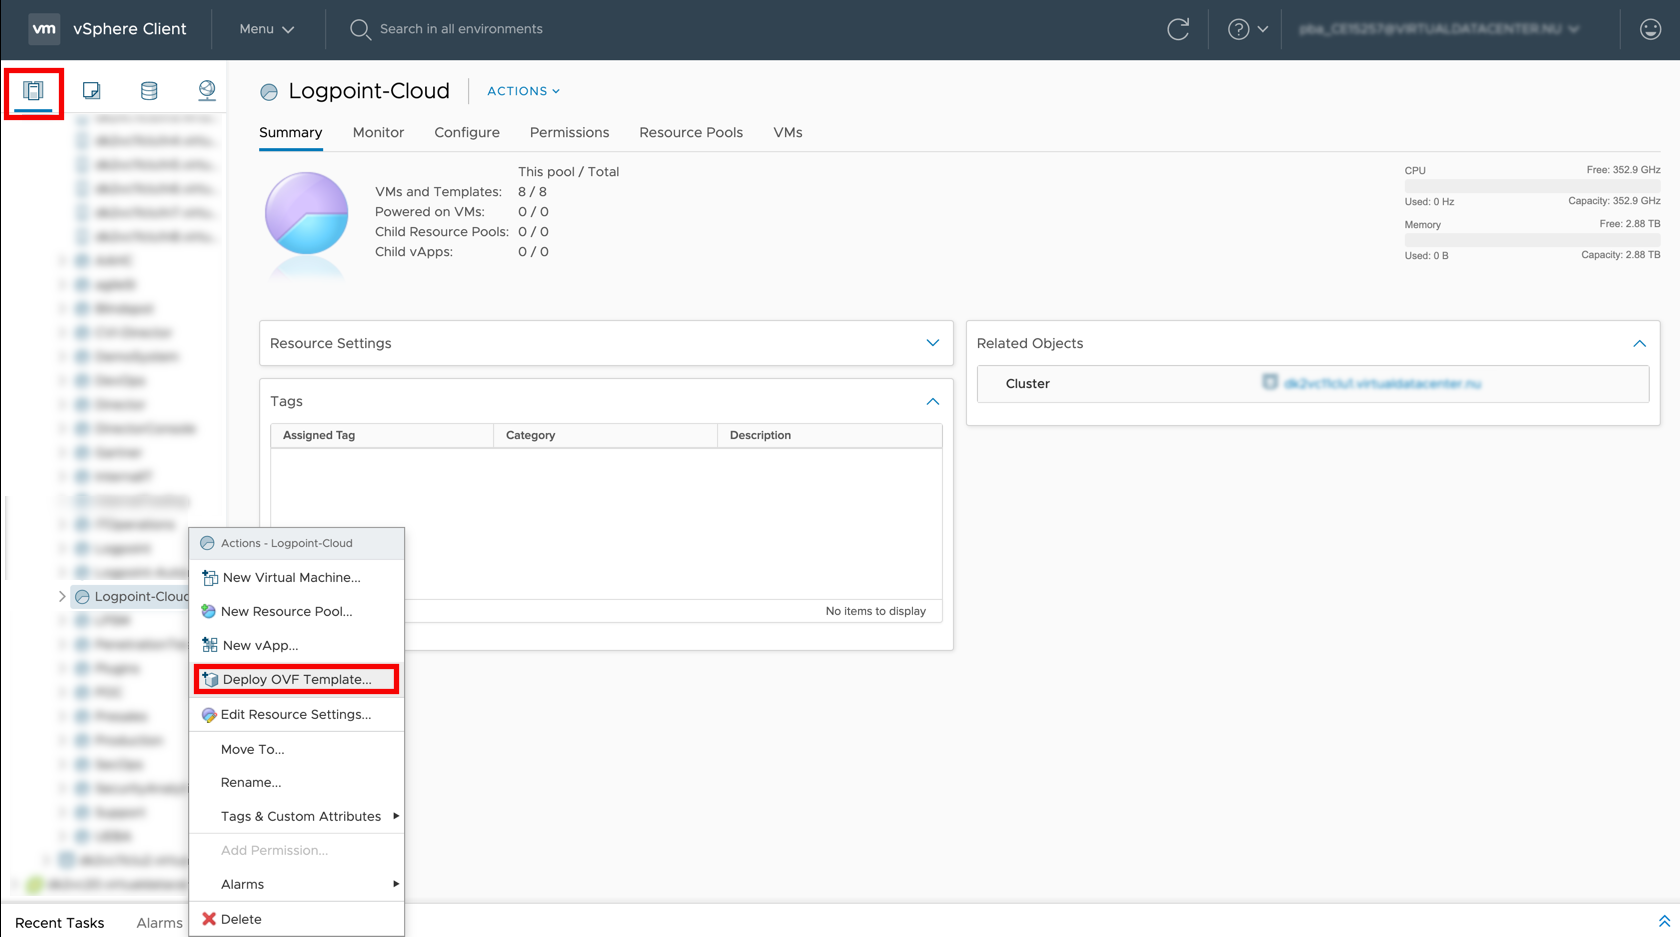
Select Local file.
Click Choose files and browse to the OVA file.
Click Next.
Name and compute
Assign a unique VM name and select a target location to avoid duplicate VM names, enforce the VM inherits appropriate permissions based on its folder or resource pool and place the VM in the correct location.
Enter a name for the virtual machine.
Select a target location for the virtual machine.
Click Next.
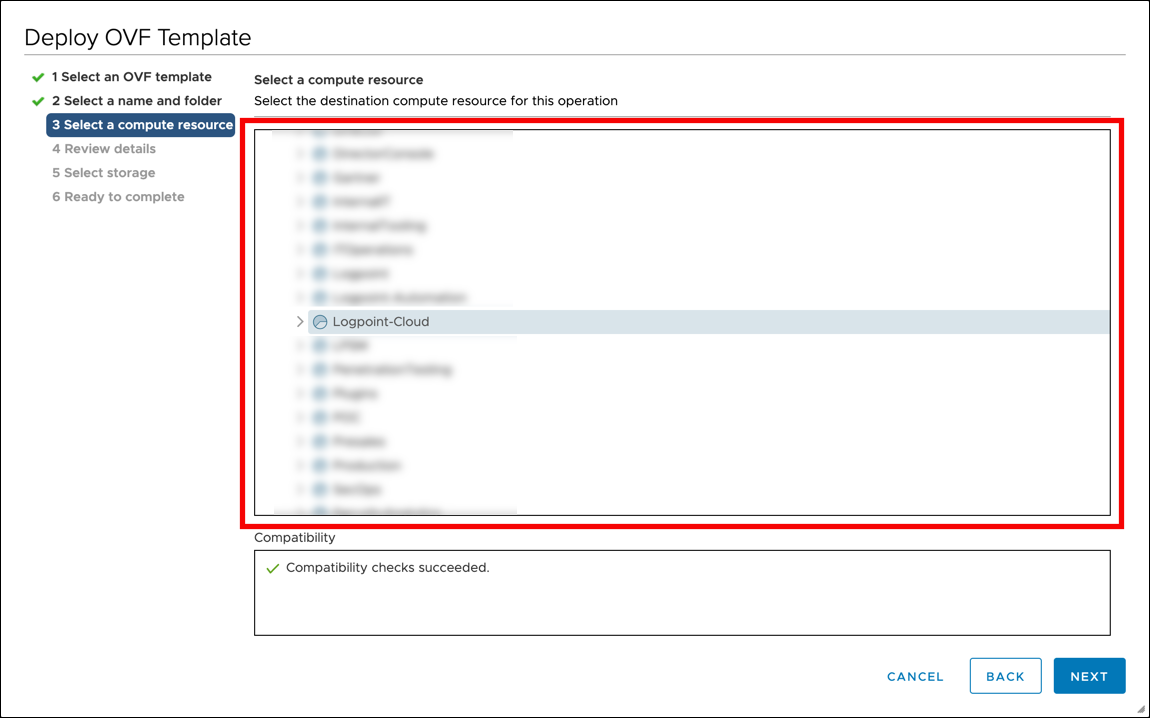
Select a Compute Resource
Select a compute resource to ensure the VM runs on a suitable host with suitable CPU, memory, and network resources.
Choose the destination resource for the virtual machine.
Click Next.
Template review and storage
Review details and verify minimum requirements:
Memory
8 GB
Disk
150 GB
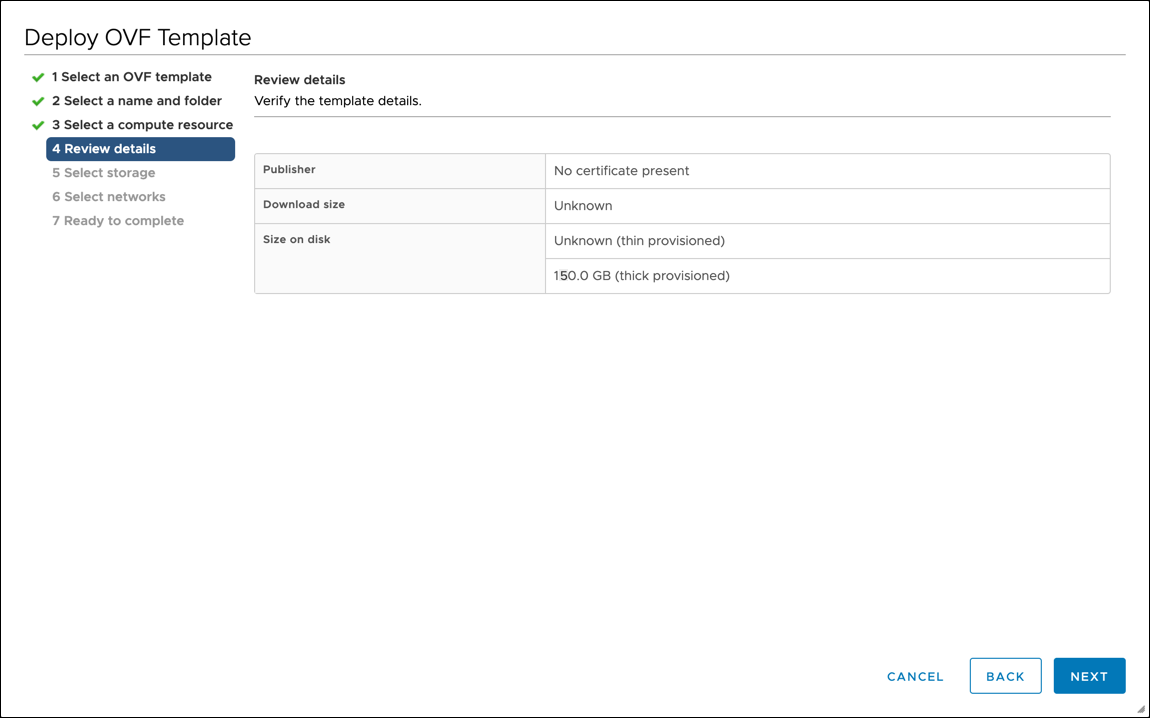
Click Next.
Review details and verify minimum requirements:
Click Next.
Select virtual disk format:
Eager Zeroed Thick: Allocates storage and clears all disk array data immediately.
Thin Provision: Allocates storage and clears disk array data only on demand.
Lazy Zeroed Thick: Allocates storage immediately but clears disk array data only on demand.
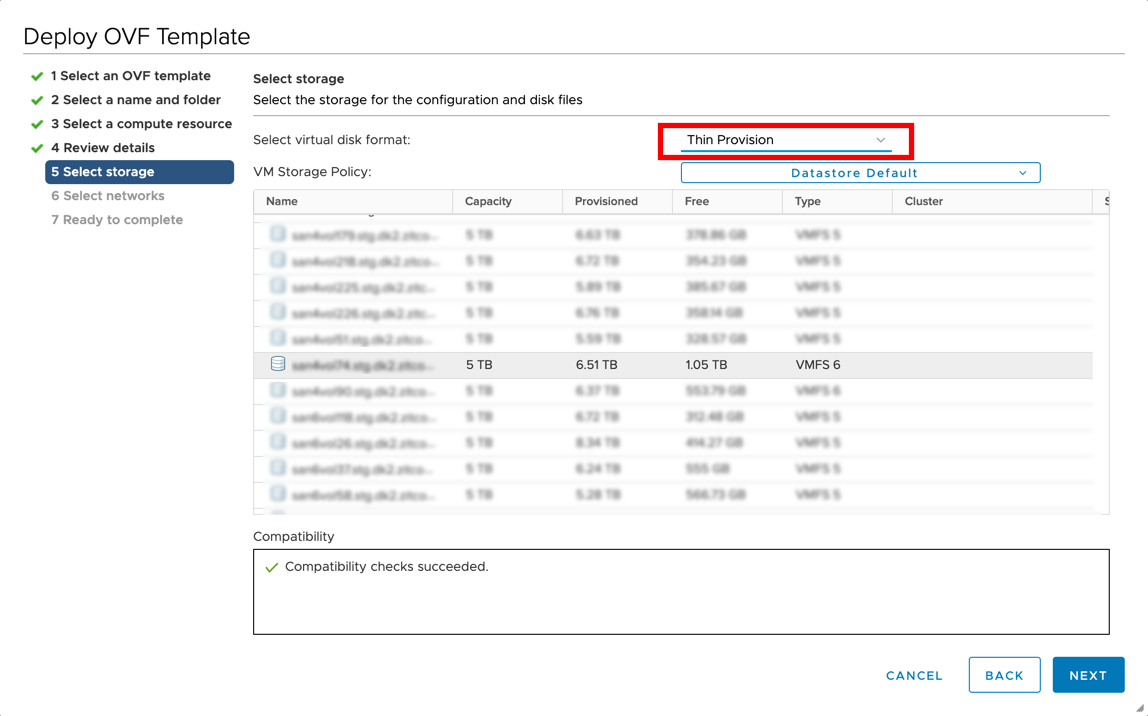
Select VM Storage Policy from the drop-down.
Select a datastore to deploy the virtual machine.
Click Next.
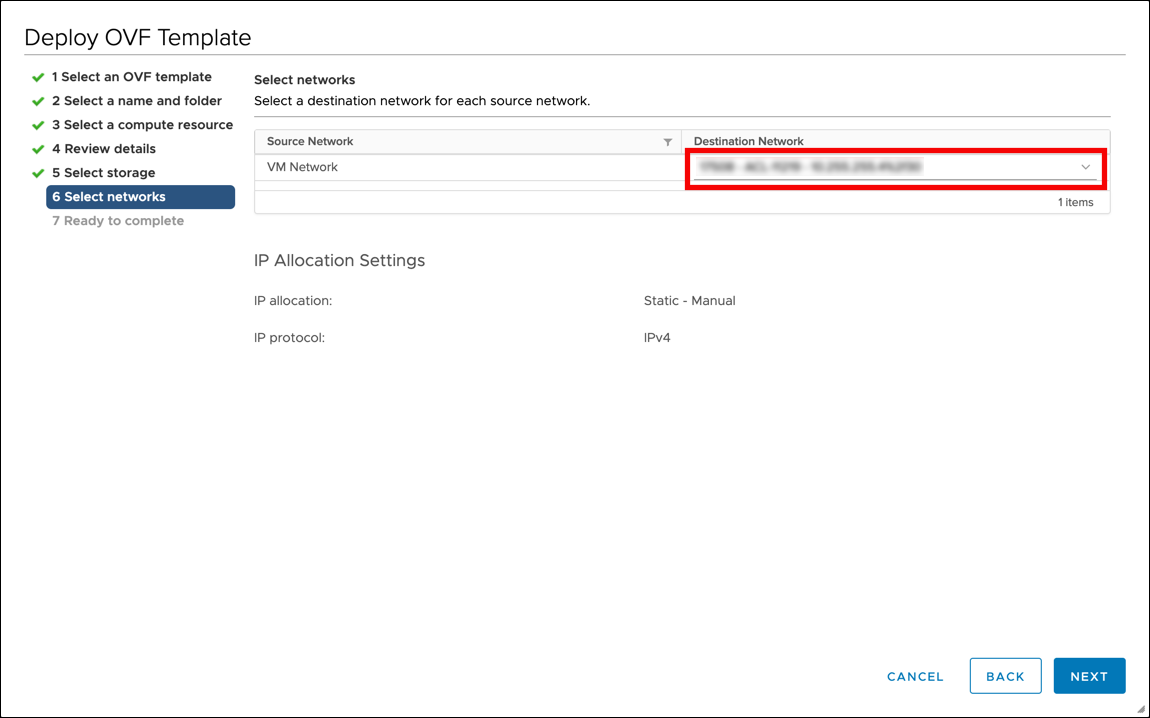
Network mapping and finish
In Destination Network, select the network for Logpoint.
Click Next.
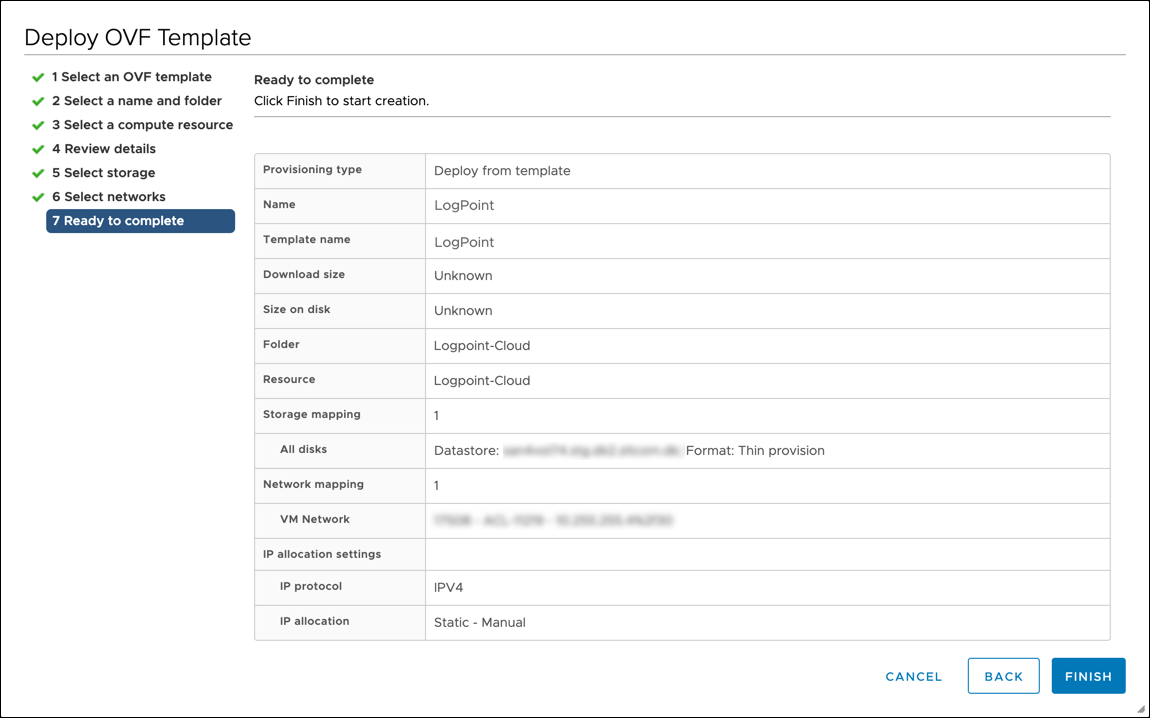
Review Configuration
Review your configurations before creating a virtual machine.
Click Finish to create the virtual machine.
To make any changes, click Back.
Verify access (DHCP or Static)
You can connect to Logpoint in:
DHCP Mode to automatically configure configures the IP address, subnet mask, default gateway and DNS server information from a DHCP server.
Static Mode to configure your connection to Logpoint manually.
Connect Using DHCP mode
Select your virtual machine.
Go to Actions >> Power >> Power On. Use the green power arrow (
 ) to turn the machine on.
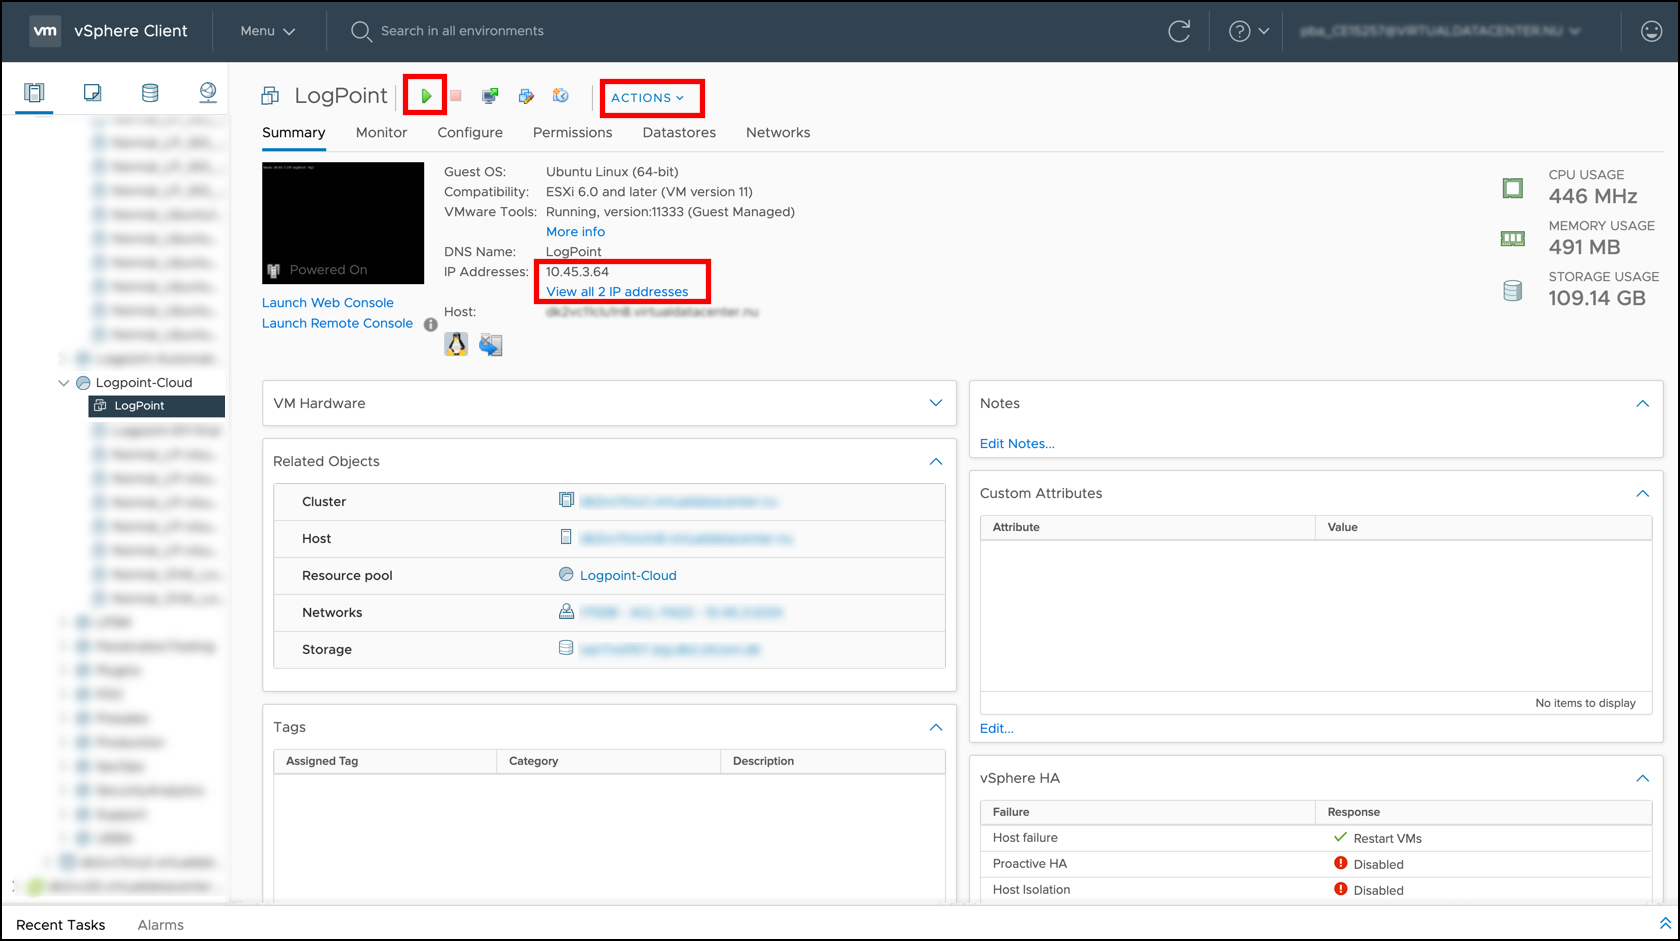
Note the IP addresses under Summary.
Enter the IP addresses as URLs on a web browser. For Example: https://10.45.3.64
Log in with:
Connect Using Static mode
Select the required virtual machine.
Go to Actions >> Power >> Power On.
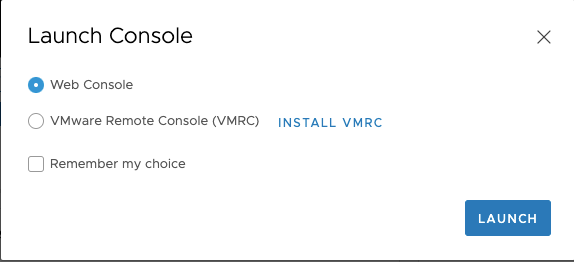
Click Launch Console.
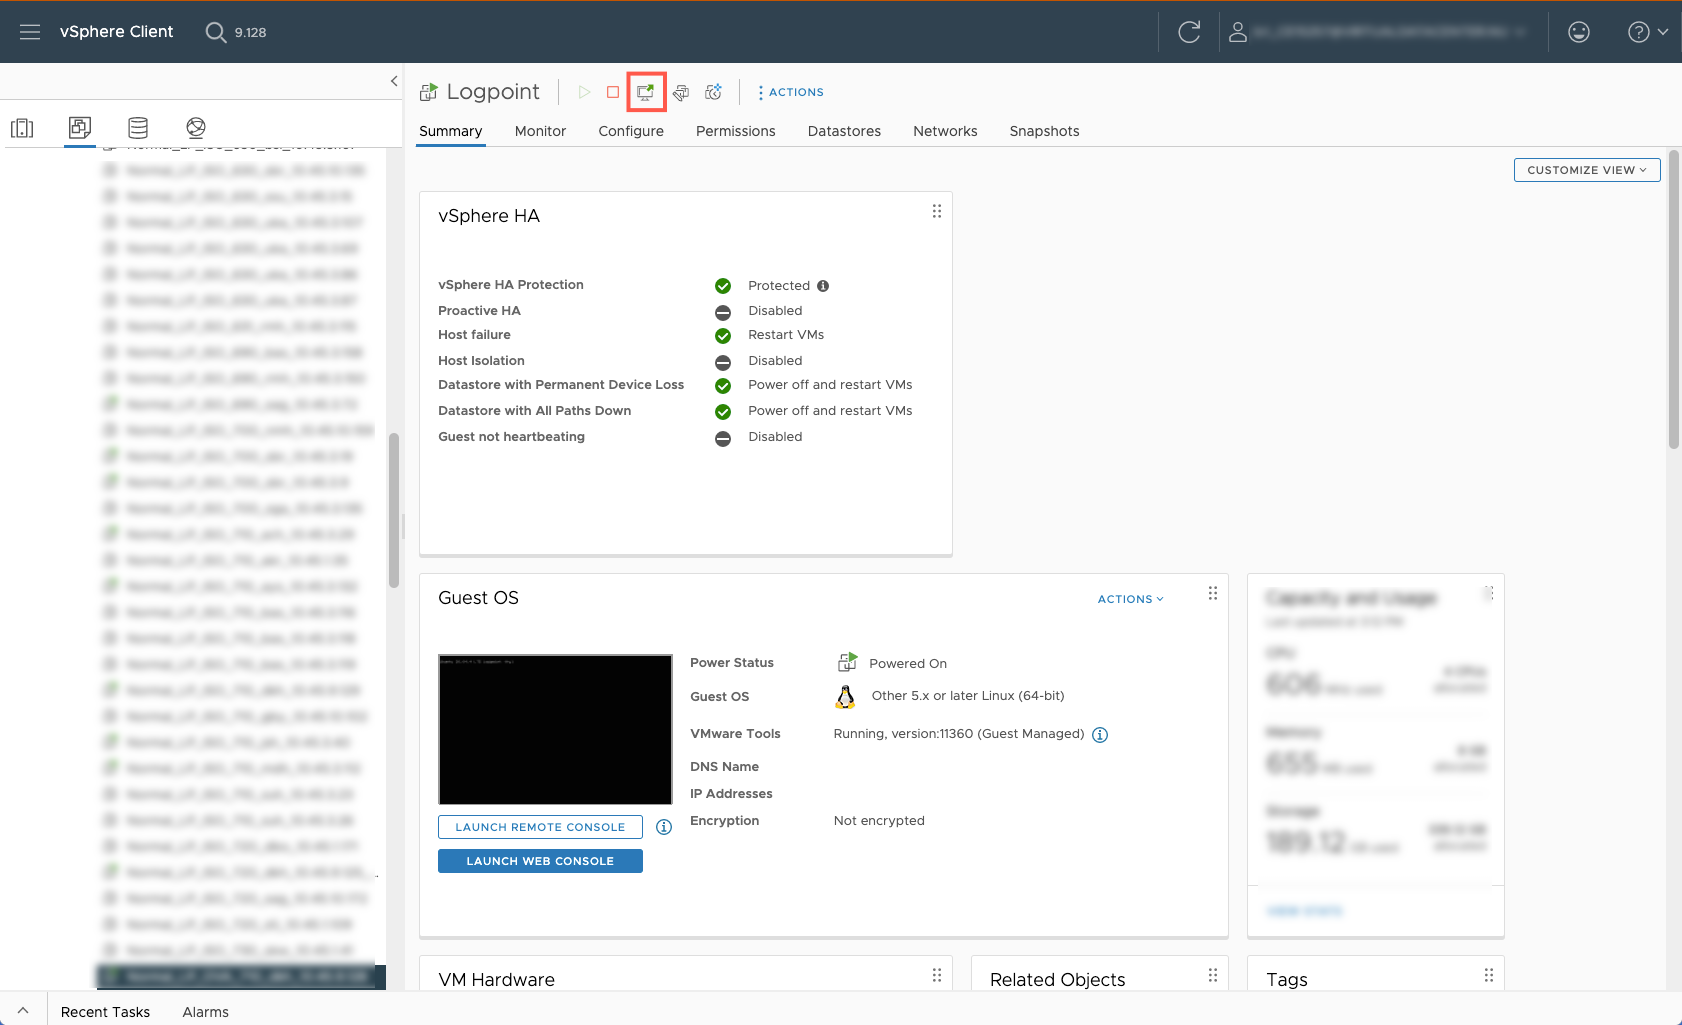
Select Web Console. Click LAUNCH.
Log in with:
Run command
change-ip.Enter HOSTNAME. Example: Logpoint
Enter the IP Address. Example: 10.45.3.64
Enter NETMASK. Example: 255.255.255.0
Enter GATEWAY. Example: 10.45.9.1
Enter PRIMARY DNS. Example: 10.0.3.2
Enter SECONDARY DNS. (Optional) Example: 8.8.8.8
Enter DOMAIN. Example: logpoint.local
SSH access (li-admin)
Go to Settings >> System >> System Settings.
Select SSH Key Pair for li-admin.
Enter a Pass Phrase.
Click Re-Generate Key Pair.
Copy the Private Key and save it in a file.
Use the
chmod 400 <filename>command to make the key accessible for an SSH connection. Example:chmod 400 ~/.ssh/id_rsaUse the
ssh -i "<filename>" li-admin@<Logpoint_Server_IP>command.Example:
ssh -i ~/.ssh/id_rsa li-admin@<LogpointServerIP>Enter the Pass Phrase to establish the SSH connection from the remote device.
Amazon Machine Image (AMI)
Logpoint AMIs are used to deploy on AWS. It provides:
Scalable computing allows you to manage the computing configuration of the Logpoint instances and make real-time adjustments without investing in separate hardware.
Complete control over security lets you configure the ports, source IPs, and protocols that can access the Logpoint instances, ensuring a high level of security.
Flexible configuration lets you adjust the parameters such as storage, memory, CPU, and networking capacity without any hassle.
Virtual Private Cloud (VPC) allows you to create a logically isolated instance separated from the rest of the AWS cloud and connect it to the network only when required.
Obtaining Logpoint AMI
Contact the Logpoint Support team and provide your AWS Account Number and Deployment Region to receive Logpoint AMI. Logpoint can share AMIs within the following AWS regions: us-east-1, eu-west-1, ec-central-1, and ap-south-1.
Log in to the AWS management console.
Click the Support drop-down and select Support Center.
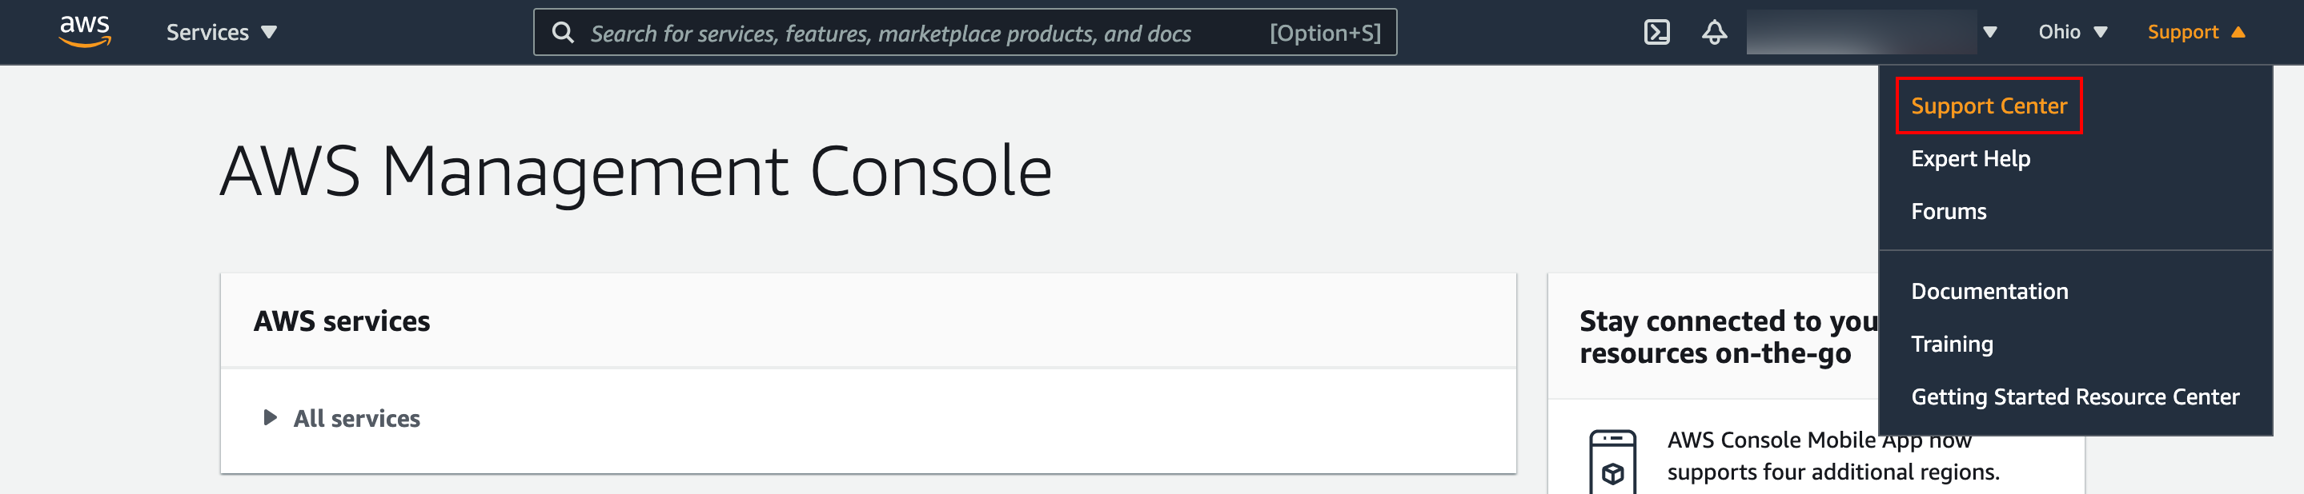
Note down the Account number at the top of the Support Center page.
Selecting the Deployment Region
Log in to the AWS management console.
In the top right drop-down, select the Region to deploy the instance.
Note down the selected Region.
Enabling EBS Encryption and launching from EBS-encrypted AMI To launch the Logpoint instances securely in the AWS environment, we recommend you enable EBS encryption and launch all instances from the EBS-encrypted AMI, including the root volume.
For enhanced security, we recommend you implement IMDSv2. To transition from IMDSv1 to IMDSv2, follow the AWS Documentation.
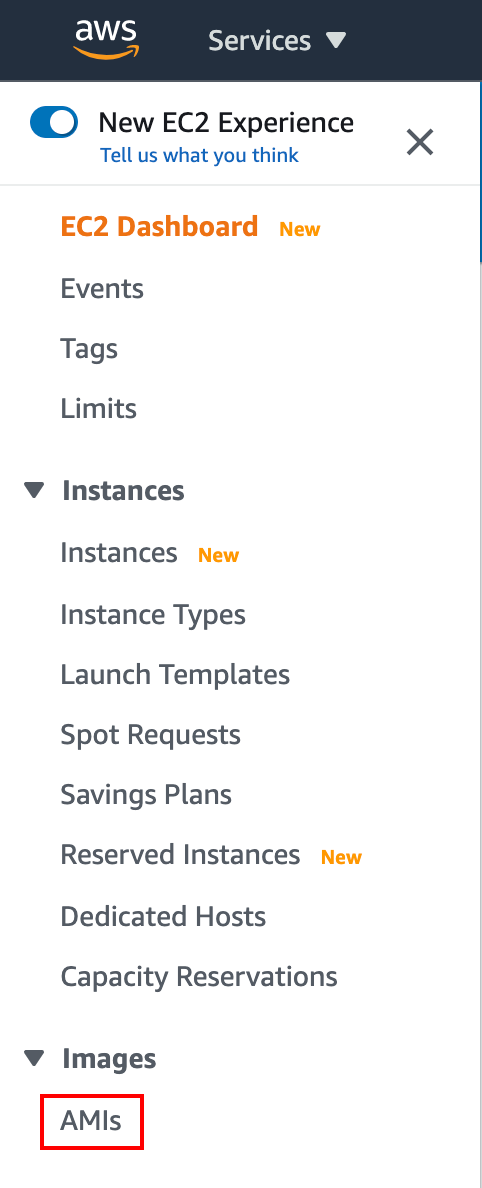
Log into the AWS management console.
Go to Services >> EC2 and select AMIs under Images.
Select Private Images from the drop-down.
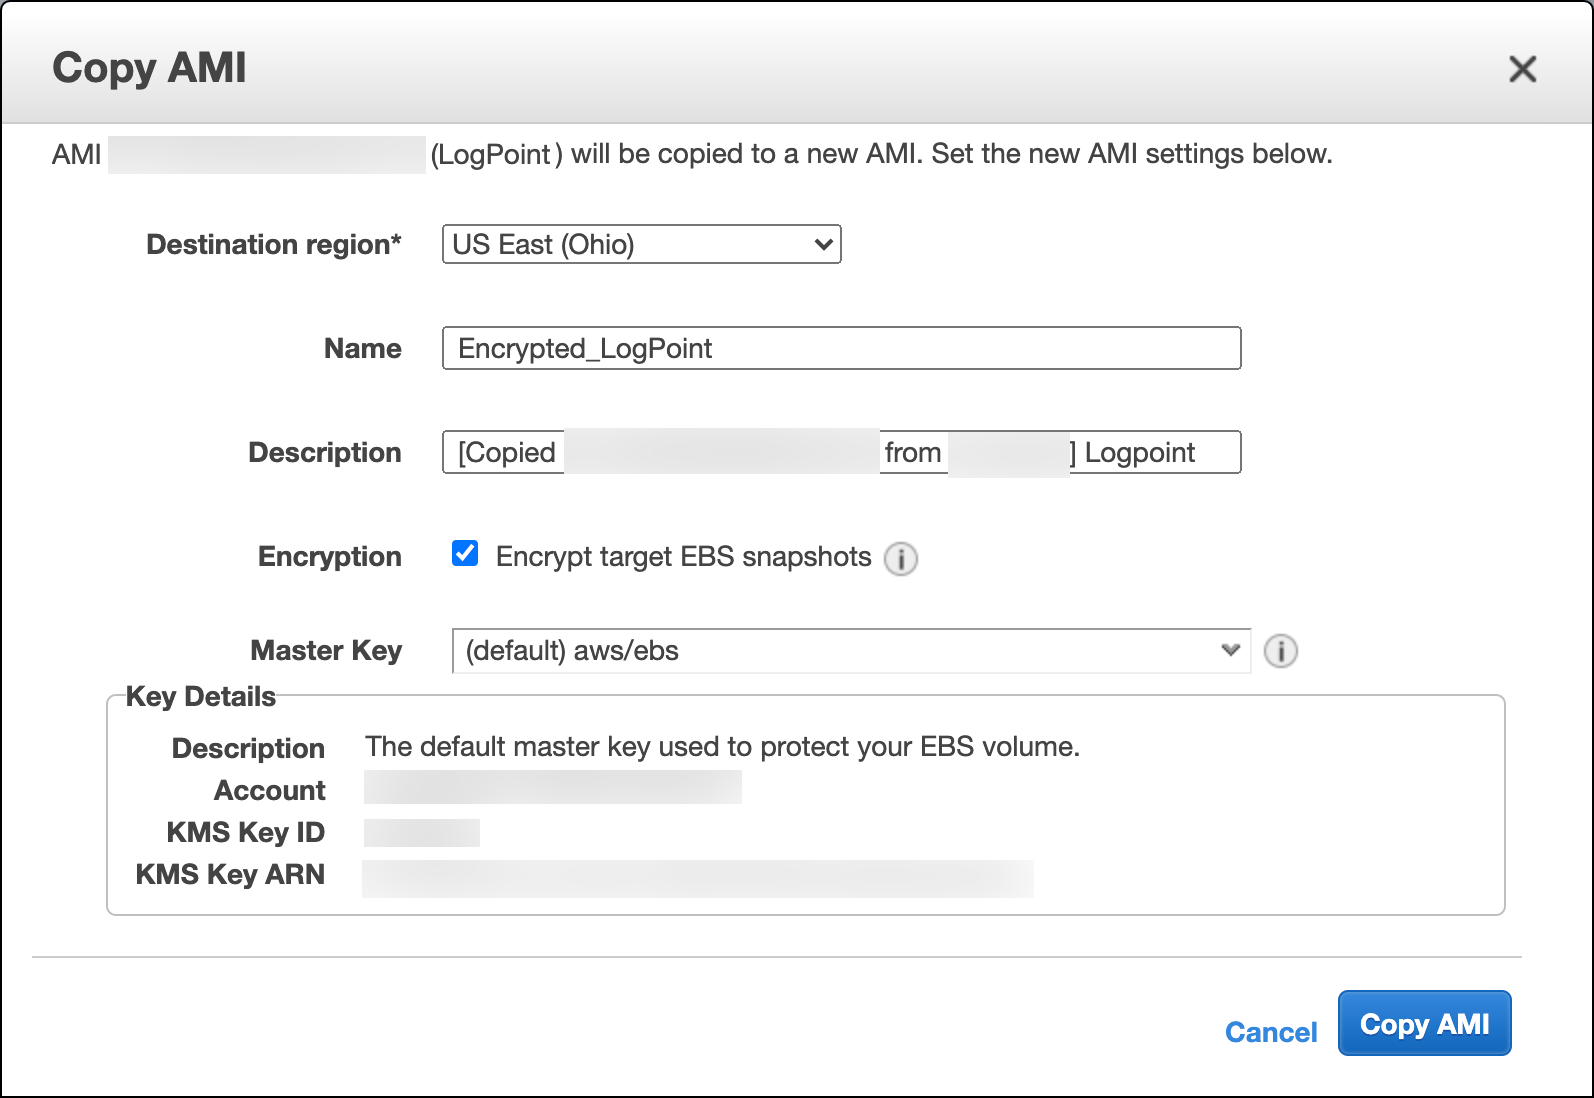
Select the Logpoint AMI and click Copy AMI from the Actions drop-down.
Select the Destination Region.
Enter the Name and Description for the encrypted AMI.
Select Encryption and select the Master Key for encryption.
Once you are redirected to the AMIs page, select the Owned by me from the drop-down.
Select the copied AMI and click Launch.
Launching instance without enabling EBS Encryption
Log into the AWS management console.
Go to Services >> EC2 and select AMIs under Images.
Select Private Images from the drop-down.
Select the Logpoint AMI and click Launch.
Launching instance (basic recommended settings)
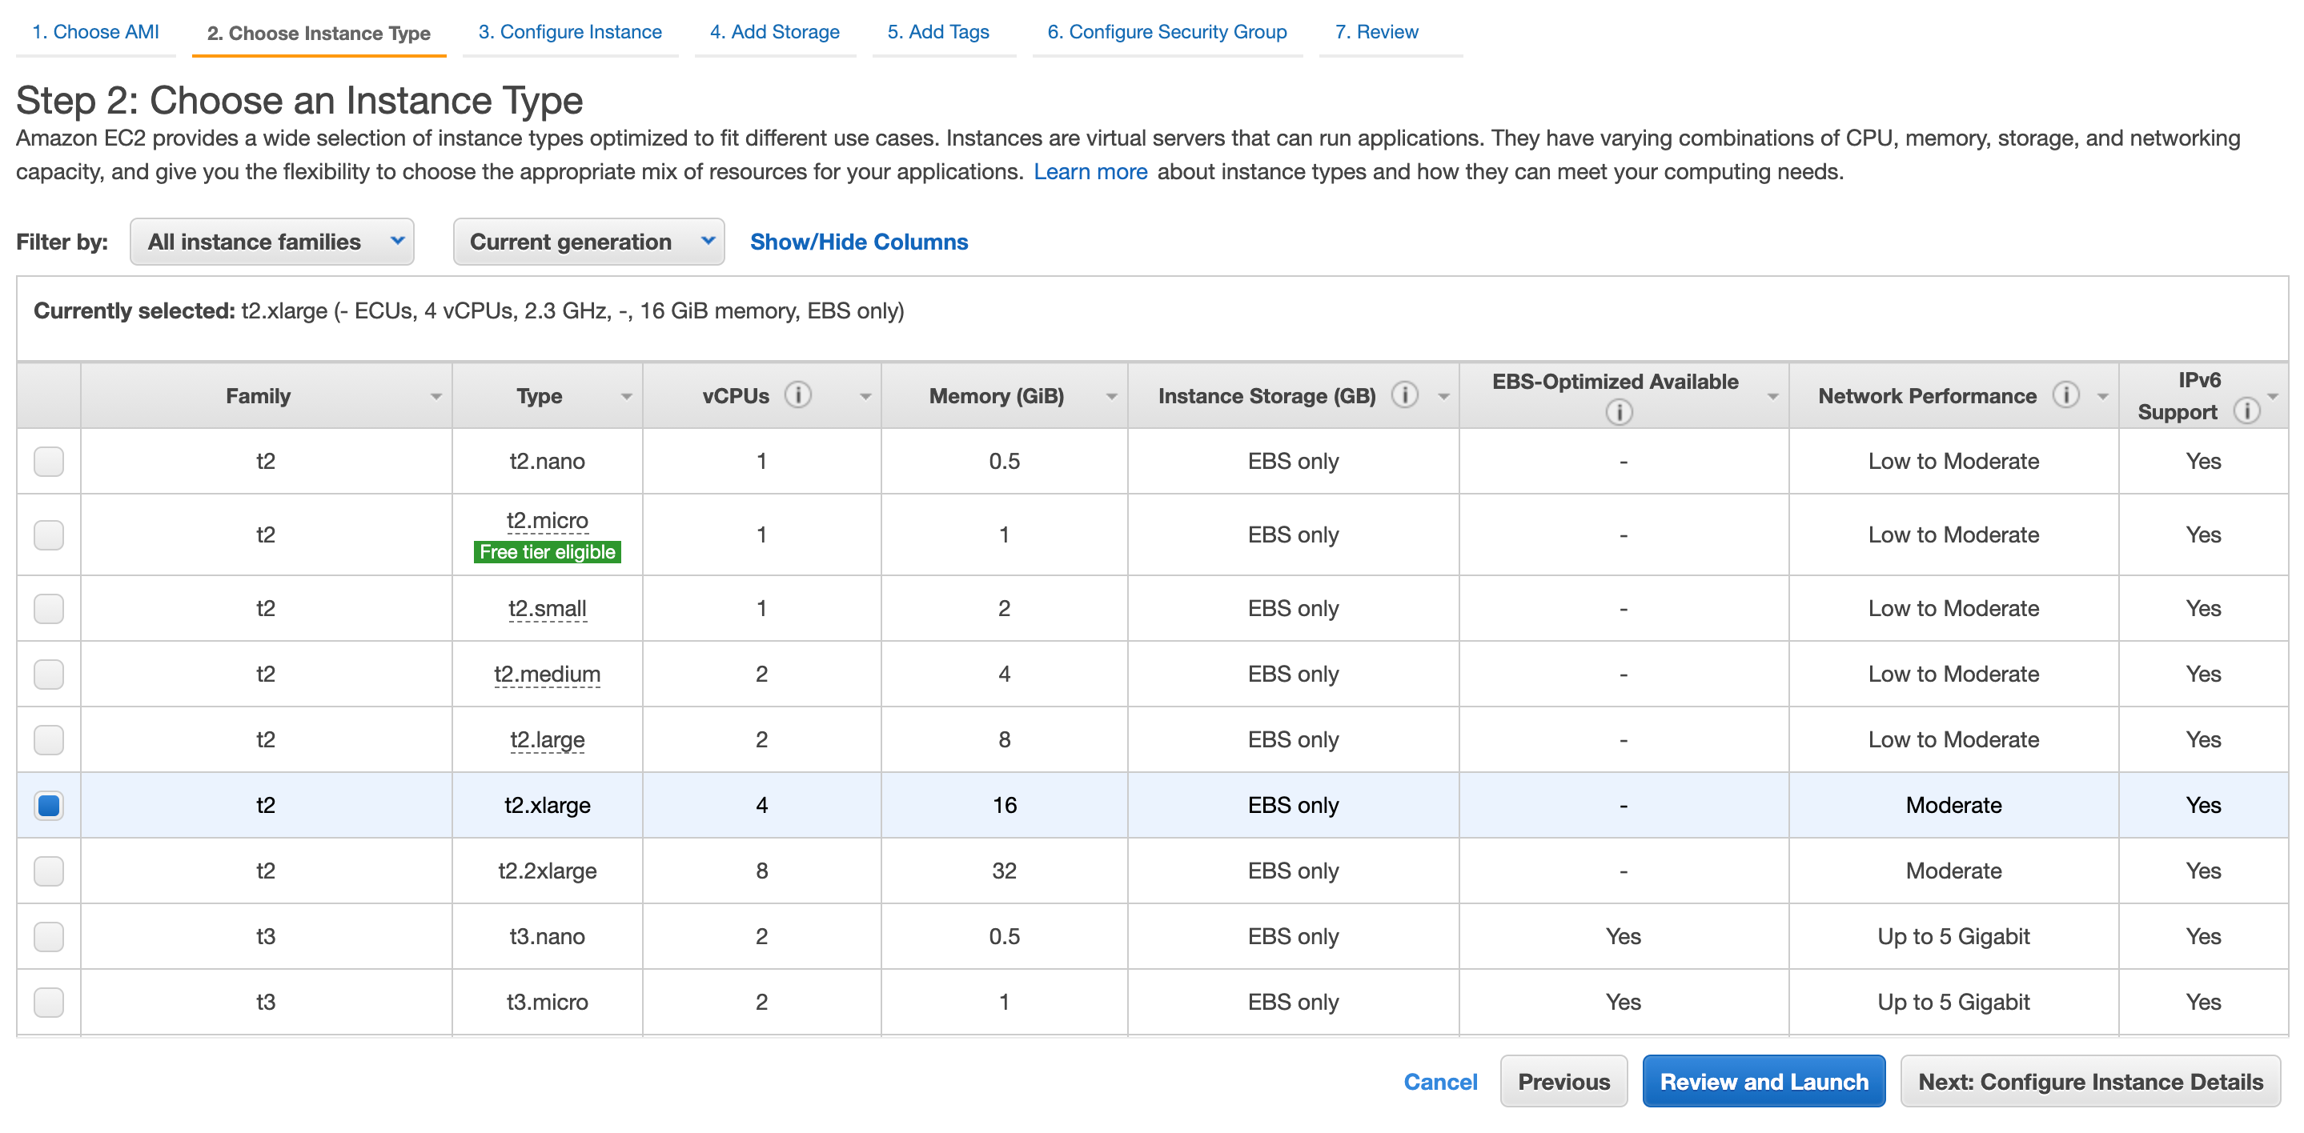
Choose an Instance Type from the list. The minimum configuration is t2.xlarge type with 4 CPUs and 16 GiB memory.
Click Next: Configure Instance Details.
Configuring Instance
Enter the Number of instances.
Deselect the Purchasing option as it is not relevant.
Select a Virtual Private Cloud (VPC) Network to host Logpoint AMI. You can create a new VPC or select from the available ones.
Select the Subnet for your instances from the selected VPC. You can use the existing subnet or create a new one.
Select Auto-assign Public IP if you want to make your instances accessible from the Internet.
Select Placement group to launch the instances in a placement group. The placement group determines how instances are placed on the underlying hardware. All the placement groups function under one of the following strategies:
Cluster — clusters the instances into a low-latency group in a single Availability Zone.
Spread — spreads the instances across the underlying hardware. You can either add the instance to an existing placement group by selecting Add to existing placement group or create a new placement group by selecting Add to a new placement group.
If you select Add to existing placement group, choose one of the available placement groups from the drop-down.
If you select Add to a new placement group, add a new placement group by specifying a Name and Placement group strategy.
Select Capacity Reservation.
Select a Domain join directory to join the Logpoint instance to a directory defined in the AWS Directory Service.
Specify the IAM role for the instances if required. Identity and Access Management (IAM) lets you specify permissions granted to each AWS resource.
Select Shutdown behavior for the instances. If you select Stop: the instances stop running, and Terminate: the instances are permanently deleted.
Select Stop - Hibernate behavior to enable hibernation in the instance.
Enable termination protection to receive a confirmation message before terminating the instances.
Select Monitoring to analyze instance metrics in detail using Amazon CloudWatch.
By default, you have access to basic monitoring, allowing you to view metrics every five minutes. The CloudWatch detailed monitoring allows you to view the metrics in the one-minute interval.
Select a Tenancy infrastructure to run your instances.
Select Add an Elastic Inference accelerator to enable cost-efficient hardware acceleration.
Select Unlimited credit specification to allow the Logpoint instances to exceed the CPU utilization baseline whenever required.
Specify Amazon EFS File systems to mount to the Logpoint instance.
Leave the Network interfaces and Advanced Details settings as they are.
Click Next: Add Storage.

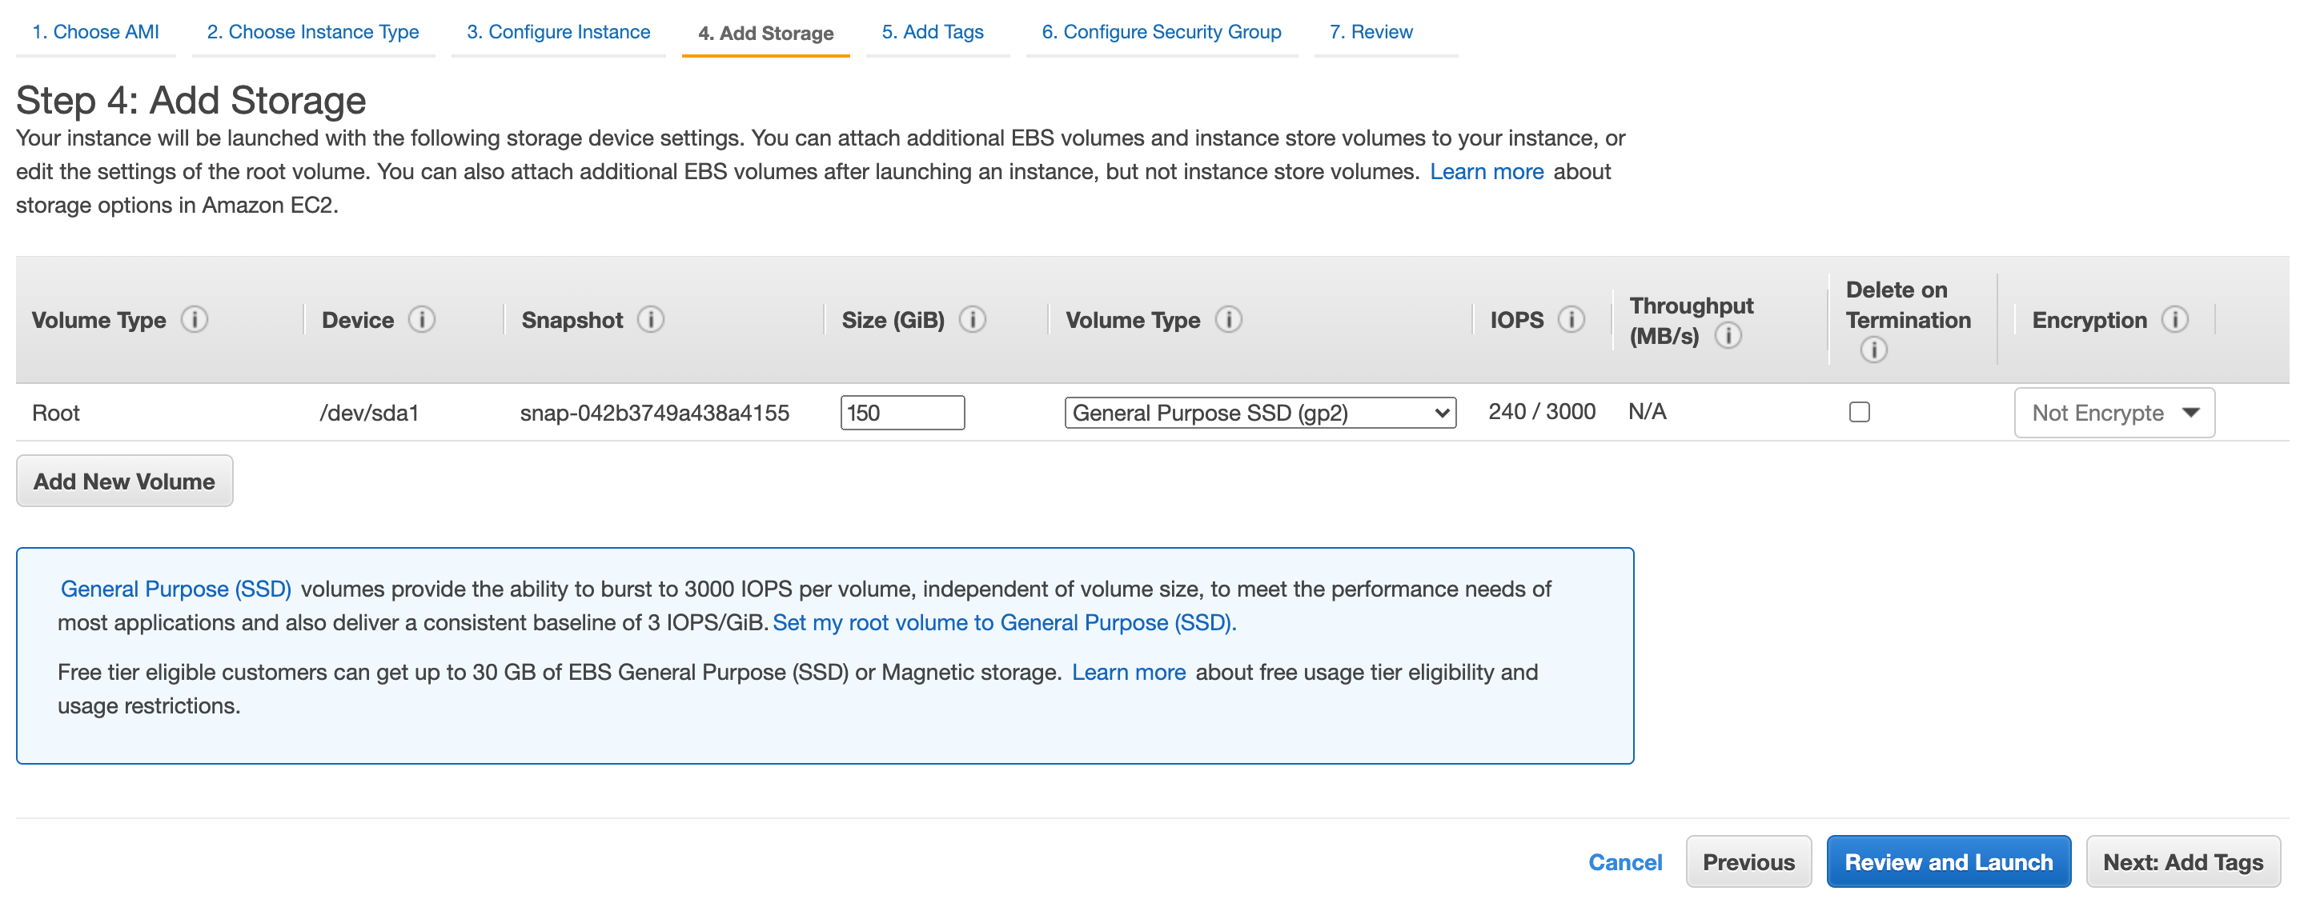
Adding Storage
Specify the storage device settings to launch the instance. Enter 150 GiB volume to install and run a Logpoint instance.
Click Next: Add Tags.
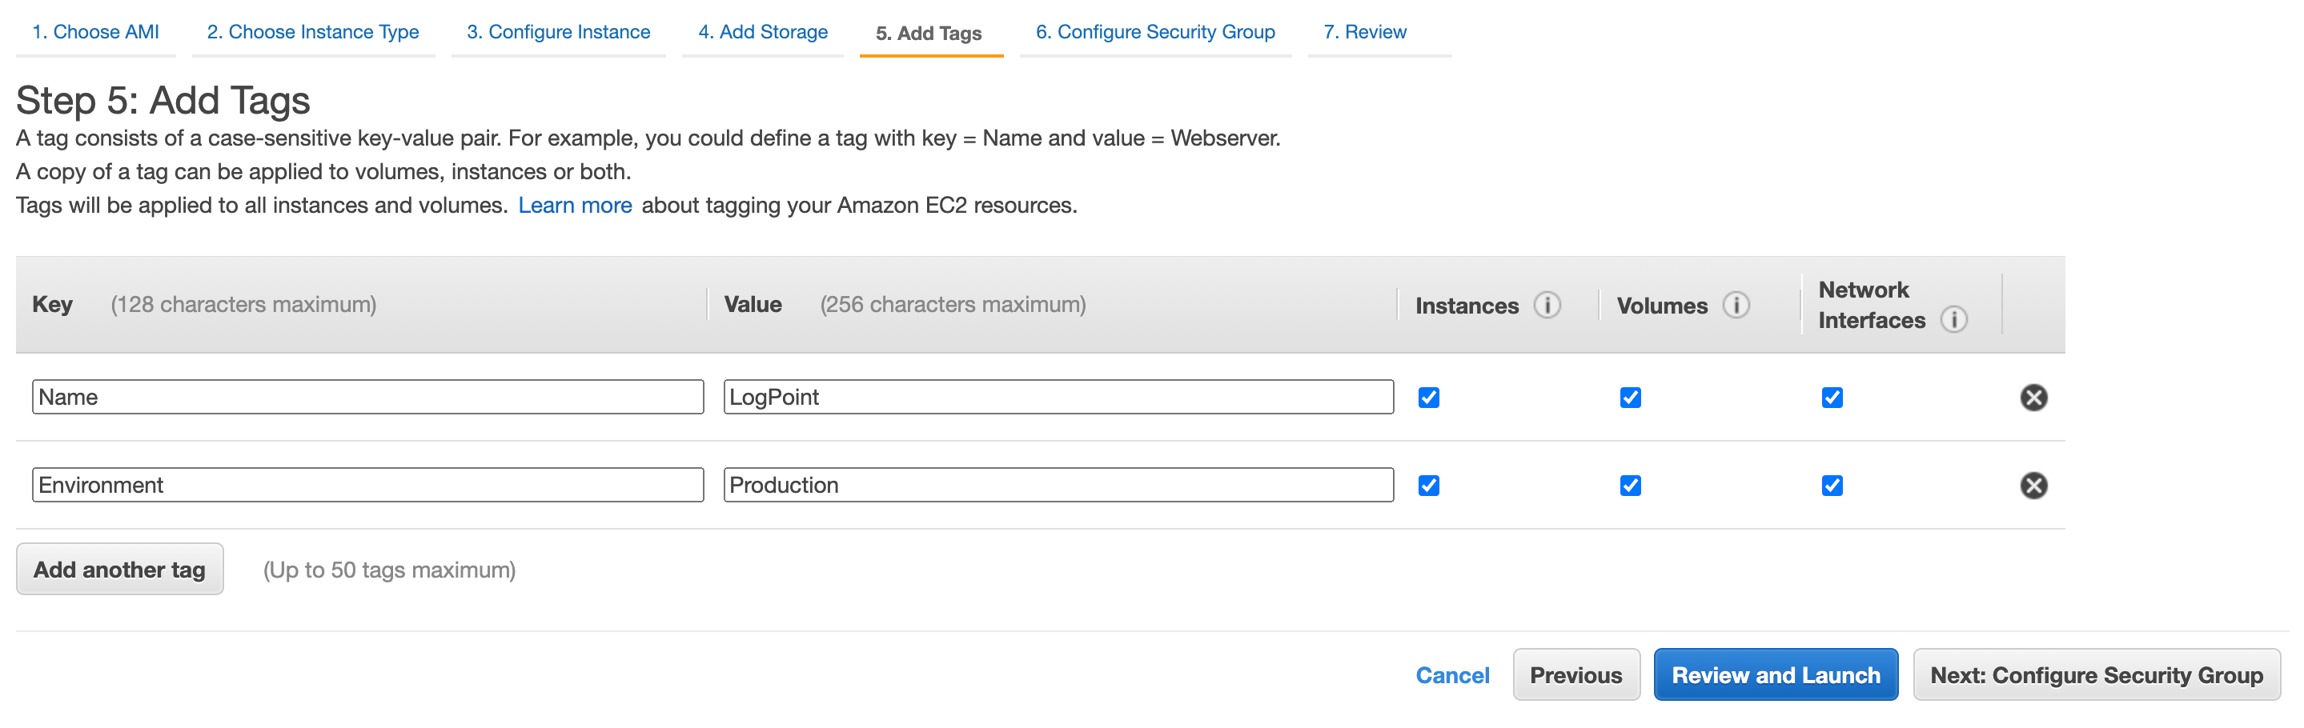
Adding Tags
Enter the tags to be applied to the instance. The tags help you distinguish the instances and volumes when required.
Click Next: Configure Security Group.
Configuring Security Groups
We recommend opening the required ports in the network Access Control List (ACL) and configure security groups to launch Logpoint instances securely.
In the Configure Security Group, select Create a new security group to set all the firewall rules that control the traffic for your Logpoint instances.
514
TCP
Syslog Collector
6514
TCP
Syslog Collector SSL
6161
TCP/UDP
Snare Collector
6162
TCP/UDP
Snare Collector
6343
UDP
SFlow Collector
21
TCP
FTP
162
TCP
SNMP Trap Collector
443
TCP
Web Service
9001
UDP
EMC Collector
7996/7997/7998/7999
TCP
Logpoint Agent Collector
Click Review and Launch.

Obtaining a Key Pair After you click Launch, a key pair is required to establish an SSH connection with Logpoint. To obtain a key pair, you can either Choose an existing key pair or Create a new key pair from the drop-down menu.
If you choose to Create a new key pair,
Enter a Key pair name.
Click Download Key Pair.
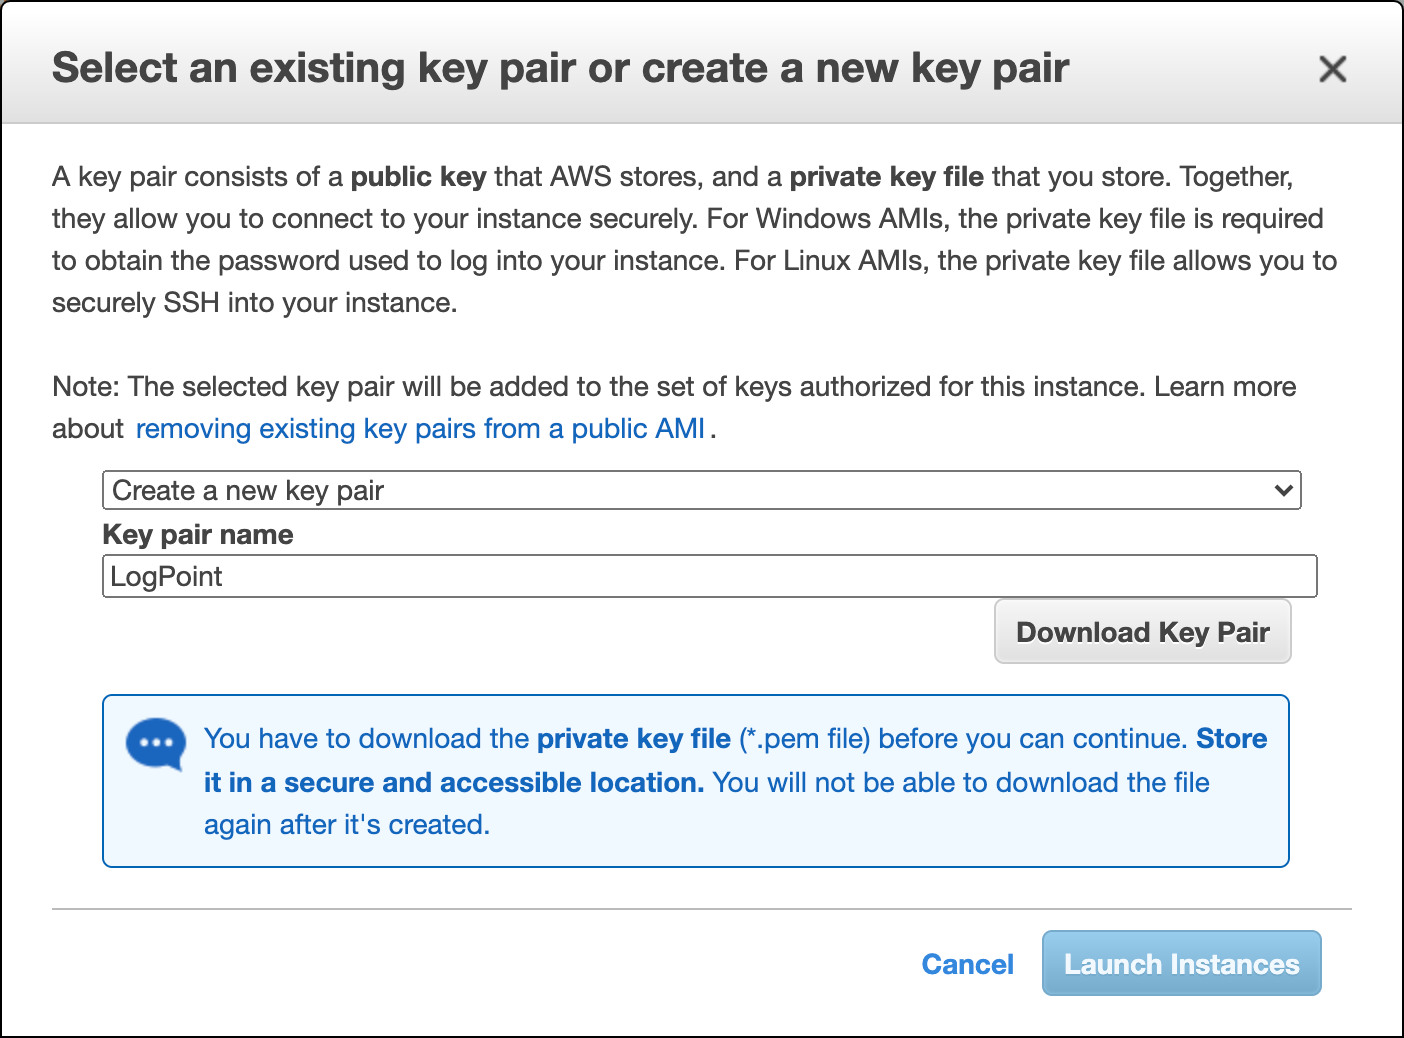
Click Launch Instances.
If you Choose an existing key pair,
Select a key pair from the list of the available key pairs.
Read the confirmation message and agree with the terms.
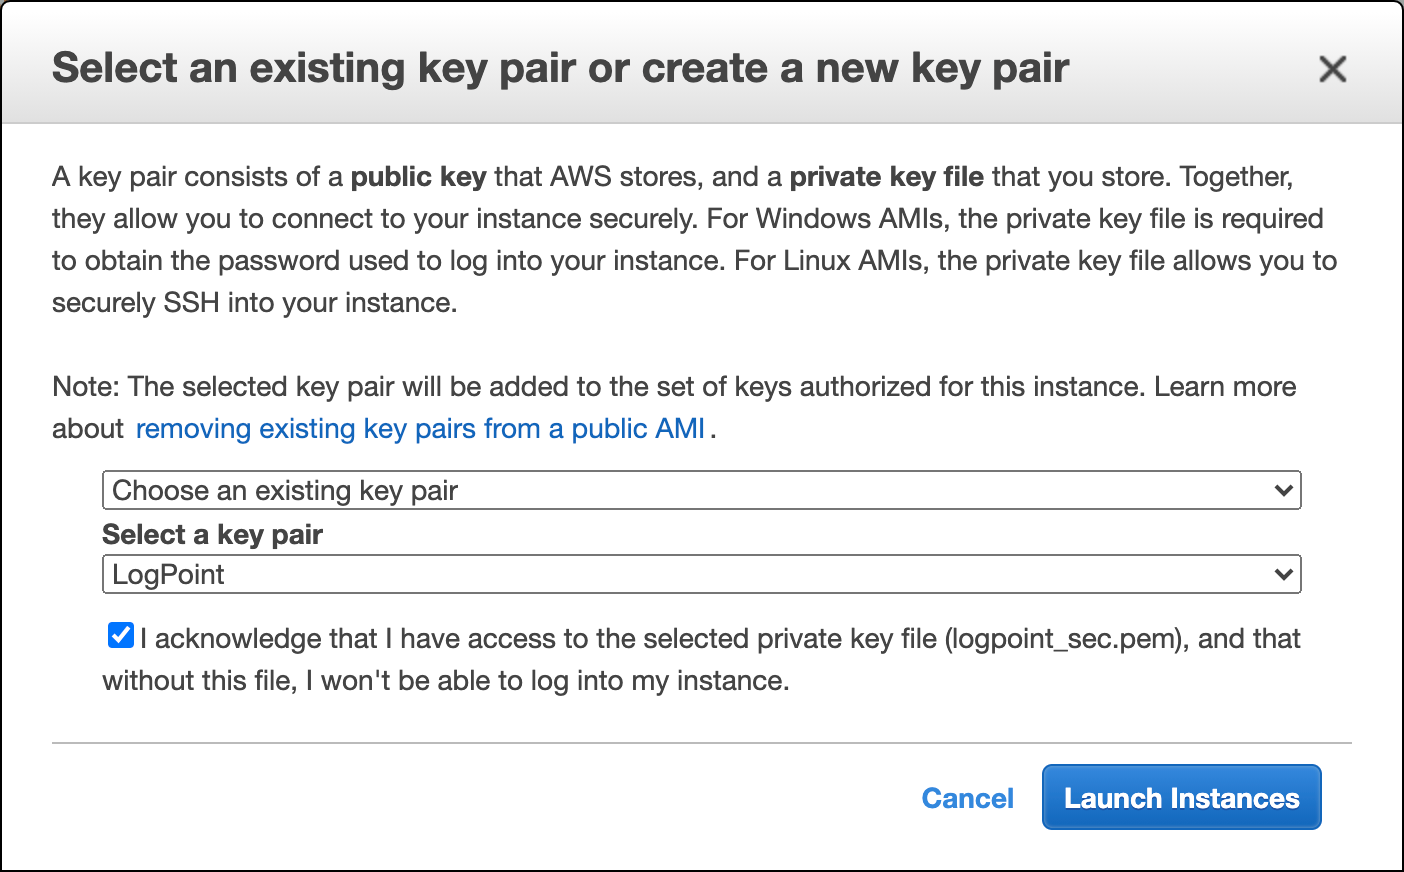
Click Launch Instances.
Verify Access
Go to Services >> EC2 >> Instances.
Select the Logpoint instance from the list of available instances.
Go to the Networking tab and note the Public IPv4 address and the Instance ID. The public IP works as the URL to access your Logpoint from the user interface and to establish an SSH connection from remote devices.
Enter the public IP address in a web browser.
Log into the user interface using the following credentials.
We recommend you set the Public IP of the instance as the Server Alias after you log in. Go to Settings >> System >> System Settings >> General to set the Server Alias.

Connecting the Instance with the Provided key-value pair
To establish an SSH connection for the li-admin user:
Open the command prompt.
Locate the downloaded key pair file.
Use the
chmod 400 <filename>command.Example: chmod 400 Logpoint.pem
Use the
ssh -i "<filename>" li-admin@<Logpoint_Server_IP>to establish SSH connection from the remote device.Example: ssh -i “Logpoint.pem” [email protected]
VHD on Microsoft Azure
Using the Logpoint Azure VHD, you can:
Azure Security Center provides unified security management and advanced threat protection. You can apply security policies across your cloud workloads, limit your exposure to threats, and detect and respond to attacks.
Azure Monitor includes Log Analytics and Application Insights. It provides sophisticated tools for collecting and analyzing telemetry. It allows you to maximize the performance and availability of your cloud and on-premises resources and applications. It also helps you analyze the performance of your Azure applications and proactively identify issues affecting them.
Azure Cost Management provides a cost management solution that helps you monitor and control expenses and optimizes resource use. You can analyze costs, create and manage budgets, export data, and review and act on recommendations.
Azure Backup and Recovery protects the data of on-premises servers, virtual machines, and virtualized workloads. It also handles disaster recovery of these resources with on-site recovery.
Deploy using the Logpoint Azure VHD. High-level steps:
Get the Logpoint VHD (SAS URL) from Logpoint Sales.
Secure Azure infrastructure (use private subnets, managed disks, NSGs, encryption).
Deploy the Logpoint VHD: copy to storage account, create managed disk, create VM from managed disk.
Copy VHD to your Storage Account (using CLI)
Monitor copy:
Copy VHD to your Storage Account (using UI)
Log into the Microsoft Azure portal and go to Storage accounts.
Click the name of your account and click Access keys.
Copy the Storage account name and key1 or key2.

Create Managed Disk from VHD (Azure Portal)
Log into the Microsoft Azure portal and go to All services.
Search for Disks and select the service and click Create.
Basics
Select a Subscription method and a Resource Group.
Enter a Disk name.
Select the Region to deploy your managed disk.
Select an Availability zone within the selected region to ensure high-availability of the applications and protect the data and applications from accidental data center failures. The Availability zone may not be available for all locations.
Choose a Source type for the managed disk. To install the Logpoint VHD,
Select Storage blob as the source type.
Select a Source subscription method.
In the Source blob option, click Browse to provide the location of the destination container of the previously obtained Logpoint Azure VHD.
Select the Linux OS.
Select the disk Size in GiB. The disk size should be 150 GiB (equal to the size of the source).
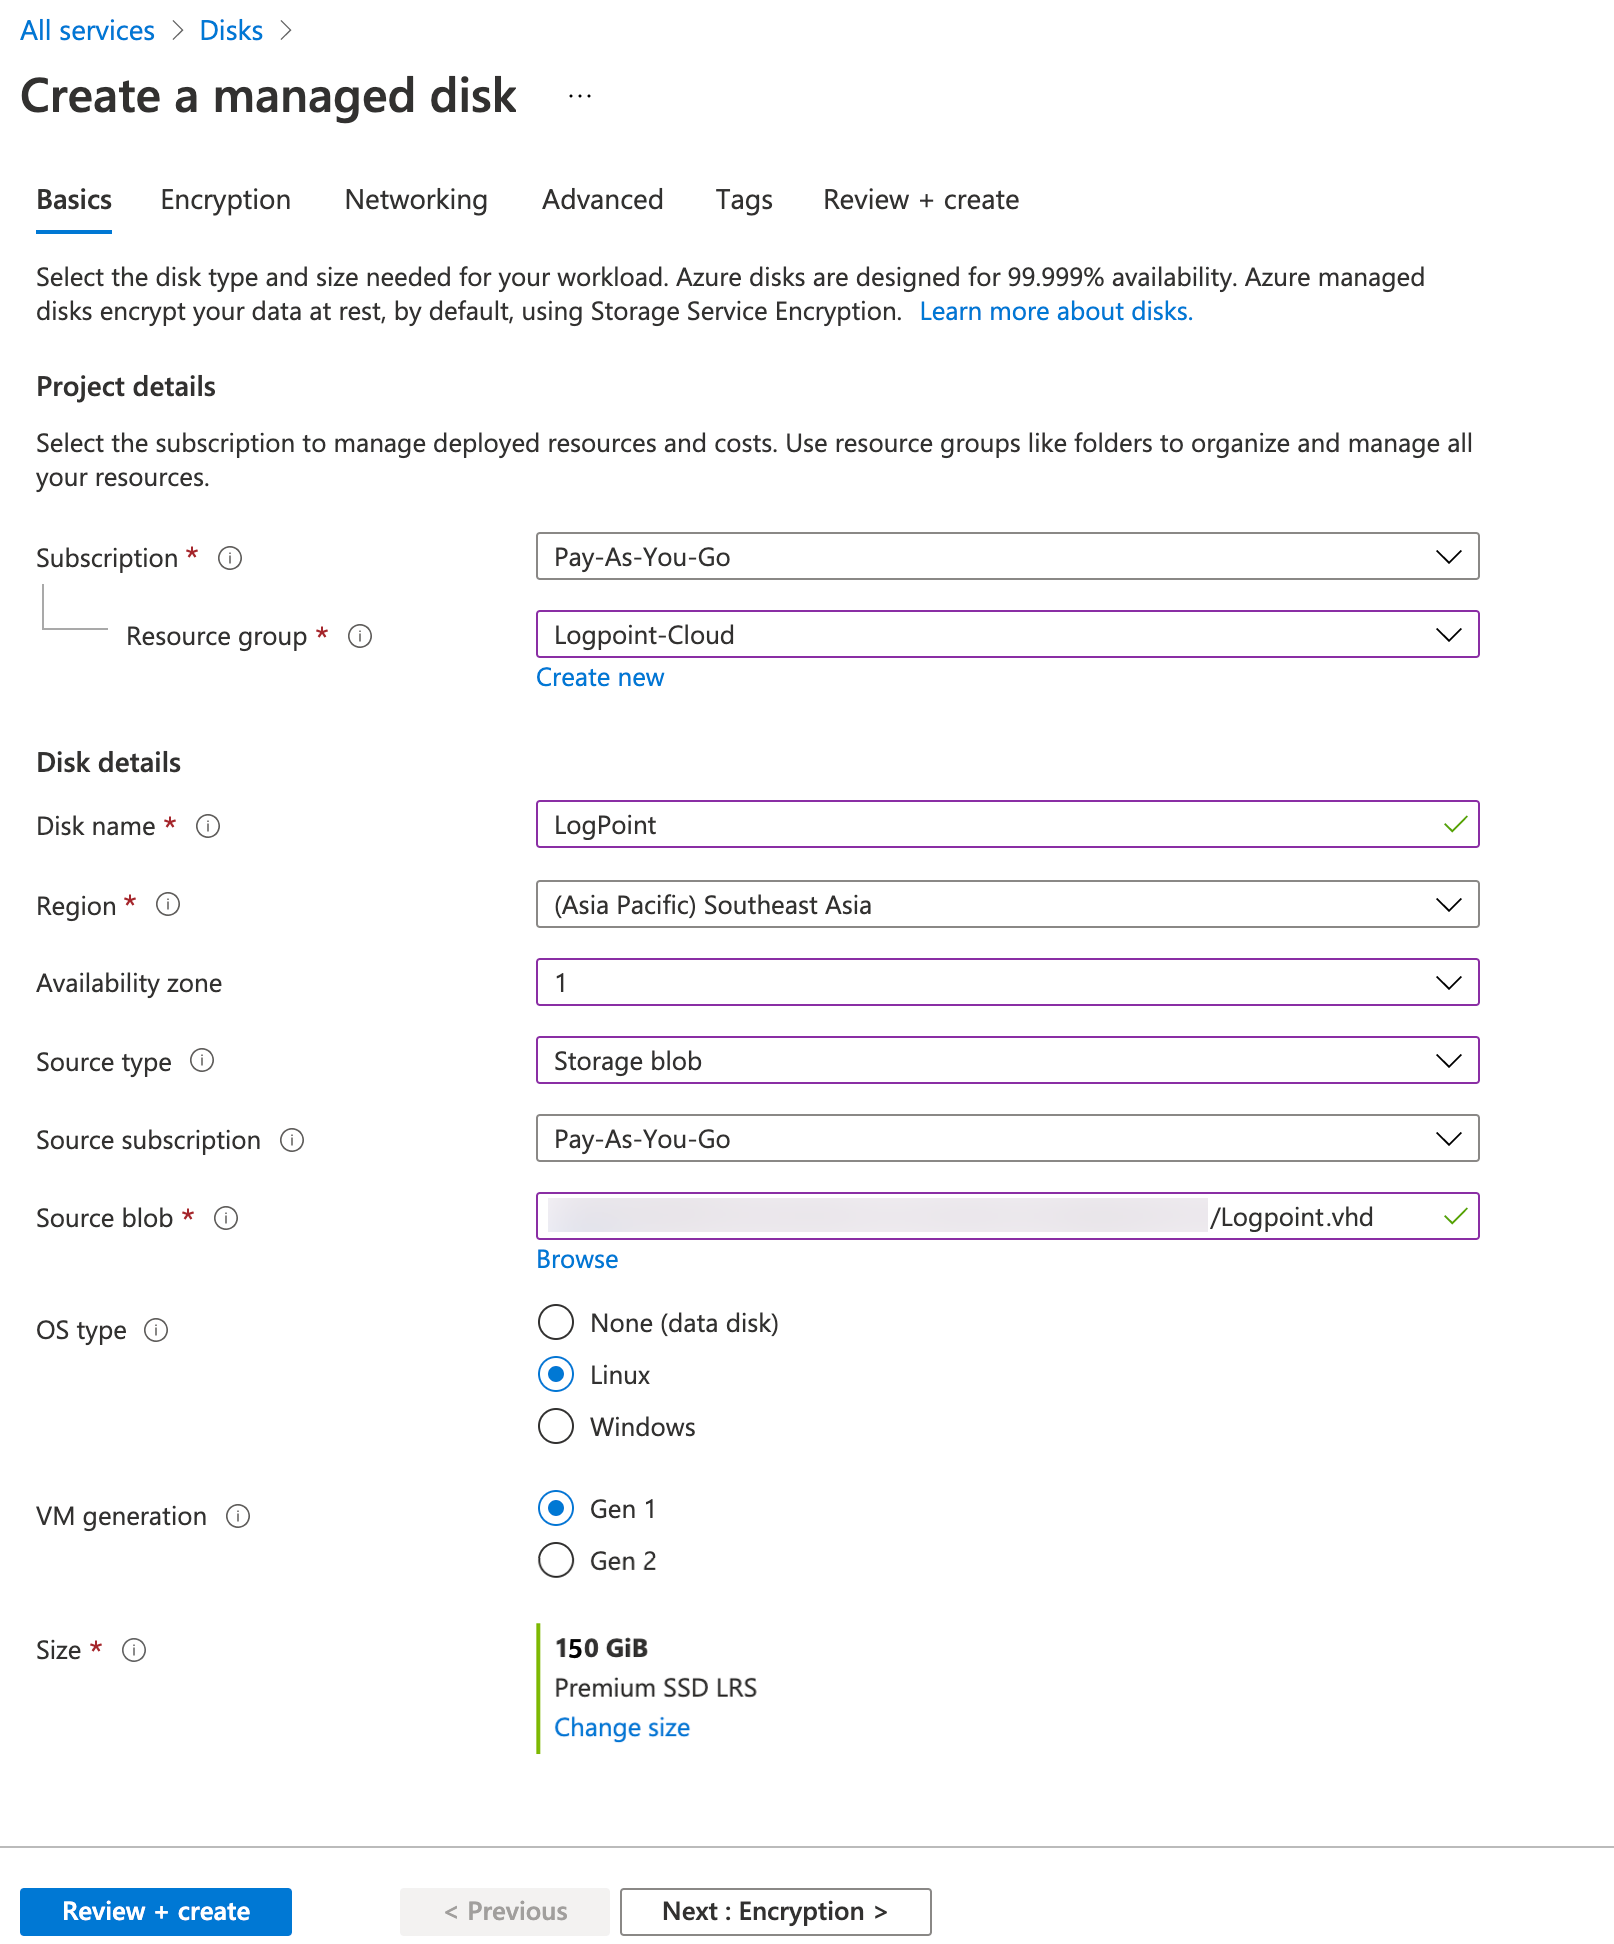
Click Next : Encryption >.
Encryption
Select an Encryption type and click Next: Networking >>.
Networking
Select a Connectivity method.
Click Next : Advanced >.
Advanced
Enable shared disk to allow the managed disk to be attached to two or more virtual machines.
click Next : Tags >.
Tags
Enter the Tags for the resources. Tags are the name-value pairs that enable you to categorize resources and view consolidated billing by applying the same tag to multiple resources and resource groups.
Click Next : Review + create >.
Review + create
The Review + create tab displays all the data entered in the previous pages. Click Previous before finalizing the configuration if necessary.
Click Create to create the managed disk.
Create VM from Managed Disk
Go to All Services >> Disks, select managed disk and create VM.
Select Subscription and Resource group (must match disk).
Enter a VM name.
Select the Availability options to manage the availability, recovery, and backup of the virtual machine. It protects your data and applications from data center outages and maintenance events.
The Image represents the base application for the virtual machine. In this case, it is the disk containing the Logpoint VHD.
Select a VM Size (minimum quad-core, 8 GB, 150 GB).
Select the required network ports accessible from the internet in the Public inbound ports option.
Click Next : Disks >.
Select an Encryption type.
Configure additional data disks for your virtual machine. You can create and attach a new disk or attach an existing disk.
Click Next: Networking >.
Select the Virtual network for your virtual machine. Virtual networks create logical isolation in Azure. Each virtual network has their IP addresses range, subnets, route tables, gateways, and security settings.
Select the Subnet range for your virtual network.
Select the Public IP to access your virtual machine from the internet. (None recommended)
Select Advanced in the NIC network security group.
Configure network security group with required ports.
Select Place this virtual machine behind an existing load balancing solution to provide an existing Azure load balancing solution to the VM.
Click Next : Management >.
In Monitoring,
Enable Boot diagnostics to capture serial console output and screenshots of the virtual machine. It helps to diagnose startup issues.
Enable OS guest diagnostics to get the metrics of the virtual machine every minute.
If you enable boot diagnostics with a custom storage account, select a Diagnostics storage account to store the metrics data.
In Identity, select System assigned managed identity to grant or receive permissions via Azure role-based access control.
In Auto-Shutdown, Enable auto-shutdown to shut down the virtual machines daily automatically.
Click Next : Advanced>.
Select the Extensions for the resources if needed.
In Custom data, enter a script, configuration file, or other data into the VM while it is being provisioned.
Enable User data to enter a script, configuration file, or other data.
Select a desired Host group or a Proximity placement group to group your VMs.
Click Next : Tags>.
Enter the Tags for the resources. Tags are the name-value pairs that enable you to categorize resources and view consolidated billing by applying the same tag to multiple resources and resource groups.
Click Next : Review + create >.
The Review + create tab displays all the data entered in the previous pages. Click Previous before finalizing the configuration if necessary.
Click Create to launch the virtual machine.
Recommended NSG ports (same as AMI list, plus 21/22 for data transfer in runtime)
Verify Access to Azure VHD
Go to All services >> Virtual machines.
Select the required Virtual machine.
In Overview, note down the Subscription ID. The Subscription ID is the password for the default user for accessing the Logpoint user interface.
Select Networking from the sidebar.
Note down the NIC Private IP. The IP address works as the URL to access your Logpoint user interface and to establish an SSH connection from remote devices. We recommend you to change the private IP address of the deployed Logpoint instance directly from the Azure Portal. If you change the IP address using the
change-ipcommand, make sure it matches the NIC private IP address in the Azure portal.

Enter the NIC Private IP in a web browser.
Log into the user interface using the following credentials.
SSH access:
Go to Settings >> System >> System Settings.
Select SSH Key Pair for li-admin.
Enter a Pass Phrase.
Click Re-Generate Key Pair.
Copy the Private Key and save it in a file.
Use the
chmod 400 <filename>command to make the key accessible for an SSH connection. Example:chmod 400 ~/.ssh/id_rsaUse the
ssh -i "<filename>" li-admin@<Logpoint_Server_IP>command.Example:
ssh -i ~/.ssh/id_rsa li-admin@<LogpointServerIP>Enter the Pass Phrase to establish the SSH connection from the remote device.
Virtual Hard Disk (VHD) on Microsoft Hyper-V Server 2016 or later
Using the Logpoint Hyper-V VHD, you can:
Expandable private cloud environment: It provides flexible, on-demand IT services allowing you to make adjustments on resources as per change in requirements.
Efficient hardware usage: It consolidates the servers dividing the workloads equally and uses powerful physical computers decreasing the power consumption and physical space.
Improve business continuity: It minimizes the impact of both scheduled and unscheduled downtime of your workloads.
Expandable virtual desktop infrastructure (VDI): It uses a centralized desktop strategy with VDI to increase business agility and data security, as well as simplify regulatory compliance and manage applications.
Requirements:
Memory
8 GB
Disk
150 GB
Launch only one Logpoint instance from a single VHD. For multiple instances, create copies of the original VHD.
Keep original VHD as backup; launch from copies.
Hyper-V VHD is dynamically expanding; you can convert to fixed-size VHD via Edit Disk.
Deployment methods: Hyper-V Manager (GUI) or Windows PowerShell.
Deploy using Hyper-V Manager (wizard)
Open Hyper-V Manager → select Hyper-V server → Actions → New → Virtual Machine.
Wizard: set Name and Location (separate folder recommended) → Next.
Select Generation 1 → Next.
Assign Startup memory (minimum 8 GB), optionally Dynamic Memory → Next.
Network: select virtual switch → Next.
Connect virtual hard disk: Use an existing virtual hard disk → browse to Logpoint VHD → Next.
Review summary → Finish.
Start VM in Hyper-V Manager → Right-click VM → Start → Connect → Login.
Deploy using PowerShell (on Hyper-V server) Run as administrator:
Initial credentials and access
Console login (li-admin):
Change password:
View IP:
or in PowerShell on Hyper-V server:
GUI login:
Configure the Logpoint Instance or Server
When you first log in, configure the Logpoint instance/server as one of:
Standard or Compliance instance
Advanced Configuration
Custom Configuration
Collector
Syslog Forwarder
Standard or Compliance
Standard Configuration enables a quick start with preconfigured dashboards and repositories for access management, incident management, and perimeter security monitoring. Dashboards come with ready-to-use widgets for compliance, and the repositories are mapped to specific source types, such as firewalls and servers, which you can use when creating a log source.
Log into Logpoint.
Select Standard Configuration and click Get started.
Choose Yes to use pre-configured dashboards (then select repos per widget) or No to proceed without dashboards (repos created).
You are redirected to Log Sources page to add log sources and map to repositories.
Advanced Configuration
Custom Configuration
Custom Configuration has complete features without any preconfigured dashboards or repositories. You can configure it according to your specific needs and preferences.
Log into Logpoint.
Click Advanced Configuration dropdown and select Custom Configuration.
Click Get started and Confirm.
Configure dashboards, repositories, and other settings manually.
Collector
Collector collects logs from different sources, normalizes them using the signatures applied, and forwards them to a configured remote Logpoint. It can enable buffering to persist locally during network outages. You can convert Logpoint to Logpoint Collector during login or configure later from Settings >> System Settings.
Log into Logpoint.
Click Advanced Configuration dropdown and select Collector.
Click Get started.
Select Enable buffering to store the data in local persistence during a network outage.
Click Confirm.
Syslog Forwarder
Syslog Forwarder collects logs from different sources, normalizes them using the signatures applied, and forwards them to a configured Logpoints and a target storage. You can convert Logpoint to a syslog forwarder during login or configure later from Settings >> System Settings.
Log into Logpoint.
Click Advanced Configuration dropdown.
Select Syslog Forwarder.
Click Get started and click Confirm.
Configuring Network Interfaces
Select the relevant interface.
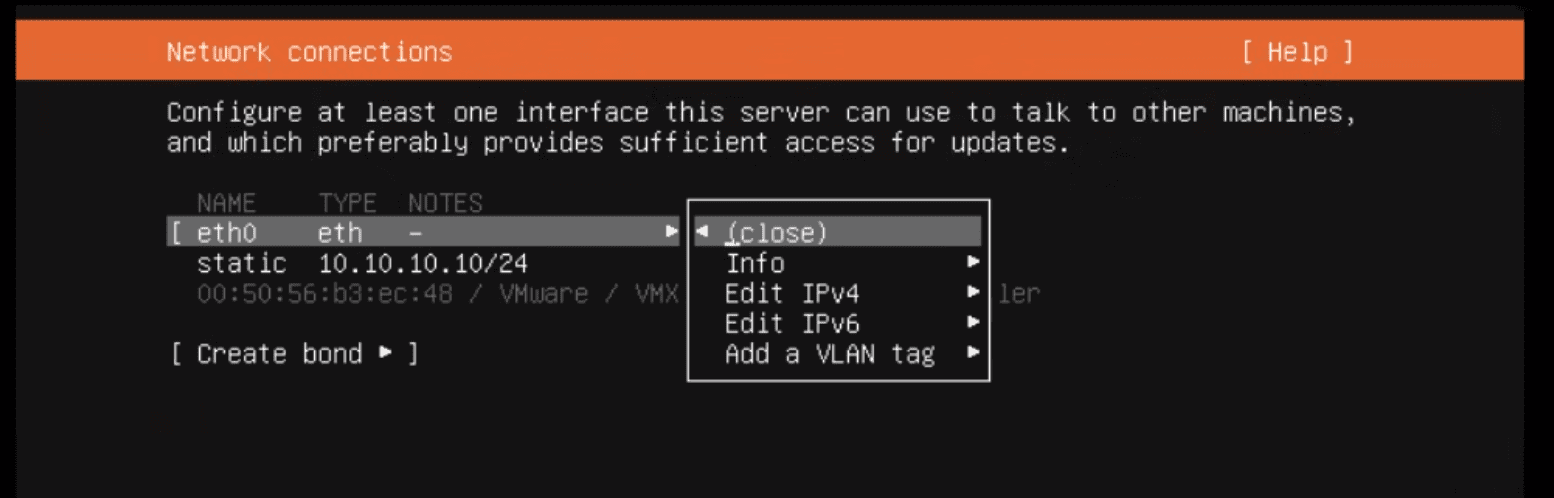
Select Edit IPv4.
Choose Method:
Automatic (DHCP) — settings are auto-set.
Manual — enter Subnet, Address, Gateway, Name servers, Search domains.
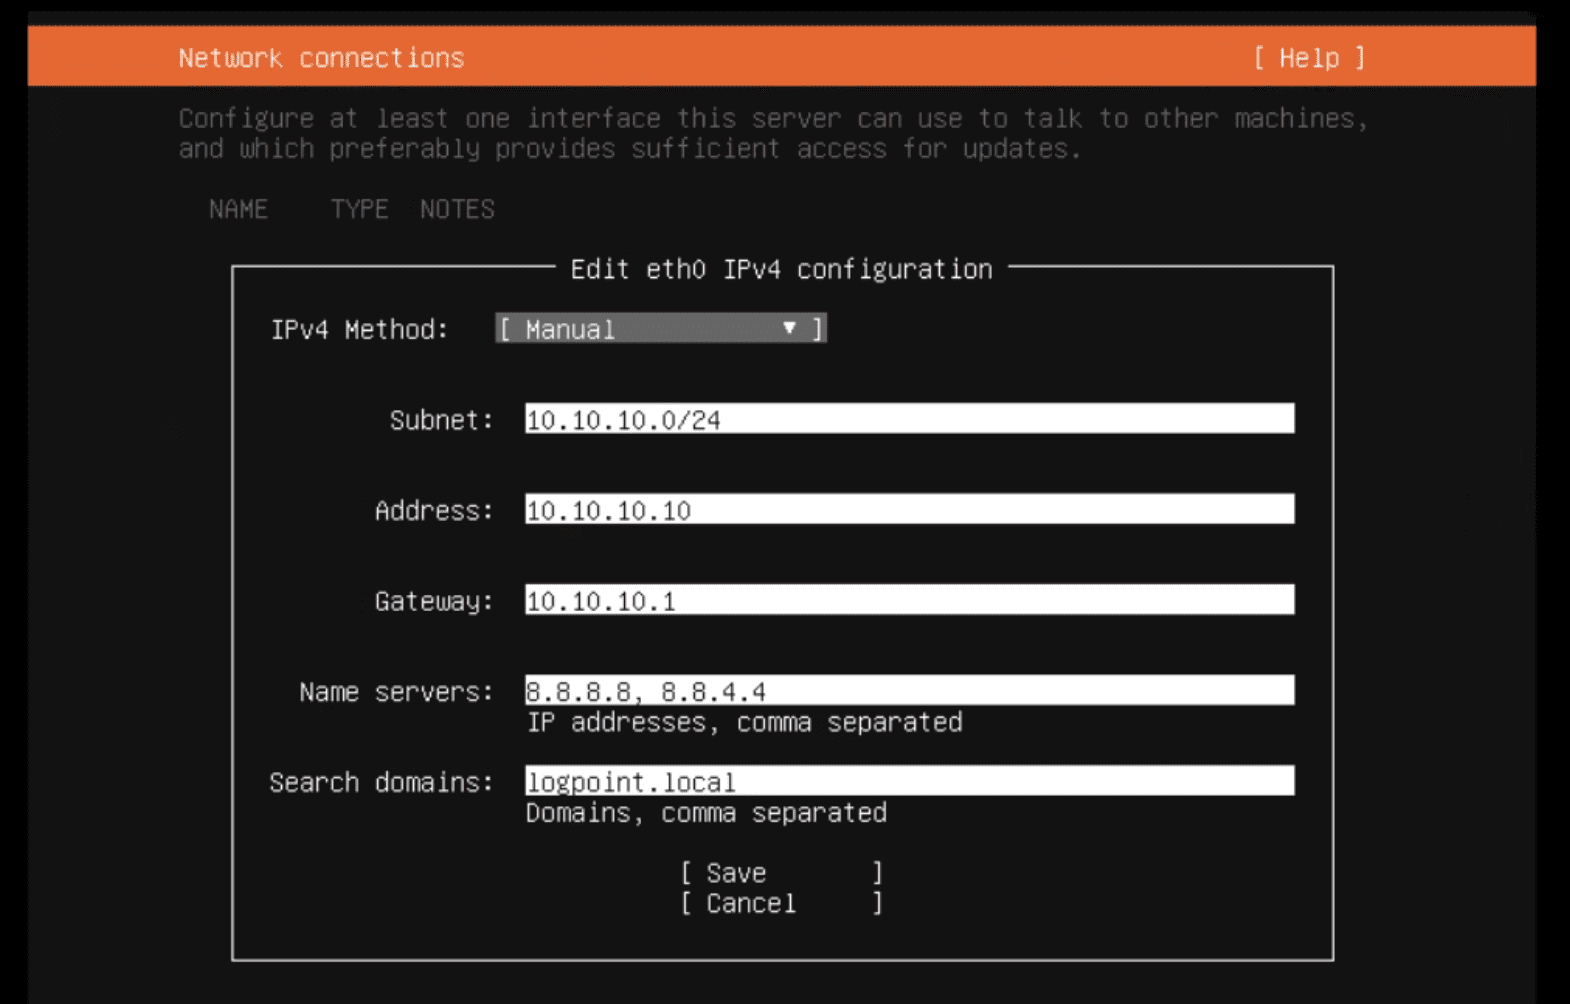
Click Save.
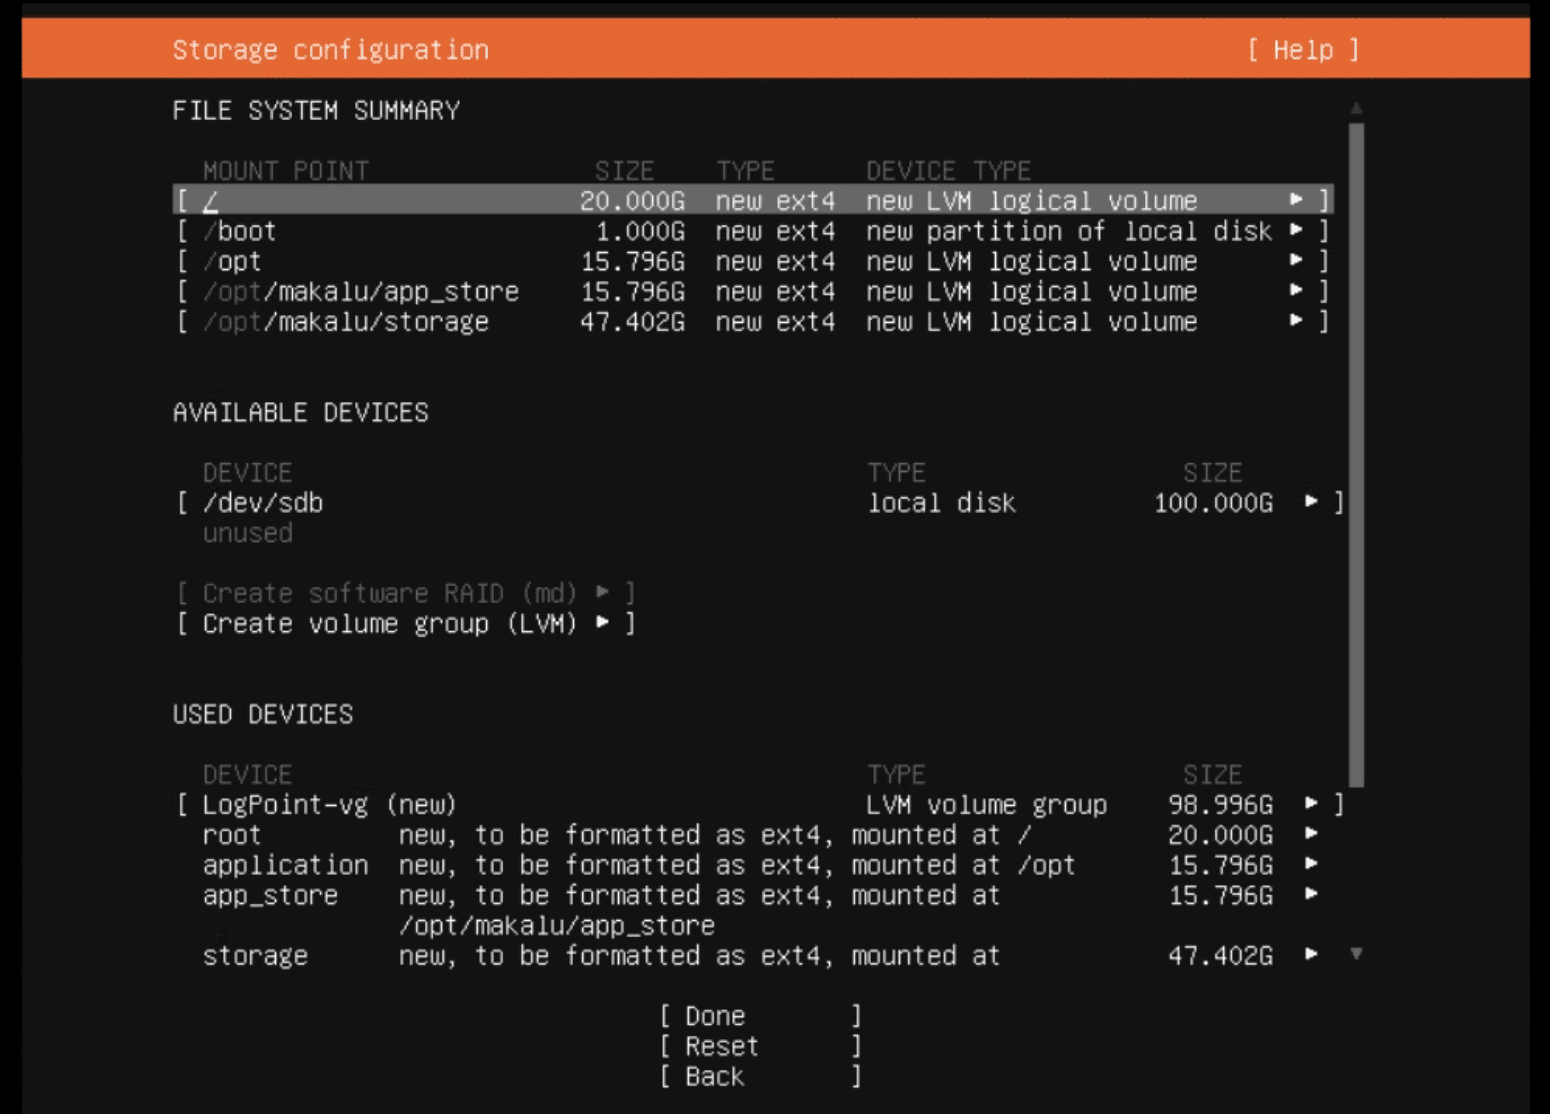
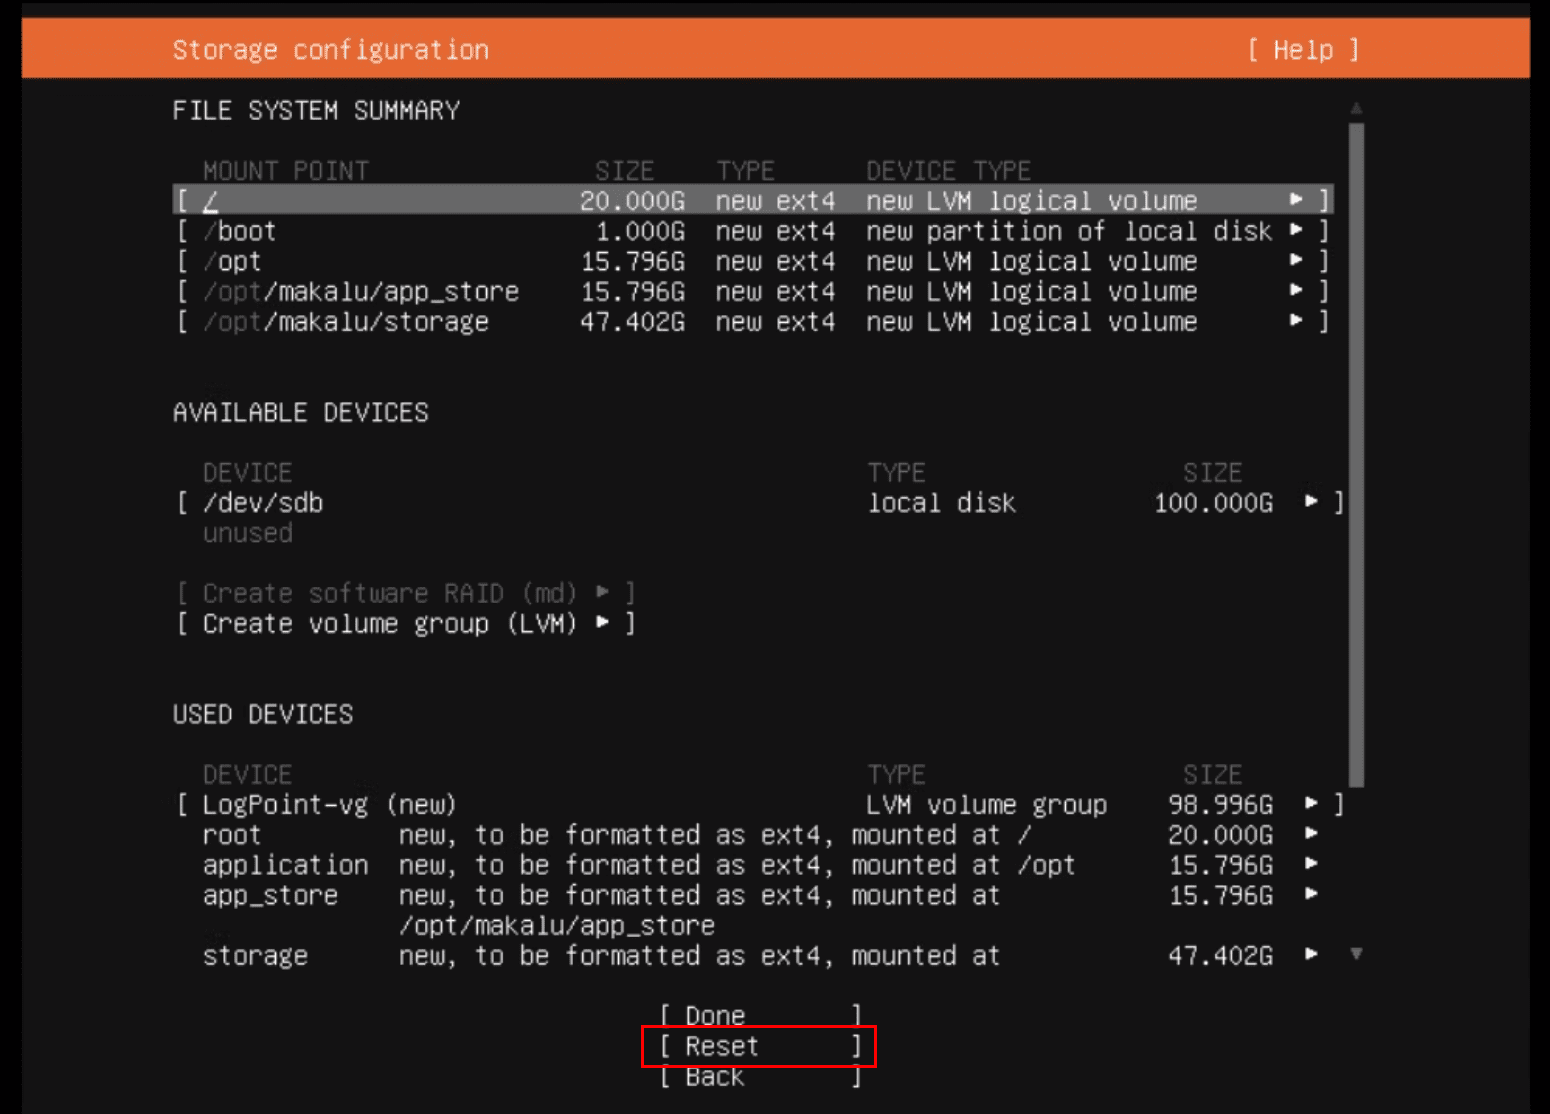
Customizing Storage Partitions during installation
In Storage Configuration, select Reset.
Select Use As Boot Device for the device to install Logpoint.
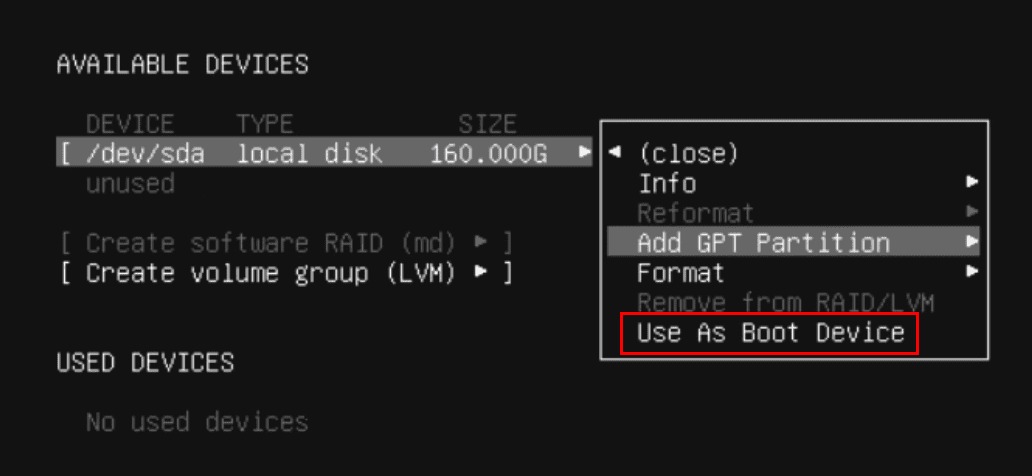
Click Add GPT Partition for available device, specify Size (recommend at least 8GB).
Select swap in Format and select Create.
Add another GPT Partition for remaining storage.
Select Leave unformatted in Format and select Create. This unformatted partition can be used to hold the logical volume group.
Click Create Volume Group (LVM).
Enter a a Name, Size, Format, and Mount point for the new logical volume.
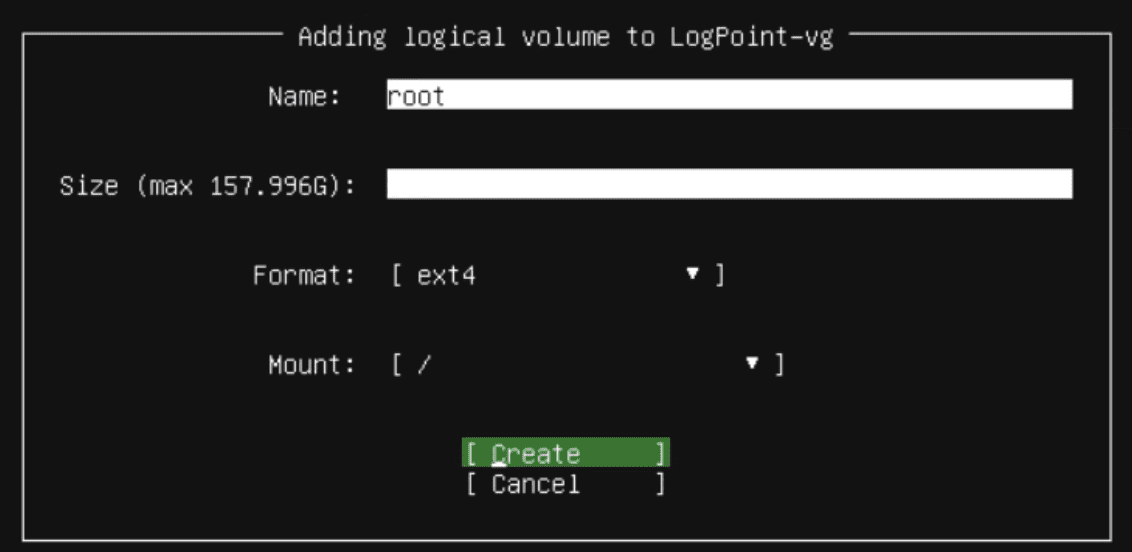
Required logical volumes before installation:
boot
/boot
1GB
root
/
40GB
application
/opt
20GB
app_store
/opt/immune/app_store
20GB
storage
/opt/immune/storage
60GB
The installer auto-provides the names and mount points for the default volume group every time you select Create Logical Volume.
Click Done after configuring logical volumes.
Last updated
Was this helpful?