Architecture Configuration
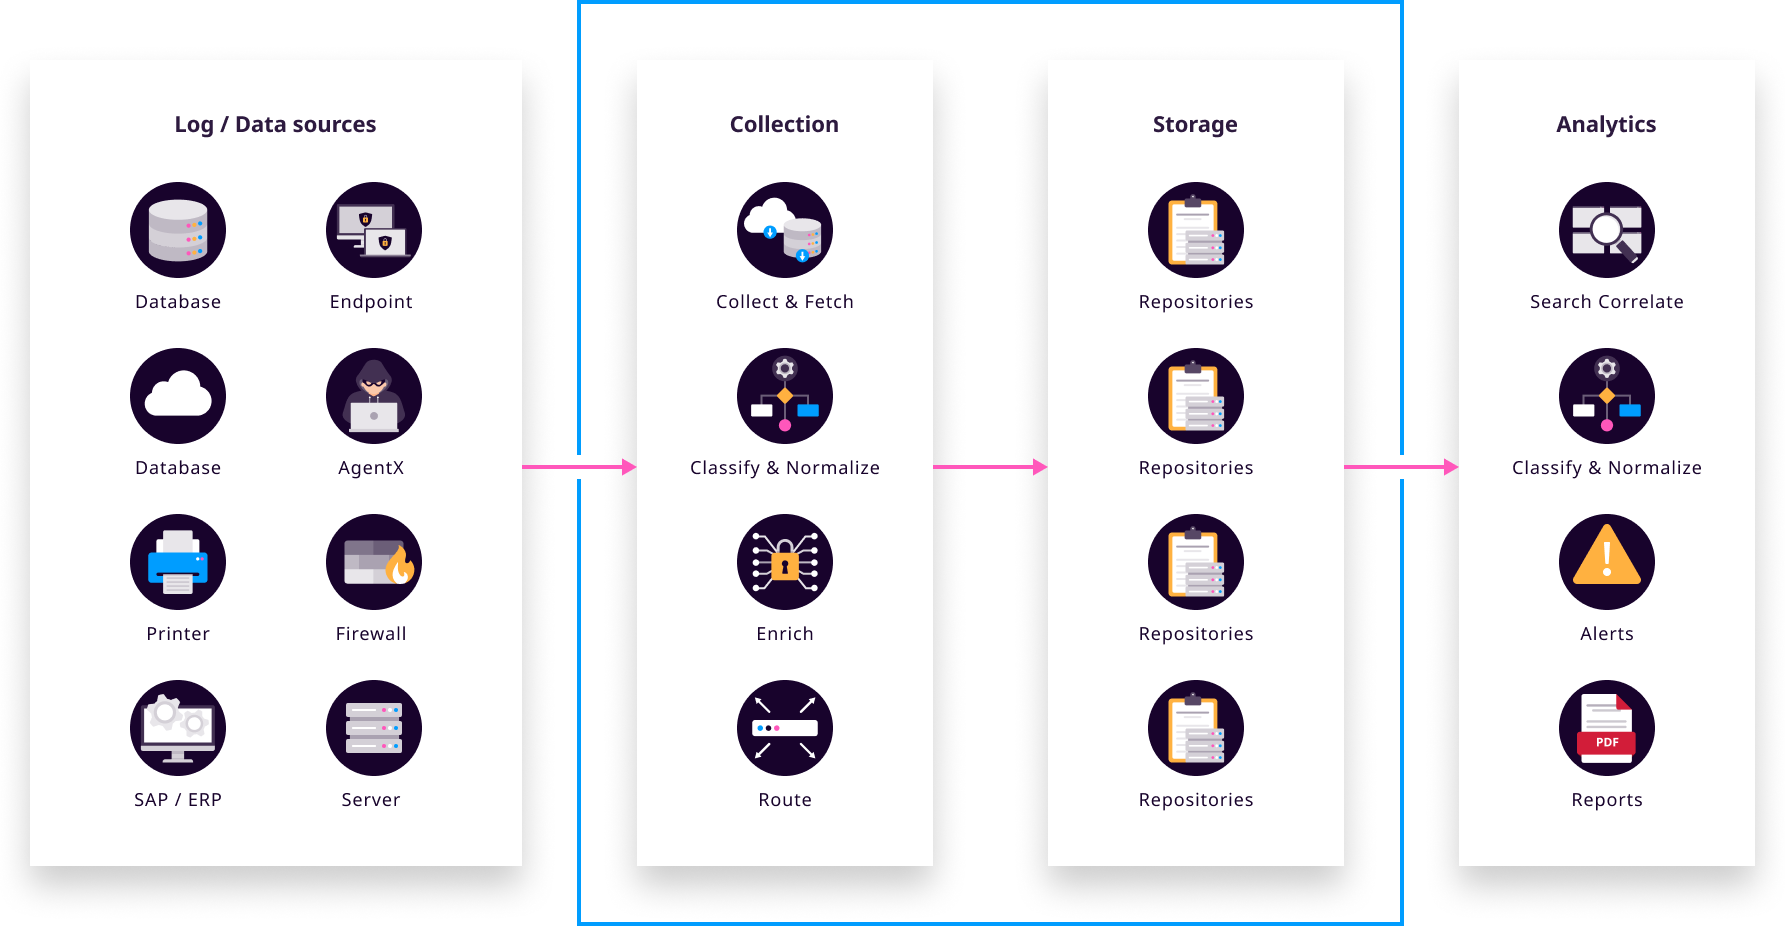
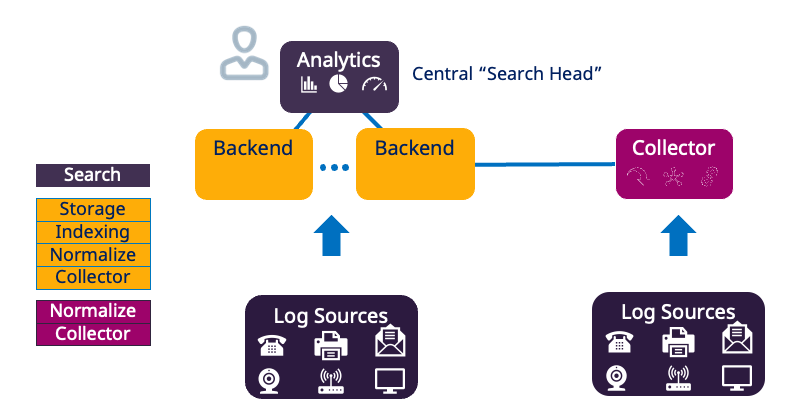
Logpoint On-premise SIEM consists of three components that perform three important tasks:
Log Management & Analytics or Search Head
Log Ingestion through Collectors or Fetchers
Storage Nodes or Repos
They can be deployed to a single physical appliance or split across multiple dedicated physical servers, virtual servers or cloud-based servers. Smaller organizations may deploy all three components within a single virtual appliance. Larger organizations can divide the components across various network zones to balance load and ensure resiliency.
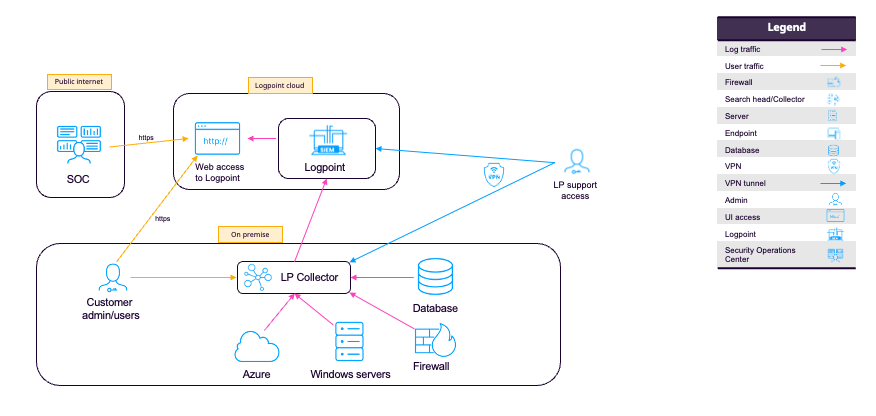
Connection between your Logpoint appliances or servers can be through Open VPN or through Logpoint Open Door.
Before you setup your environment, consider:
data
location
data access
agents
devices
cloud
retention
legal requirements
load balancing
high availability
security zones
organizational structure
multi-tenancy
geography
Log Management & Analytics or Search Head
The Search Head is the user interface where you control and manage other Logpoint servers and Logpoint products (SIEM, SOAR Automation, Case Management). It distributes queries to relevant repos (storage nodes), collates results, and displays them in the GUI. The Search Head does not store data.
Use the Search Head (Main Logpoint) to setup, modify, or configure features. You can switch to a storage/repo node to perform searches there if needed (useful for slow searches). If you don't see or have access to particular UI items (for example, user management), ensure you are using the Search Head/Main Logpoint.
For scalability or failover, you can include more than one search head that independently runs and aggregates queries to/from the repos.
Access and administer the following within Distributed Logpoint using a search head
Permission Groups
Normalization Policies & Normalization Packages
Routing Policies
Log Collection Policies
Parsers
Distributed Collector and Distributed Logpoint
Devices and Device Groups
Label Packages
Search Templates
Macros
System Monitor
System Settings
Logpoint License, Open Door, Integrations
View Search Views and Packages
View Alert Rules
View Lists and Tables
View and create Dashboards
View and create users and user groups
View and update data privacy settings
Export data through Logpoint Sync
UEBA
Log Ingestion through Collectors
Collectors retrieve log data and buffer it. A Collector listens on dedicated ports, retrieves logs, normalizes (splits messages into key/value pairs), and forwards logs to a Storage Node. Collectors work together with Windows agents to retrieve, encrypt, buffer, and monitor files and the Windows Registry. Collectors also support static enrichment.
A Collector can be deployed at a remote site to aggregate local log streams and perform caching, buffering, and compression before sending the aggregate stream over a single VPN port to the Search Head.
In a Distributed Environment, add a Logpoint Node and convert it to a Collector or Fetcher.
Storage Nodes or Repos
All ingested logs are stored as flat files in individual repositories (repos) in a NoSQL-based database.
When you setup a repo, configure:
How long to retain or store log data before automatic discard.
Which users or user groups have access to the log data in the repo
Whether log data is replicated so you can still access log data even when a server or repository is down or unresponsive.
What storage tier data is kept from and moved to automatically. For example, moving older data to a cheaper storage tier.
A repo can use multiple storage tiers located on one or more underlying disks because repos are logical spaces rather than physical disk spaces.
Which logs are forwarded to which repos is setup through a Routing Policy that divides incoming log data so it can be forwarded to different repos.
Repos or storage nodes can be located close to their data sources to minimize log traffic egress costs from cloud locations and to minimize network bandwidth requirements. When repos are located close to their data source, only search queries and search responses are transmitted over the WAN.
Your Environment
Environments entirely depend on your data traffic, events per second and geographical location to name just a few. Logpoint Customer Success works closely with our customers to design and apply the right architecture. Your Logpoint Architecture can span On-premise deployments, the Cloud, and off-site locations.
Standalone / All-in-One
Standalone or all-in-one deployments combine collection, normalization, and analytics in a single Logpoint instance.
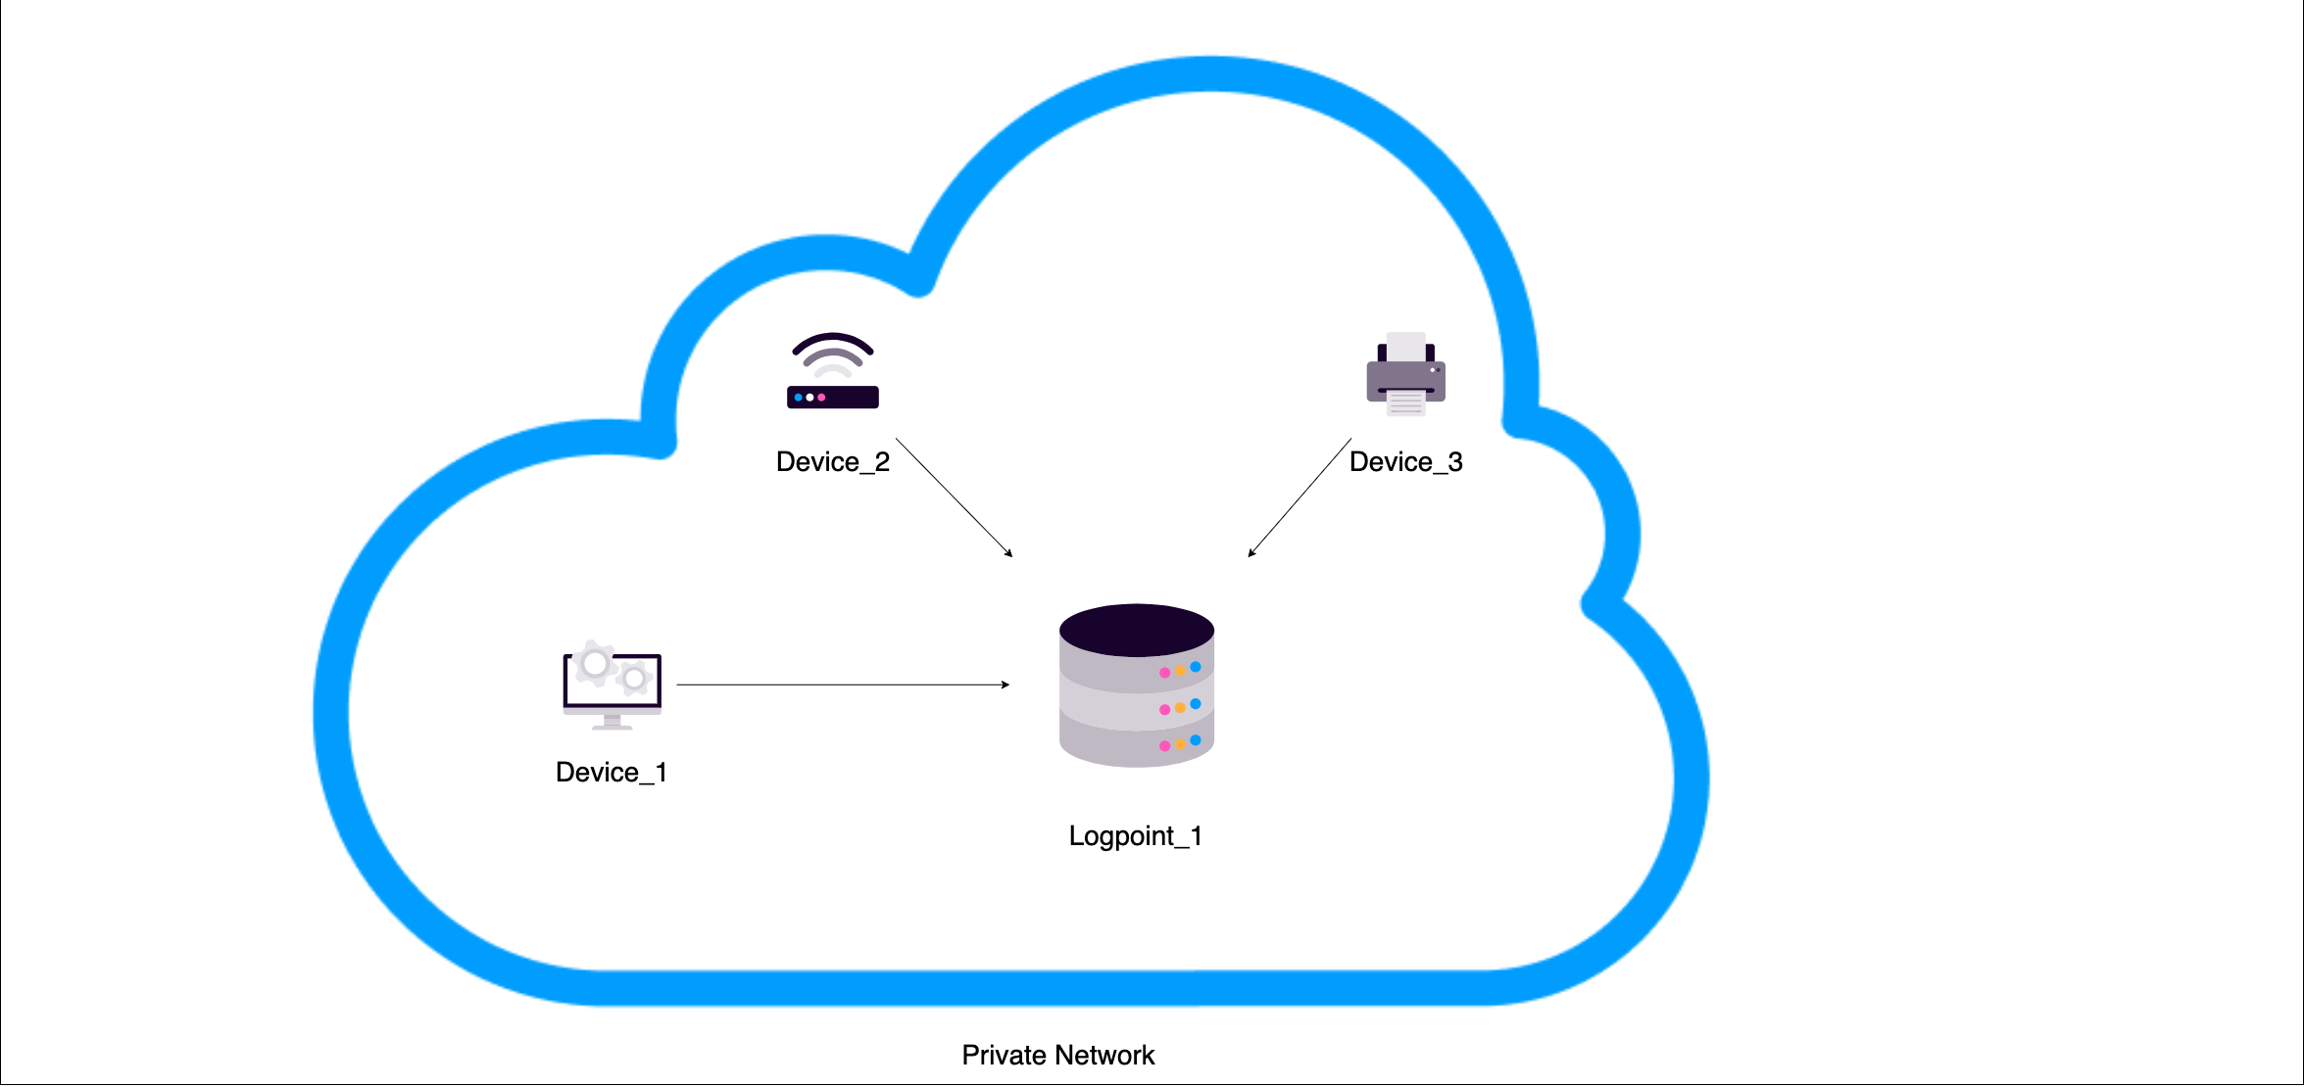
If you have an all-in-one/standalone, the same interface is used to:
Sizing
Considerations before setup:
Geographic Distribution - where the search head(s), data nodes and collectors will be.
Number of events per second - Logpoint can provide you with a spreadsheet to help you or you can also get a general idea using our sizing calculator.
High Availability and load balancing requirements.
Number of live searches you will perform, including dashboards, alert rules, searches and the number of users who will perform these live searches.
Number of SOAR Automation playbooks you will use.
Number of Repos you need.
Log Retention Period.
The following sizing specifications are only guidelines to help you get a general idea of how to size. Your infrastructure and environment may differ.
Logpoint Search Head
Average live searches: 100
Hardware: 4 CPU cores, 18 GB RAM
Typical disk use < 200 GB
Data Node (no collector)
HW for 1000 EPS
8 CPU cores
32 GB RAM
Disk according to type and retention. Compressed logs and indexes take up the same amount of disk space as raw logs stored directly. Even when raw logs are compressed, the index will require a space ratio of 1:1.
HA or shadow repositories require additional resources. Generally speaking, you will need to double the amount of storage and increase CPU cores and RAM.
Collector Node
HW for 1000 EPS
6 CPU cores
16 GB RAM
Sufficient disk space for buffering during lost connectivity
Virtual Logpoint
To use a virtual environment, be aware:
Some virtual environments have a large number of servers sharing disk access, which can impact I/O.
There needs to be enough reserved resources and I/O, or you need to use SSD, if not performance will be poor even if sizing is correctly calculated.
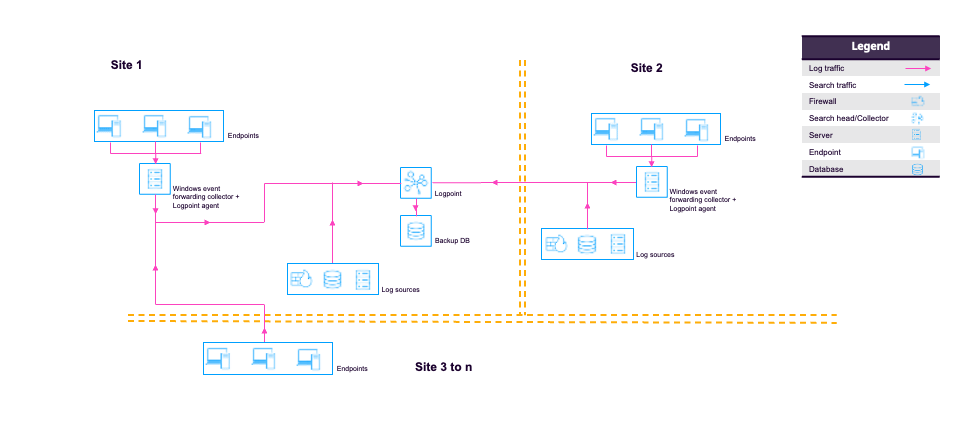
Distributed Logpoint
A full Logpoint server operating with another Logpoint server with Search Head is termed Distributed Logpoint or environment. It segregates indexing and searching between separate instances or servers. The Search Head performs its search searches throughout the logs' index files across your environment's repos.
All Logpoints in a distributed architecture must have the same version of Logpoint installed.
When connecting Search head to Distributed Logpoint, or Collector to Distributed Logpoint, ensure 8443 port is open and https protocol is allowed if there is a firewall between them. For more information, go to Open Firewall Ports.
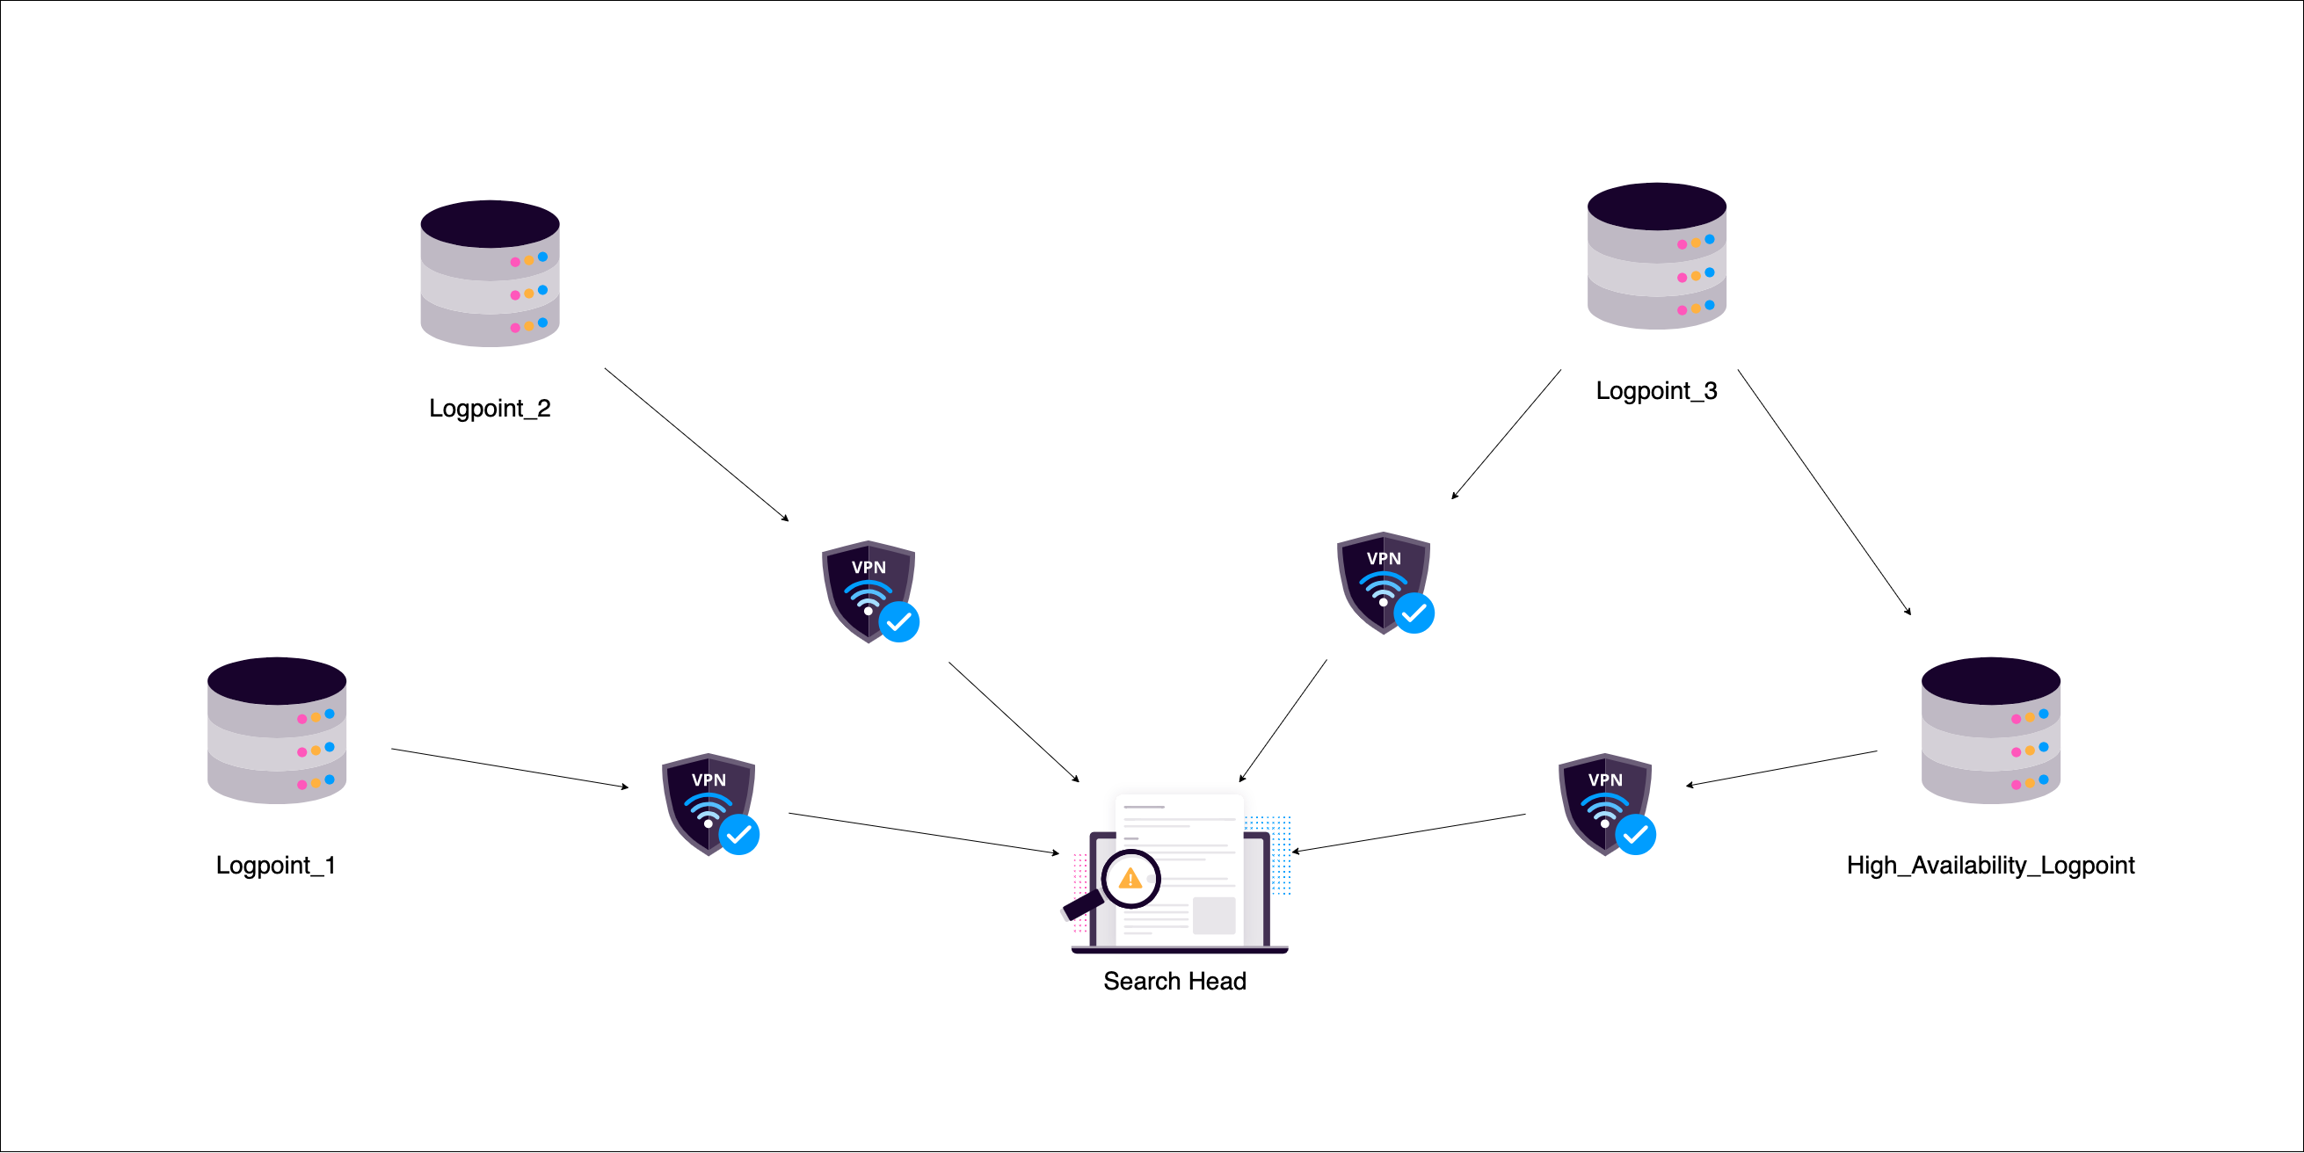
In distributed environments you can connect multiple nodes operating in different modes to store and analyze logs centrally.
High Availability should be configured to duplicate and store configurations and logs as backups.
Setup Distributed Logpoint
Activate Open Door.
Configure the Search Head.
Add Data Node Connections.
Configure Collector and/or Syslog forwarder.
Open Door
Open Door is the gateway for communication between two Logpoints. It must be activated for a Logpoint to be on a distributed architecture. When activated, it creates a virtual interface (tun10000) that allows secure communication between the two Logpoints.
If the connection is between Distributed Logpoint (DLP) server or instance and Search Head, enable Open Door on the server or instance.
If the connection is between Logpoint Collector (LPC) and Search Head, activate Open Door on the Search Head or main Logpoint.
The private network address must be unique for each Logpoint.
Before activating open door, open the following ports:
1194/UDP
Allow Open VPN to access the distributed Logpoint
Inbound for DLP-Search Head connection; Outbound for LPC-Search Head connection
443/TCP (HTTPS)
Secure communication for Logpoint
Allow request/response communication to the Search Head/Main Logpoint from the Distributed Logpoint
Activate Open Door
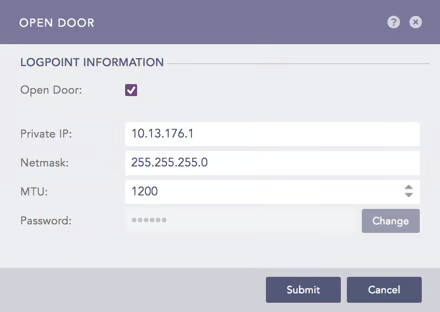
Go to Settings >> System Settings from the navigation bar and click Open Door.
Activate Open Door.
Copy or enter your Private IP address and Netmask. The IP address must end with .1. Remember it as you must add it when configuring the DLP server.
You cannot use the following netmask: 255.255.255.248, 255.255.255.252, 255.255.255.254, 255.255.255.255.
Enter the Maximum Transmissions Unit (MTU) in bytes. This is the maximum packet size that is transferred between Logpoints. The default value is 1500. You can enter a value between 46 and 1500. We recommend you enter a value higher than 1000 to maintain a stable connection. Small values lead to high network overhead, and may cause network failure or instability.
Enter a Password. Remember it as you must add it when configuring the DLP server.
In Logpoint Collector, you must re-enter password under Settings >> Configuration >> Distributed Logpoint in the connected Logpoint Collectors.
In the server or instance in a Distributed Logpoint, you must re-enter password under Settings >> Configuration >> Distributed Logpoint in the main Logpoint.
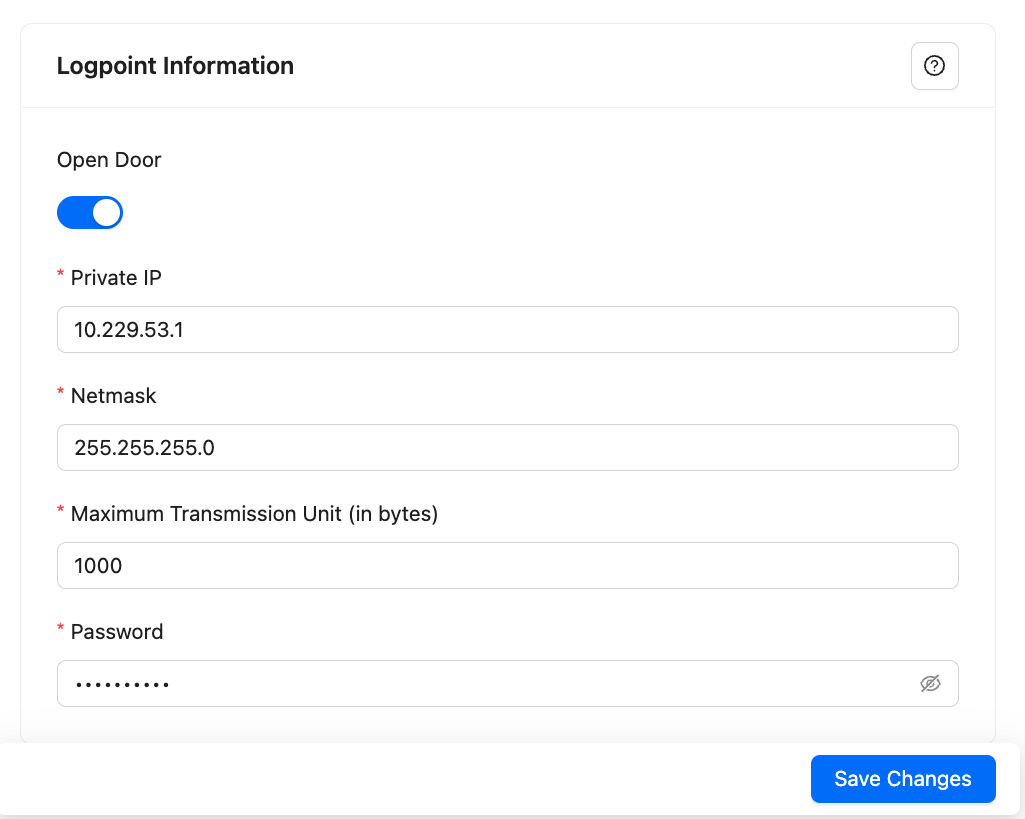
Click Save Changes.
Search Head or Main Logpoint
The Search Head is the user interface where you control and manage all the other Logpoint machines in your environment in addition to all Logpoint products, including SIEM, SOAR Automation and Case Management. You can collect, index, and store logs from multiple Logpoint machines and search through them from a single, main Search Head.
Configure the Search Head
Go to Settings >> System Settings from the navigation bar and click System Settings.
Select General.
Enter a Logpoint Name.
Enter a Browser tab title, a name appended to the tab's title.
Enter or update the Server Alias. Updating it does not update the system IP Address or the DNS.
Identifier is the unique value given to each Logpoint.
Modes ignore. Only relevant for Logpoint Director.
Select the Default Login Screen for the Logpoint.
In Session Inactivity Timeout, Timeout (minutes), enter a specific period of time, in minutes, when Logpoint users are timed out.
Enter the Base Repo Path for High Availability to alter the default path /opt/immune/storage/. It is the base path for the repos from the remote machine.
Select whether the timestamp for searches is:
Collection Timestamp (col_ts) to mark the time when Logpoint collected the log.
Log Timestamp (log_ts) to mark the time when a device generated the log. The time conversion of log_ts occurs when a Normalization Policy is applied to the Collectors/Fetchers.
Choose the Over Scan Period (in minutes and a Time Zone. The overscan period is the extra period (apart from the selected period) when Logpoint searches for logs. Both the col_ts and the log_ts fields are saved in UTC and displayed according to the selected time zone.
Both the log_ts and col_ts key-value pairs are displayed in the search results.
The Time Range is applied either on the col_ts or the log_ts across all the Distributed Logpoints.
Select a Time Zone.
Select Enable SOAR in Logpoint to enable incident investigation with Playbooks and Cases. Go to Getting Started with SOAR for details.
Enabling or disabling SOAR may take some time depending on available memory.
SOAR is always disabled in the Logpoint Collector and Syslog Forwarder modes.
Click Save.
Add Data Nodes
After setting up the Search Head or Main Logpoint, add the additional nodes or distributed Logpoints to create your environment. You will need to add at least one node and then configure it as a collector or forwarder. You can add any additional nodes to make up your environment, you can add data nodes and later convert them to a collector or forwarder. After you have added other nodes, you can switch between them in your main Logpoint. Go to Settings, use the drop-down at the top right.

You can always modify or delete existing nodes.
Adding Data Nodes
Go to Settings >> Configuration from the navigation bar and click Distributed Logpoint.
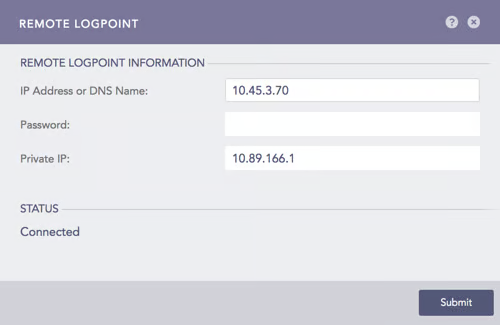
Click Add Remote Logpoint.
Enter the IP Address or DNS Name of the remote Logpoint.
Enter the Password and the Private IP from Enabling Open Door on the remote machine.
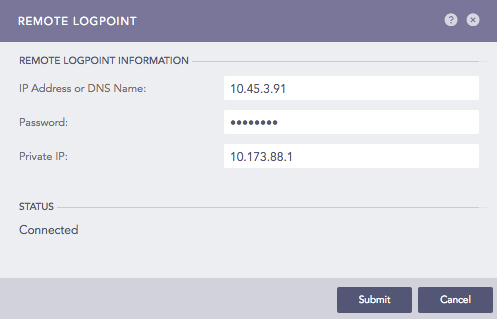
Click Submit.
The status changes to Connected. If it doesn't, refresh the page.
Editing and Deleting a node
Editing a node
Go to Settings >> Configuration from the navigation bar and click Distributed Logpoint.
Click the Name of the Logpoint.
Update the information.
Click Submit.
Deleting a node
Go to Settings >> Configuration from the navigation bar and click Distributed Logpoint.
Click Delete.
Click Yes.
Add a Collector and/or Syslog Forwarder
After you setup the Search Head or main Logpoint and add the nodes for your environment, Setup one of the nodes as a Collector or Syslog Forwarder to get your log data into Logpoint.
Converting Logpoint to a Collector or Syslog Forwarder is done through Modes of Operation.
Modes available:
Logpoint Collector
Syslog Forwarder
You can also convert a regular Logpoint into either a Logpoint Collector or a Syslog Forwarder.
When a Logpoint node accepts incoming log data via Syslog and forwards it to another target, for example a Logpoint Collector you can use a Raw Sys Log Forwarder to export the raw logs to a remote target. Useful when a lot of incoming log streams need to be aggregated and forwarded over the network without each source device having direct connectivity to the destination Logpoint Collector node.
Collector
Collectors ingest normalize, and forward logs to a remote Logpoint. In a standalone Logpoint, add a collector as a device in the Main Logpoint.
Distributed Collectors only collect logs, they have no dashboards. search or report generation capabilities. The remote Logpoint then configures the sources and storage locations for the logs. Before configuring a Distributed Collector, remember to activate Open Door in the remote Logpoint first.
After setting up Distributed Collectors you need to add a device to determine where or from which location the collector will ingest the logs.
You can also add a Syslog Collector Collects logs from the sources that follow the Syslog protocol. These logs are then forwarded to Logpoint for storage and analysis. Users can create syslog collector log sources from scratch or use templates tailored to specific devices or applications.
Set up a Collector
In Main Logpoint, go to Settings >> Configuration from the navigation bar and click Devices.
Click ADD.
Specify the Collector as a Distributed Collector.

To verify the connection between the devices, switch to the Collector Logpoint.
Go to View Devices from the navigation bar.
Converting the Instance or Server to Collector
Go to Settings >> System Settings from the navigation bar and click System Settings.
Select Modes of Operation.
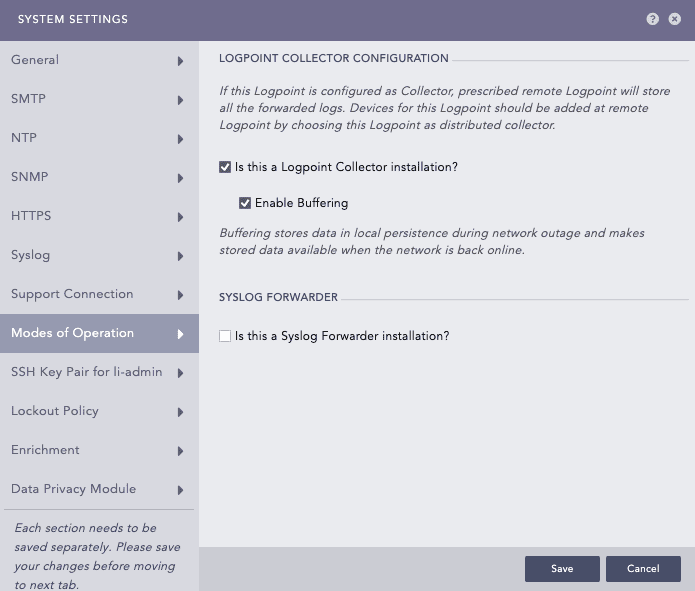
In LOGPOINT COLLECTOR CONFIGURATION, select Is this a Logpoint Collector installation?
Click Enable Buffering to store the data in local persistence storage during a network outage. By default, the logs are stored in the buffer for 7 days. To change the default retention period, contact Logpoint Support.
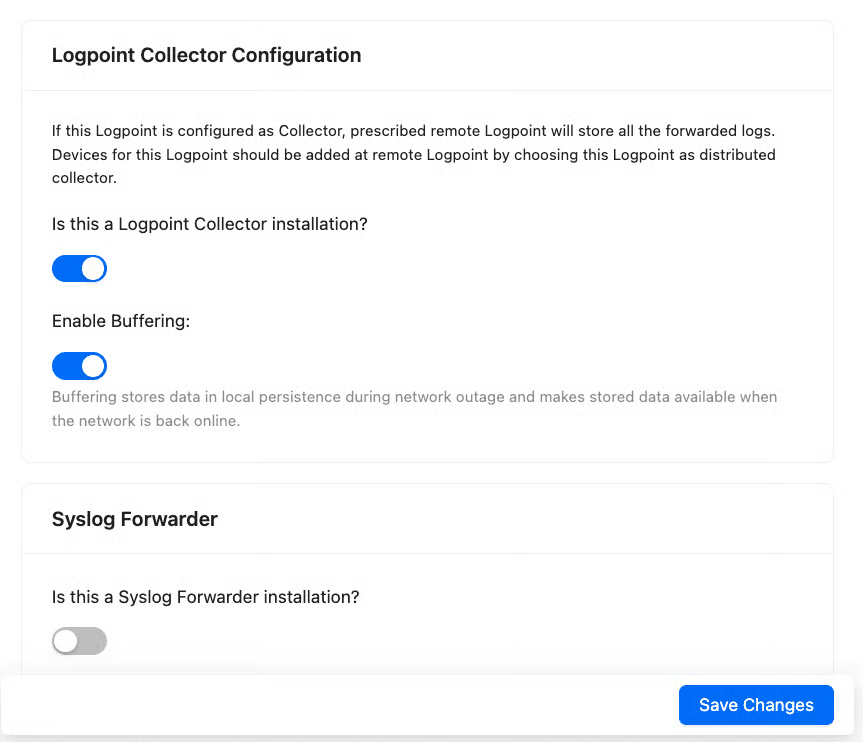
Click Save Changes.
Switch to the Main Logpoint or Search Head.
Go to Settings >> System Settings from the navigation bar and click Open Door.
Select Open Door.
Note the Private IP and the Password.
Go to Settings >> Configuration from the navigation bar and click Remote Logpoint.
Enter the IP Address of the Main Logpoint, the Password, and the Private IP.
The Collector is added under Settings >> Configuration from the navigation bar.
Click Distributed Collector in the Main Logpoint and activate it from the Actions column.
Fetchers
Syslog Forwarder File Fetcher is configured to fetch logs from remote targets. Once fetched, the logs are stored in Logpoint for centralized management and analysis.
Adding a Logpoint Collector in Standalone or All in One Environment
In the Main Logpoint, go to Settings >> Configuration from the navigation bar and click Devices.
Click Add.
Specify the Collector as a Distributed Collector.
To verify the connection between the devices, switch to the Collector Logpoint.
Go to View Devices.
If you disable the Collector, make sure that you remove it from the list of devices on the Main Logpoint.
If you change the password on the Collector machine from Settings >> Remote Logpoint, all the services of the Collector restart. The logs are not collected until the Collectors and Fetchers are up and running.
Configuring Distributed Collectors
Log in to the Logpoint to add as a Collector.
Go to Settings >> System Settings from the navigation bar and click System Settings.
Click Modes of Operation.
Select Is this Logpoint Collector Installation?.
Click Enable Buffering to store data locally during network disruptions and have access to it once the network is restored. By default, the logs are stored in the buffer for 7 days. If you want to change the default retention period, contact Logpoint Support.
Click Save.
Go to Settings >> Configuration from the navigation bar and click Remote Logpoint.
Enter the IP address or DNS Name of the remote Logpoint.
Enter the Password and Private IP provided while enabling Open Door.
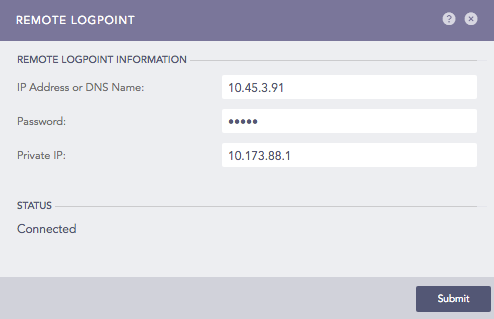
Click Submit.
To view that the collector is added, login to the remote Logpoint and go to Settings >> Configuration>>Distributed Collector. The collector is listed under Distributed Collectors.
Adding Devices
To determine the devices from which a Distributor Collector collects logs, you need to add devices in the remote Logpoint.
To add a device:
In the remote Logpoint, go to Settings >> Configuration from the navigation bar and click Devices.
At the top-left, click ADD.
Enter Name, Device Address(es), Device Groups, and Log Collection Policy.
In Distributed Collector, enter the Logpoint Collector's name.
Select your Time Zone.
Click Submit.
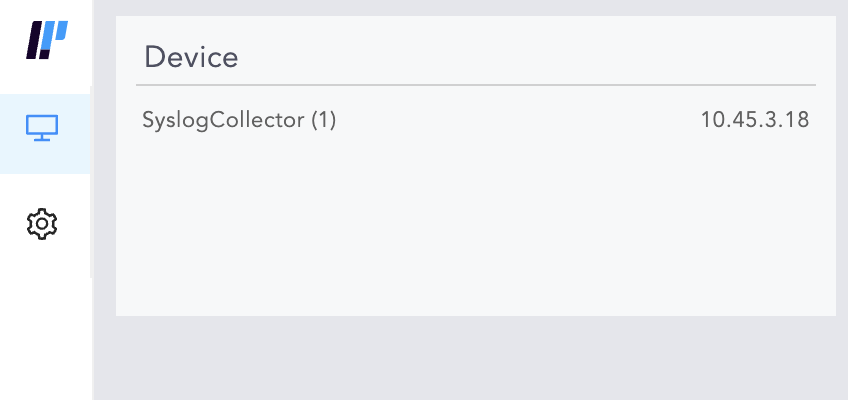
To view the added devices, go to View Devices in the Logpoint Collector.
Syslog Collector
Syslog Collector collects logs from the sources that follow the Syslog protocol. Users can create syslog collector log sources from scratch or use templates tailored to specific devices or applications. Syslog Collector is typically used when logs need to be standardised, normalized, and enhanced before forwarding.
Configuring a Syslog Collector
You can add a custom TLS certificate for log collection via Syslog. The added certificate is used by the Syslog collector to collect logs through TLS on port 6514.
Go to Settings >> System Settings from the navigation bar and click System Settings.
Select Syslog.
Upload your TLS Certificate and Key. The certificate must have the .crt extension and the key must have the .key extension. Only Logpoint Administrators can add a certificate and key. The certificate must be of PEM encoded x.509 standard.
Select Add sequence numbers on log received from syslog collector to enter a sequence number to the syslogs. The number is assigned on a device per protocol basis to each log collected from the Syslog Collector.
In Message length, you can define the size for Syslog messages. The maximum message size can be 64 KB, with a default size of 12 KB. Any message that exceeds the maximum size is divided into multiple events and truncated at the defined size. For example, if the message length is 40 KB, logs larger than that size are chunked into 40 KB segments.
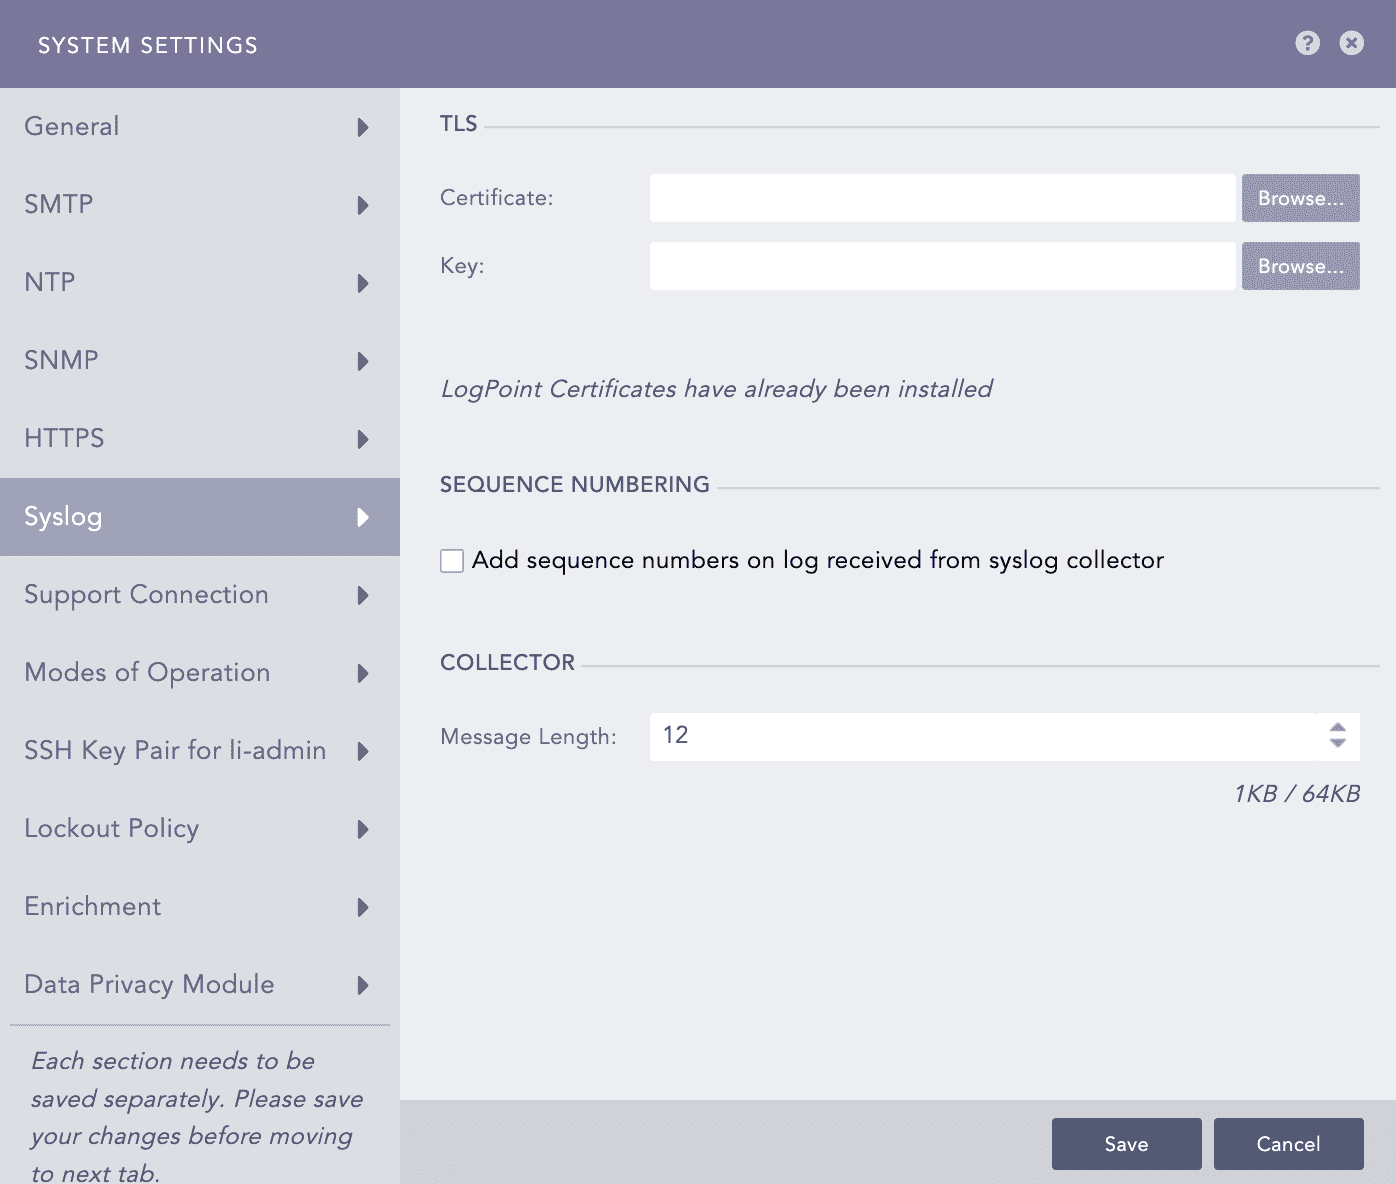
Click Save.
Syslog Forwarder
Syslog Forwarder collects logs from different sources, normalizes them using the signatures applied, and forwards them to a configured Logpoints and a target storage. Unlike Logpoint Collectors, Syslog Forwarder can not act as a buffer.
Syslog Forwarder supports Air Gap. The Main Logpoints are usually located in high-security zones whereas Syslog Forwarders and other devices are in low-security zones.
Converting Logpoint to Syslog Forwarder
Go to Settings >> System settings from the navigation bar and click System Settings.
Select Modes of Operation.
In Syslog Forwarder, select the Is this a Syslog Forwarder installation?.
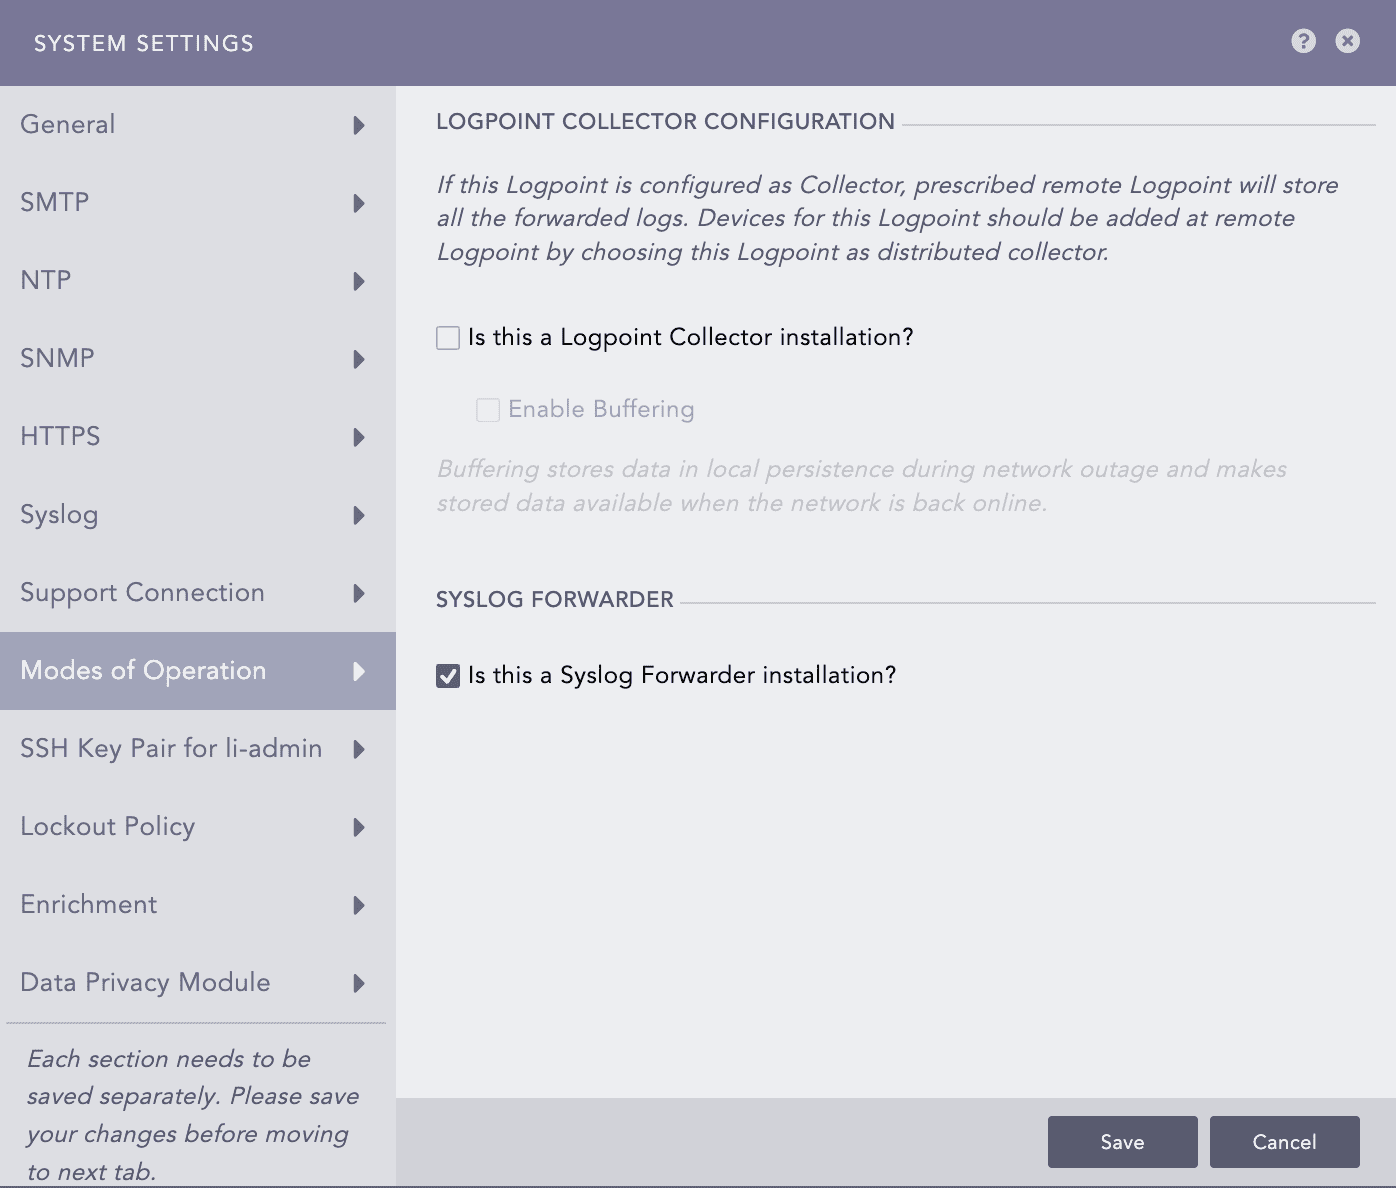
Click Save.
Using a Syslog Forwarder
Before using a Syslog Forwarder:
Export a config file from Main Logpoint
Import the config file on the Syslog Forwarder
Add target(s)
Add target storage for air gap
Add devices
Exporting a config file
Switch to the Main Logpoint and go to Settings >> Configuration from the navigation bar and click Distributed Logpoints.
Add a Syslog Forwarder. See Adding a Syslog Forwarder.
Click the Export configuration icon in the Actions column of the relevant Syslog Forwarder.
The config file is downloaded on your machine.
Save the config file.
Importing a config file
Switch to the Syslog Forwarder and go to Settings >> System Settings from the navigation bar and click Sync.
Click Import Data.
Browse to the config file saved earlier.
Adding a Target
Targets are Logpoints nodes that receive logs from Syslog Forwarder.
On the Syslog Forwarder, go to Settings >> Configuration from the navigation bar and click Syslog Forwarder.
Click Targets.
Click Add IP.
Enter the Name and IP address of the target.
Specify the Pattern of the logs to be forwarded. If you do not specify a pattern, all the logs are forwarded.
Enter a Port number for the input port of the remote target machine.
Select Enable UDP to use the User Datagram Protocol (UDP). TCP is used by default. After selecting UDP, choose the UDP size in bytes.
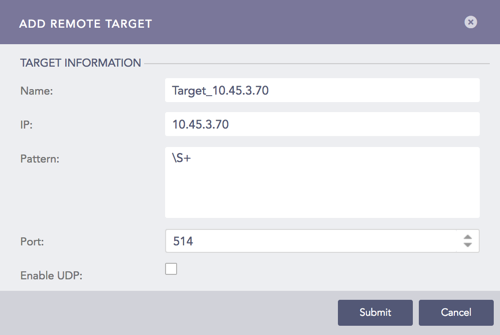
Click Submit.
Adding Target Storage
Target storage enables airgap in low-security zones. You can add multiple Remote Targets but only oneTarget Storage. For each IP added as a Remote Target, add Syslog Forwarder in the target Logpoint.
On the Syslog Forwarder, go to Settings >> Configuration from the navigation bar and click Syslog Forwarder.
Click Targets. Click Add Storage.
Enter a Name for the storage.
Specify the Path to the remote storage. The format should be:
//<IP Address>/<Path>/
For example: //192.168.2.247/storage/
Enter or type the Pattern of the forwarded logs. If you do not specify a pattern, all the logs are forwarded.
Enter a Username and Password.

Click Submit.
Adding a Device
On the Syslog Forwarder, go to Settings >> Configuration from the navigation bar and click Syslog Forwarder.
Click Add.
Device lists all the devices configured as a Syslog Forwarder in the Main Logpoint. To select a device, double-click it.
In Remote Target(s) enter the IP or a remote storage IP address.
Click Submit.
Syslog Forwarder File Fetcher
Syslog Forwarder File Fetcher is configured to fetch logs from remote targets. Once fetched, the logs are stored in Logpoint for centralized management and analysis.
Configuring a Syslog Forwarder
Go to Settings >> Configuration and click on Devices.
Find the Remote Target and click on the "+" icon in the Actions column.
Select Syslog Forwarder File Fetcher.
Enter or type
Charset:
<relevant charset>. Default isutf8.Remote Path:
<remote storage path>Username:
<username of remote machine>Password:
<password of remote machine>
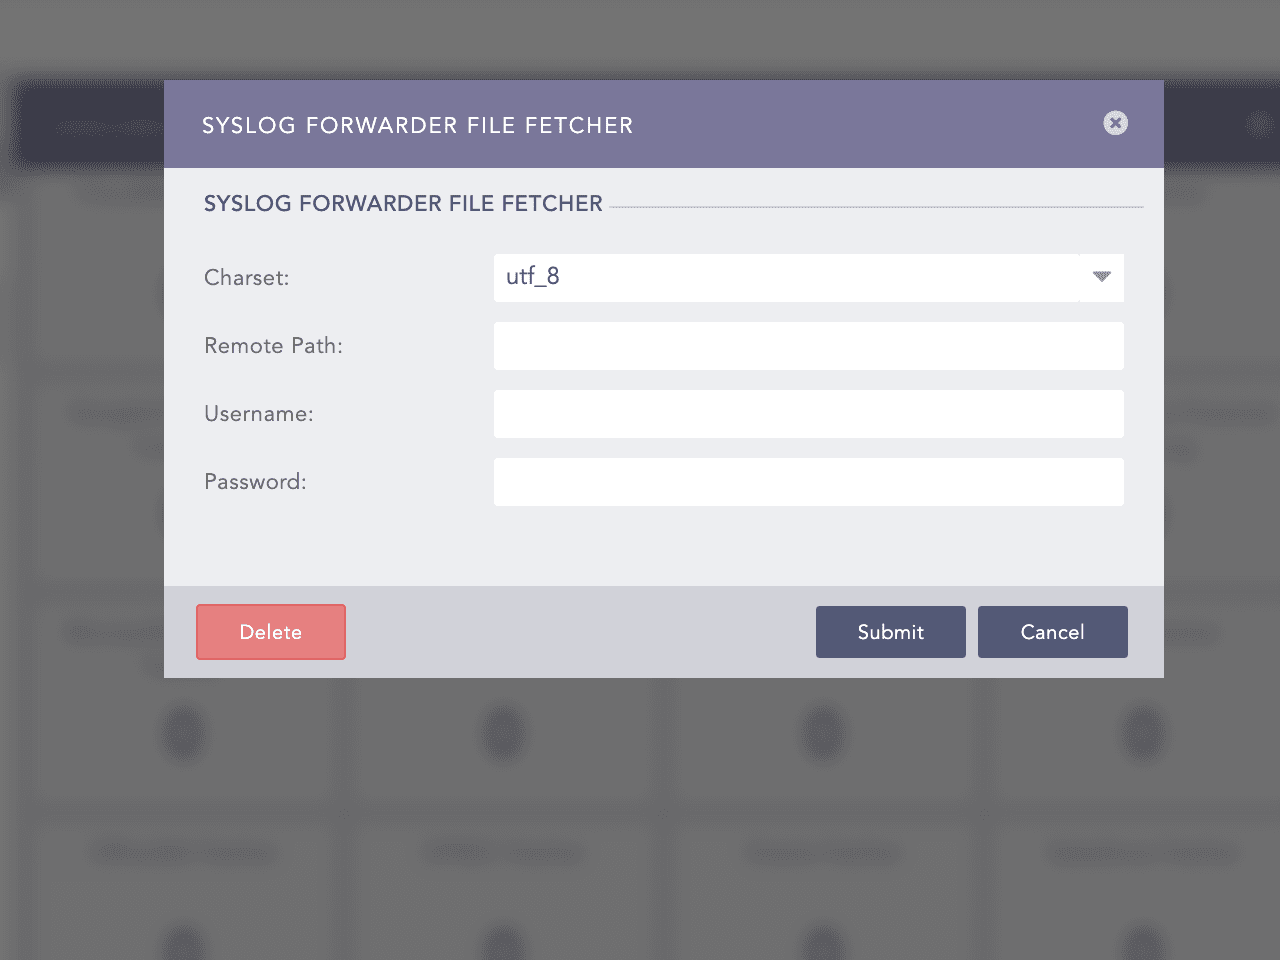
Click Submit.
Raw Syslog Forwarder
Raw Syslog Forwarders collect and forward raw logs from a Logpoint to a remote target.
You can enable IP Spoofing to directly add the log collection devices in the target Logpoint instead of adding them in the raw syslogforwarder and still distinguish the Logpoint where the logs are collected.
To use Raw Syslog Forwarders, you must configure
target(s) or which devices the raw syslog messages are forwarded
device(s) or where Logpoint will collect and forward the raw syslog messages
To view logs forwarded from a localhost, you must add the IP of the Raw Syslog Forwarder to the remote target. You have to add a device in target logpoint and configure its syslog collector to view the logs forwarded from that device. A remote target supports both TCP and UCP for localhost; however, it supports only UDP for other devices.
Adding a Target
Go to Settings >> Configuration from the navigation bar and click Raw Syslog Forwarder.
Click Targets.
Click Add IP.
Provide the Name, IP address, and Port number for the input port of the target.
Select the Protocol to send the syslog message. If you choose TCP IP spoofing is disabled.
Click Submit.
Repeat steps to add more targets.
View Logs in Remote Target
To view logs from localhost, you must add the IP of the Raw Syslog Forwarder to the remote target. You must also configure its Syslog Collector.
When forwarding localhost logs, Logpoint adds additional data in the header and sends the original message in the following format:
Example:
Original: 2016-01-29_06:00:20.70969 Starting report_jobs Forwarded: <13> Jan 29 06:00:25 localhost 2016-01-29_06:00:20.70969 Starting report_jobs.
Editing a Target
Go to Settings >> Configuration from the navigation bar and click Raw Syslog Forwarder.
Click Targets.
Click the Name of the relecant target.
Update the information.
Click Submit.
Deleting a Target
Before you delete a target, make sure it isn't in use.
Go to Settings >> Configuration from the navigation bar and click Raw Syslog Forwarder.
Click Targets.
Click Delete.
Click Yes.
Adding Devices
Go to Settings >> Configuration from the navigation bar and click Raw Syslog Forwarder.
Click Add.
Double-click the devices or device groups to select them. If you select All for a device group, any device added to it in the future is automatically selected as a target.
Select the Remote Target(s).
Enter a regex Pattern to match before forwarding logs. Only the logs matching the specified pattern are forwarded. For example:
[ 0-9 ]+ forwards a log only if a digit is present in logs.
[ a-z A-Z 0-9 ]+ forwards a log only if it contains either a-z, A-Z, or 0-9.
\S+ forwards all the logs.
Click Submit.
The Raw Syslog Forwarder now collects logs from the selected devices and forwards the raw logs to the designated targets.
Editing Devices
Go to Settings >> Configuration from the navigation bar and click Raw Syslog Forwarder.
Click the Device of the required Raw Syslog Forwarder.
Update the information.
Click Submit.
Deleting Devices
Go to Settings >> Configuration from the navigation bar and click Raw Syslog Forwarder.
Click Delete.
To delete multiple Raw Syslog Forwarders, select the concerned forwarders, click More and select Delete Selected.
To delete all the forwarders, click More and select Delete All.
Click Yes
Last updated
Was this helpful?