Authentication
Logpoint Authentication ensures secure, controlled access to Logpoint by verifying user identities before granting access. It supports multiple authentication methods, allowing organizations to align access control with their existing identity management systems. By enforcing role-based access and authentication policies, Logpoint authentication helps protect sensitive data while ensuring users can access only the features and components relevant to their roles.
Available Authentication Methods
Logpoint
Built-in authentication, no external dependencies
LDAP
Centralized user management, group-based access control
RADIUS
Network access control, strong authentication
ADFS
Single Sign-On (SSO), Windows integration
SAML 2.0
Industry standard, supports multiple identity providers
OAuth 2.0
Token-based authentication, third-party integration
LDAP Authentication
LDAP authentication allows Logpoint to authenticate users against your organization's LDAP directory. User credentials and role-based access controls are pulled from the existing LDAP structure.
How It Works
Logpoint connects to the LDAP server using bind credentials
User groups are retrieved from LDAP
LDAP groups are mapped to Logpoint user groups
Users inherit permissions based on their group membership
Supported Login Formats
DN Format
CN=john, OU=people, DC=example, DC=com
sAMAccountName@domain
domain\sAMAccountName
example.com\john
uid@domain
domain\uid
example.com\john
Connection Methods
Simple LDAP
Port: 389
Protocol: Plain LDAP
Library: Python-LDAP
LDAP over SSL
Port: 636
Protocol: LDAPS
Requires: SSL certificate configuration
Configuring LDAP
To configure LDAP in Logpoint, you must create an LDAP strategy. An LDAP strategy is a defined approach for how an organization uses LDAP (Lightweight Directory Access Protocol) to manage user authentication, authorization, and directory data across systems.
After you create the LDAP strategy, map the LDAP groups to Logpoint User Groups. The permission for the LDAP User Group depends on the permissions granted to the Logpoint User group.
Deleting an existing LDAP strategy removes all associated LDAP users along with their personal data from Logpoint.
Creating LDAP Strategy
Go to Settings >> System Settings from the navigation bar and click Plugins.
Find LDAP Authentication and click Manage.
Click Add.
In LDAP STRATEGY INFORMATION, enter the Name and Description for the LDAP strategy.
In LDAP CONNECTION SETTINGS:
Enter the Host/Port address of the LDAP server that authenticates the user.
Enable SSL (Secure Sockets Layer) to establish an encrypted link.
Enter a Bind DN, which is a distinguished name for the LDAP server.
Enter and confirm the Password to authenticate the user.
In LDAP USER/GROUP MAPPING, select either a User or a Group. For the User, enter the memberOf and for the Group, enter the member information.
The fields in USER SETTINGS and GROUP SETTINGS are updated according to the values entered in the LDAP Connection Settings.
The User Base DN is the node where the LDAP users are present.
The Group Mem Attr and the User Name Attr are attributes of the group member and the user provided in the database respectively.
The Filter is the string that filters the user results.
Select the Authenticate Using parameter from the dropdown menu. It is required during login.
Choose dn to use standard DN format for login; uid to use uid for login (uid for Linux system) and SAM Account Name to use SAM Account Name for login (SAM Account Name for Windows).
Group Base DN is the node in which the LDAP groups are present.
Mem Group Attr contains the members belonging to a group.
Group Name Attr is the attribute of the group name provided in the database.
Select a Unique Field for the user. Logpoint uses the value of the selected field to identify each LDAP user uniquely.
The unique field also prevents duplicate user creation when users are moved to a different Organizational Unit (OU) in the LDAP server. If duplicate LDAP users already exist in Logpoint, they must be deleted manually.
Enable or Disable the paginated search. You can choose to paginate the search if the remote server offers a paginated search service.
In SETTINGS, enter the Username Template and the Fullname Template in the jinja format.
For example: If the user attributes inside Active Directory is displayName, FirstName and LastName then:
Username Template = {{displayName}}
Fullname Template = {{FirstName}} {{LastName}}
Click Submit.
Mapping LDAP Groups to Logpoint User Groups
Click the Map LDAP Groups to Logpoint User Groups (mapping) icon in Actions.
LDAP GROUPS lists all the LDAP Group Names. Select the group name to edit.
In EDIT LDAP GROUP, the LDAP Group Name and LDAP Group DN are auto-filled. Select a Logpoint User Group and TimeZone from the dropdowns.
Click Submit. LDAP GROUPS now displays the User Group and Timezone information for the edited group.
Accessing Logpoint via LDAP Authentication
Once LDAP authentication is configured, users authenticate to Logpoint using their directory credentials, with the LDAP server verifying their identity and group memberships to determine appropriate access levels.
Log in via LDAP
Go to Settings >> System Settings from the navigation bar and click Plugins.
Find LDAP Authentication and click Manage.
Click Settings.
Select your domain from the Default Domain dropdown.
Click Save.
Go to the Logpoint login page and click Other Authentication Options.
Select LDAP Authentication.
Enter the Username and Password.
Click Login.
RADIUS Authentication
RADIUS authentication enables Logpoint login using credentials from a RADIUS server, commonly used for network access control and multi-factor authentication.
To use RADIUS authentication, you must first add RADIUS Server details to Logpoint so the system can establish a secure connection between Logpoint and your RADIUS server. The RADIUS server then validates user credentials and returns role information that Logpoint uses to determine appropriate access levels.
RADIUS authentication supports role-based access control through mappings that connect RADIUS user roles to Logpoint user groups, ensuring users automatically receive the correct permissions based on their organizational role. For flexibility, configure multiple RADIUS servers with priority-based failover, define a default user group for unmapped roles, and customize attribute interpretation using RADIUS dictionary files to support vendor-specific configurations. Once operational, users authenticate seamlessly through the Logpoint login interface using their standard RADIUS credentials, with Logpoint automatically creating and managing user accounts while enforcing the permissions defined by their role mappings.
Prerequisites
RADIUS server IP address and secret passphrase
CSV file with RADIUS users and their roles
RADIUS dictionary file (default provided or custom)
Install RADIUS Authentication
Go to the Marketplace and download the RADIUS Authentication .pak file.
In Logpoint, go to Settings >> System Settings from the navigation bar and click Applications.
Click Import.
Browse to the downloaded .pak file and click Upload.
After installing it, you can find it under Settings >> System Settings >> Plugins.
Adding RADIUS Server Details to Logpoint
Go to Settings >> System Settings from the navigation bar and click Plugins.
Find Radius Authentication and click Manage.
Click Add Server.
Enter the radius Server IP Address.
Enter the Secret passphrase of the RADIUS server.
Set the Priority of the radius server, 1 being the highest priority.
Click Save.
In DEFAULT SETTINGS, select a Logpoint user group as the Default Role.
Enter the Role Attribute.
Click Save.
Mapping Roles
Map the radius server roles to a Logpoint user group to define access permissions in Logpoint.
Go to Settings >> System Settings in the navigation bar, and click Plugins.
Find Radius Authentication and click Manage.
Click ROLES MAPPING.
In the Radius Role, enter the role of the user in the radius server.
Select a Logpoint User Group to assign to the Radius role.
Click Add. A table lists the mapped RADIUS roles and LogPoint user groups. You can edit or delete the added role mappings from the table.
Click Submit.
Importing Roles Map
A roles map file maps RADIUS users to their respective RADIUS roles in a Comma-Separated Values (CSV) format. To assign multiple roles to a user, separate the roles by a colon (:) in the roles map file. The CSV file must be created without a header row. If a header is included, it is processed as a valid RADIUS role entry.
Click Import Roles Map.
Browse the roles map file (CSV) and click Submit.
Default Dictionary
The RADIUS dictionary file maps the attribute numbers in the RADIUS packet to a descriptive name. Using the dictionary, you can define data types for different attributes or define new attributes of the RADIUS packets.
Radius Authentication includes a dictionary file by default, which is located at:
Default dictionary file:
You can also import a vendor-specific dictionary file.
Importing Dictionary
Go to Settings >> System Settings from the navigation bar and click Plugins.
Find Radius Authentication and click Manage.
Click IMPORT DICTIONARY.
Browse and open the dictionary file. The name of the dictionary file must be dictionary.
Click Submit.
Manage Radius Authentication Users
RADIUS users can be deactivated, reactivated, or permanently deleted from Logpoint, depending on your administrative requirements.
Manage a User
Go to System Settings >> User Accounts >> Users.
In the Plugin Users, click RADIUS Authentication.
Click the Deactivate User icon next to the user to deactivate.
Deactivated users are prevented from logging in but remain in the system for record-keeping.
Enter your administrator credentials and click OK.
Click Manage De-Activated Users.
Click the Activate icon or the Delete icon to activate or delete the deactivated user, respectively.
Accessing Logpoint via Radius Authentication
Once radius authentication is configured by adding the RADIUS server details, users authenticate to Logpoint with their network credentials, and the RADIUS server validates their identity and access permissions in real time.
Log in via Radius Authentication
Go to the Logpoint login page and click Other Authentication Options.
Select RADIUS Authentication.
Enter the Username and Password.
Click Login.
After you log in, the system adds “radius_” as a prefix to your username. For example, if you log in as “bob” , Logpoint updates your username as “radius_bob.”
If you have configured Duo Security in your Logpoint, verify with the Duo’s two-factor authentication. Go to Duo Security Guide for more information.
ADFS Authentication
ADFS Authentication enables seamless single sign-on (SSO) for Logpoint using Microsoft Active Directory Federation Services. Users authenticate with their existing Active Directory credentials, eliminating the need for separate Logpoint passwords while maintaining centralized access control and security policies.
To use ADFS authentication, you must first add your ADFS server details to Logpoint to establish a secure connection. When users log in, the ADFS server validates their credentials and returns role information that determines their access levels in LogPoint.
Through role mappings, you can connect ADFS user roles to Logpoint user groups, ensuring users automatically receive appropriate permissions based on their organizational role. LogPoint automatically creates and manages user accounts, enforcing the permissions defined by these role mappings.
Prerequisites
Administrative access to ADFS server
A configured ADFS server (see Microsoft ADFS documentation)
Duo Security account credentials if implementing Multi-Factor Authentication
Install ADFS Authentication
Go to the Marketplace and download the ADFS Authentication .pak file.
In Logpoint, go to Settings >> System Settings from the navigation bar and click Applications.
Click Import.
Browse to the downloaded .pak file and click Upload.
After installing it, you can find it under Settings >> System Settings >> Plugins.
Adding ADFS Server Details to Logpoint
Go to Settings >> System Settings from the navigation bar and click Plugins.
Find ADFS Authentication and click Manage.
Click Add Server.
Enter a unique Server Name.
Enter the fully qualified domain name of your ADFS server in the ADFS URL text box. Logpoint users will be redirected to this domain for authentication.
Copy the automatically generated ADFS Endpoint URL, which is required while configuring Logpoint in your ADFS server.
While adding Logpoint as a Relying Party Trust in the ADFS server, on the Configure URL page, select Enable support for the SAML 2.0 Web SSO protocol and provide the ADFS Endpoint URL in the Relying Party SAML 2.0 SSO service URL.
Enter the Relying party identifier in the Issuer text box. Find it under Identifier in the Relying Party Trust panel of your ADFS server.
Provide the token-signing certificate of your ADFS server in the ADFS Certificate text box. Retrieve the certificate from the Certificates panel on the ADFS server, export it in Base-64 encoded X.509 (.CER) format, and paste the certificate content into the ADFS Certificate text box.
Enter the Response Username Field and Response Role Field, which are used to extract the username and role from the ADFS server.
After adding Logpoint as a Relying Party Trust on the ADFS server, create claim rules for the username and role. When defining the rules, map the appropriate LDAP attributes to two outgoing claim types: one for the user role (Role) and the other for the username (e.g., a suitable attribute).
Once the claim rules are created, open the Edit Claim Rules page and select the relevant rule. Click View Rule Language. The values specified in the types parameter correspond to the Response Username Field and Response Role Field.
Click Save.
Click the Default Settings.
Select a Logpoint user group as the Default Role. The application assigns the user group to the ADFS users whose role attribute has not been returned by the ADFS server.
Click Save.
Mapping Roles
Map the ADFS server roles to a Logpoint user group to define access permissions in Logpoint.
Go to Settings >> System Settings in the navigation bar, and click Plugins.
Find ADFS Authentication and click Manage.
Click ROLES MAPPING.
In the ADFS Role, enter the role of the user in the ADFS server.
Select a Logpoint User Group to assign to the ADFS role.
Click Add. A table lists the mapped ADFS roles and Logpoint user groups. You can edit or delete the added role mappings from the table.
Click Submit.
Mapping roles in the ADFS Authentication application is mandatory.
The ADFS role to Logpoint user group mapping is one-to-one, which means you can map an ADFS role to a single Logpoint user group only.
Manage ADFS Authentication Users
ADFS users can be deactivated, reactivated, or permanently deleted from Logpoint, depending on your administrative requirements.
Manage a User
Go to System Settings >> User Accounts >> Users.
In the Plugin Users, click ADFS Authentication.
Click the Deactivate User icon next to the user to deactivate.
Deactivated users are prevented from logging in but remain in the system for record-keeping.
Enter your administrator credentials and click OK.
Click Manage De-Activated Users.
Click the Activate icon or the Delete icon to activate or delete the deactivated user, respectively.
Accessing Logpoint via ADFS Authentication
Once ADFS authentication is configured by adding the ADFS server details, users experience a seamless single sign-on workflow when accessing Logpoint. Ensure the time zones of the ADFS server and Logpoint are identical during login.
After you log in with the ADFS Authentication, you get signed into Logpoint for a period of session time. You can define the session time in the ADFS server.
Log in via ADFS Authentication
Go to the Logpoint login page and click Other Authentication Options.
Select ADFS Authentication.
Click Login.
Enter the ADFS Username and Password.
Click Sign in.
After you log in, the system adds adfs as a prefix to your username. For example, if you log in as Bob, Logpoint updates your username as adfs_bob.
If you have configured Duo Security in your Logpoint, verify with the Duo’s two-factor authentication. Go to Duo Security Guide for more information.
SAML Authentication
SAML (Security Assertion Markup Language) Authentication enables users to log into Logpoint using SAML Identity Providers (IdPs), implementing single sign-on and optional multi-factor authentication.
Supported Identity Providers
Logpoint supports SAML v2 compliant Identity Providers, including:
Microsoft’s Active Directory Federation Services (ADFS)
OneLogin
IdentityServer4
Shibboleth
Ping Identity
CyberArk
Ilex
Prerequisites
Administrative access to Logpoint and SAML Identity Provider
Synchronized time zones between the IdP server and Logpoint
SAML Toolkit application registered in Azure Enterprise Applications
User accounts in Azure Active Directory
Users or group's access to the Logpoint SAML Authentication
SAML configured as the single sign-on method
Install SAML Authentication
Go to the Marketplace and download the SAML Authentication .pak file.
In Logpoint, go to Settings >> System Settings from the navigation bar and click Applications.
Click Import.
Browse to the downloaded .pak file and click Upload.
After installing it, you can find it under Settings >> System Settings >> Plugins.
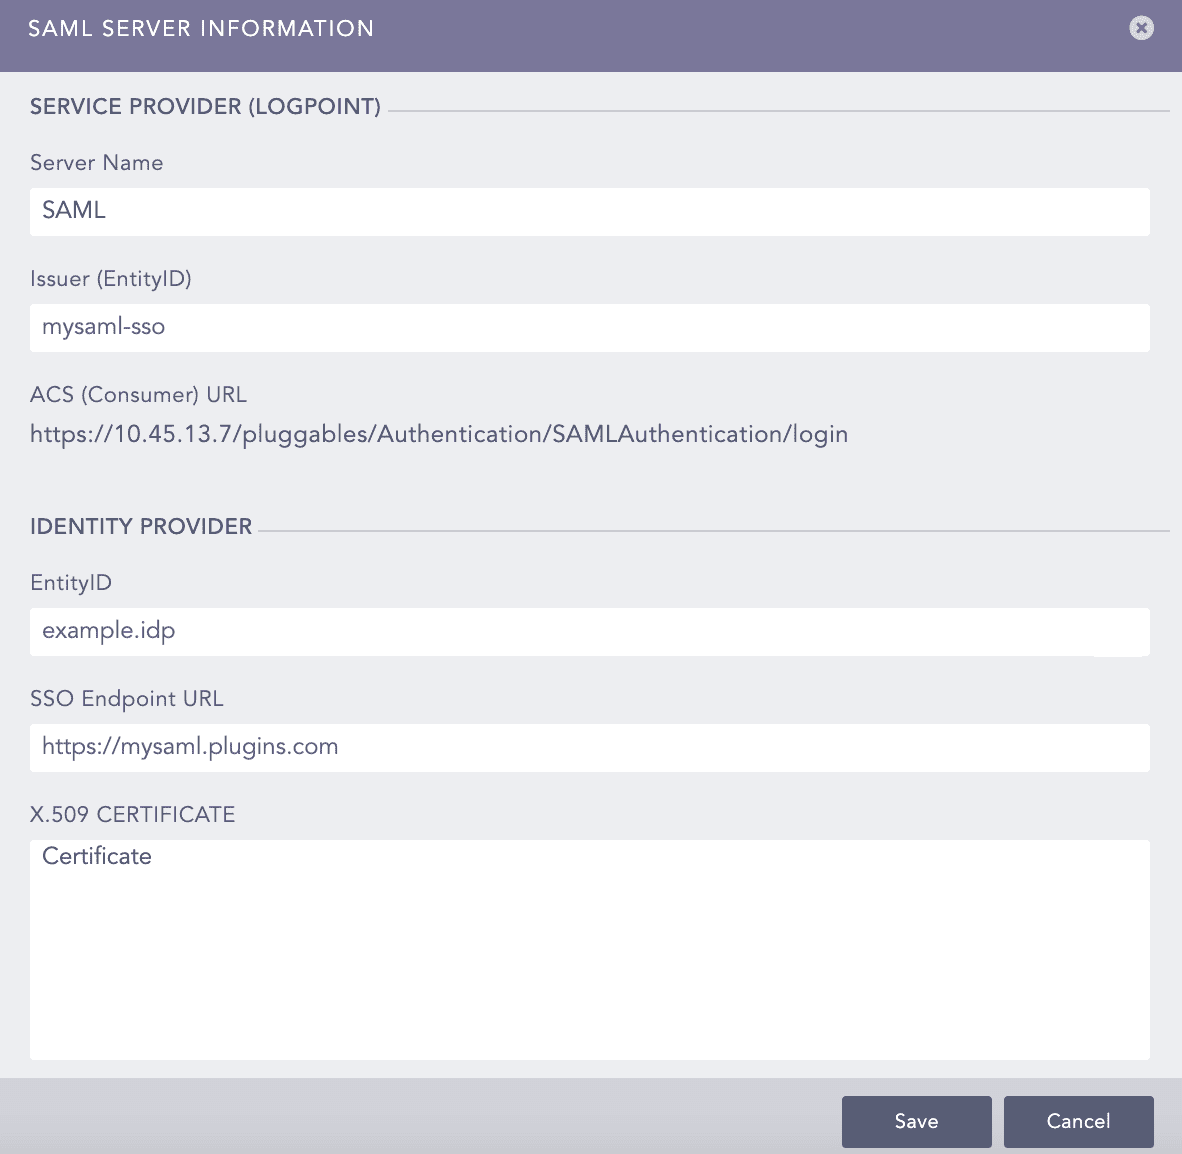
Adding SAML Server Details to Logpoint
Go to Settings >> System Settings from the navigation bar and click Plugins.
Find SAML Authentication and click Manage.
Click Add Server.
Enter a unique Server Name.
In Issuer (EntityID), enter the Logpoint’s IP address. You must add these Issuer (EntityID) and ACS (Consumer) URL in your IdP server. For Shibboleth, you must download the Logpoint metadata file and upload it in its server.
SAML Authentication generates the ACS (Consumer) URL automatically.
Enter the EntityID. Find it in your IdP metadata file as entity ID.
Enter the SSO EndPoint URL. You can find it in your IdP metadata file as Location in SingleSignOnService. The SingleSignOnService must be HTTP-POST.
Enter the X.509 Certificate. You can find it in your IdP metadata file as the signing certificate. For Shibboleth, you can find it as the FrontChannel signing certificate.
In Response Username Field, enter the field to extract the username from the SAML response.
In Response Role Field, enter the field to extract the role from the SAML response.
Click Save.
Click Yes to make SAML authentication the default authentication. Otherwise, click No.
Click Default Settings.
Select a Logpoint user group as the Default Role. SAML Authentication assigns the user group to the SAML Authentication users whose role attribute are not returned by the IdP server.
Click Save.
To download the Logpoint Metadata, click the Download icon from Actions.
Mapping Roles
Map the SAML roles to a Logpoint user group to define access permissions in Logpoint. A SAML role can be mapped to a single Logpoint user group only.
Go to Settings >> System Settings in the navigation bar, and click Plugins.
Find SAML Authentication and click Manage.
Click ROLES MAPPING.
Enter a SAML Role.
Select a Logpoint User Group for the provided SAML role.
Click Add. A table lists the mapped SAML roles and Logpoint user groups. You can edit or delete the added role mappings from the table.
Click Submit.
Manage SAML Authentication Users
SAML users can be deactivated, reactivated, or permanently deleted from Logpoint, depending on your administrative requirements.
Manage a User
Go to System Settings >> User Accounts >> Users.
In the Plugin Users, click SAML Authentication.
Click the Deactivate User icon next to the user to deactivate.
Deactivated users are prevented from logging in but remain in the system for record-keeping.
Enter your administrator credentials and click OK.
Click Manage De-Activated Users.
Click the Activate icon or the Delete icon to activate or delete the deactivated user, respectively.
Accessing Logpoint via SAML Authentication
If you have selected SAML Authentication as the default authentication, Logpoint redirects you to the IdP authorization server. You can log into Logpoint using the IdP server credentials.
Log in via SAML Authentication
Go to the Logpoint login page and click Other Authentication Options.
Select SAML Authentication.
Click Login.
Log in using your IdP credentials.
After you log in, the system adds saml_ as a prefix to your username. For example, if you log in as Bob, Logpoint updates your username as saml_bob.
OAuth Authentication
OAuth authentication enables users to log in to Logpoint using OAuth 2.0, allowing secure access through an external authorization server. Instead of using local credentials, OAuth 2.0 relies on authorization tokens to grant authenticated access to Logpoint.
Prerequisites
A registered OAuth application for Logpoint
Client ID and Client Secret
Authorization and token endpoint URLs
A configured redirect (callback) URL
Install OAuth Authentication
Go to the Marketplace and download the OAuth Authentication .pak file.
In Logpoint, go to Settings >> System Settings from the navigation bar and click Applications.
Click Import.
Browse to the downloaded .pak file and click Upload.
After installing it, you can find it under Settings >> System Settings >> Plugins.
Adding OAuth Server Details to Logpoint
Go to Settings >> System Settings from the navigation bar and click Plugins.
Find OAuth Authentication and click Manage.
Click Add Server.
Enter a unique Server Name.
Enter the ID provided by OAuth to the registered clients in Client ID.
Enter the password for OAuth in Client Secret.
Enter the OAuth Authorization Endpoint, Token Endpoint and User Info Endpoint.
Enter the Redirect URL. It is the Logpoint URL where OAuth redirects after verifying the access token and users information.
Enter the Role Field. It is used to extract roles from the OAuth response.
Click Save.
Click Yes to make OAuth the default authentication. Otherwise, click No.
Click Default Settings.
Select a Logpoint user group as the Default Role.
Click Save.
Mapping Roles
Map the OAuth roles to a Logpoint user group to define access permissions in Logpoint. A OAuth role can be mapped to a single Logpoint user group only.
Go to Settings >> System Settings in the navigation bar, and click Plugins.
Find OAuth Authentication and click Manage.
Click ROLES MAPPING.
Enter an OAuth Role.
Select a Logpoint User Group for the provided OAuth role.
Click Add. A table lists the mapped OAuth roles and Logpoint user groups. You can edit or delete the added role mappings from the table.
Click Submit.
Manage OAuth Authentication Users
OAuth users can be deactivated, reactivated, or permanently deleted from Logpoint, depending on your administrative requirements.
Manage a User
Go to System Settings >> User Accounts >> Users.
In the Plugin Users, click OAuth Authentication.
Click the Deactivate User icon next to the user to deactivate.
Deactivated users are prevented from logging in but remain in the system for record-keeping.
Enter your administrator credentials and click OK.
Click Manage De-Activated Users.
Click the Activate icon or the Delete icon to activate or delete the deactivated user, respectively.
Accessing Logpoint via OAuth Authentication
If you have selected OAuth Authentication as the default authentication, Logpoint redirects you to the login page of the authorization server. Log in using the OAuth credentials.
Log in via OAuth Authentication
Go to the Logpoint login page and click Other Authentication Options.
Select OAuth Authentication.
Click Login.
Log in using your credentials.
After you log in, the system adds oauth_ as a prefix to your username. For example, if you log in as Bob, Logpoint updates your username as oauth_bob.
Was this helpful?