Alert Detections
Alert Rules or Detections check log events as they occur and generate an incident if the conditions of the rule match a defined activity. They can be based on any detector or Logpoint query and are usually used to check log events for signs of malicious activity, or for certain operational messages and thresholds. At the same time an alert is generated, an incident correlating to the alert is also created.
Alert Rule criteria specifies the exact conditions or thresholds that must be met for the alert to trigger an incident. It is the logic of when the alert should trigger, typically based on log count metrics from the query in the Alert Rule. The condition of the Alert Rule is the level of risk combined with the number of times risky behaviour is detected.
Alerts Rule Detections are grouped or organized into:
Vendor Rules: Predefined alert rules that are included with some Log Source integrations. Logpoint maintains these detections, including alerts mapped to the MITRE ATT&CK framework and other common cyber-threat indicators.
My Rules: Alert rules that you create and own. You can build them from scratch or clone an existing vendor rule and modify it to create a new detection.
Shared Rules: Alert rules shared by multiple Logpoint users. You can clone a shared rule and customize it to create your own detection.
Used Rules: Alert rules that are currently active. This view helps you identify which rules are contributing to ongoing security monitoring.
Transferred Rules: Alert rules whose ownership has been transferred to you to support consistent ownership, proper access control, and centralized rule management.
View Existing Alert Rule Detections
View the Alert Rule list in either:
The Tabular View, which lists Alert Rule Detections and is displayed by default. Using the Tabular View list you can:
Filter and sort the contents
Create a new alert rule
Share alerts with other users
Unshare alerts
Transfer ownership
Clone an Alert Rule
Export & Import Alert Rules
Perform a search based on the alert
Change the timeframe and/or repo of the alert rule search
Edit an Alert Rule
Activate, Deactivate, and Delete an Alert Rule
Coverage View arranges and maps Logpoint Alert Rules to the MITRE ATT&CK Framework.
Drill down into each tactic and technique to see which alert rules detect them.
Activate an alert rule if it is not active
Filter and Sort the List
There are a large number of Detections/Alert Rules. To help you find the alert rule easily, you can filter the list according to what type of rule it is, filter the list according to the column names, or only view active alert rules.
Filtering and Sorting the Alerts List
Go to Settings >> Knowledge Base from the navigation bar and click Alert Rules.
At the top left, click All Rules and select which views to view. Select Vendor, My rules, Shared Rules, Used Rules, and Transferred Rules.
To sort the list, click on a column name to sort the list in ascending or descending order.
At the top right, select FILTER ACTIVE RULES to only view the Detections/Alert Rules that are in use.
Create an Alert Rule
Either:
Go to Settings >> Knowledge Base from the navigation bar and click Alert Rules. Click Add.
Go to a Dashboard or Search Template widget, click the drop-down. Click Alert.
In Create New Alert, click Parameters.
Enter a Name and Description.
In Query, enter an alert query or use the following query. If you are creating an alert rule from a widget, the widget’s query is auto-filled in the alert rule.
Click Browse to select a query based on:
Search History: Recent search queries.
Saved searches: Queries you saved.
Vendor searches: Integration-specific searches that are part of a log source.
Search Labels: To select a search based on Labels.
Live Searches: Queries from other alerts.
If your query is long, click Expand. Click Collapse to return to the default view.
Click Repos to select which repos to run the query on.
In Query Time-range, select the period of time or when to run the query. For example, when the query time range is set to 3 days, Logpoint will search for logs from the last 3 days. You can set a time range in either minutes, hours, or days. The maximum time range limit is 30 days or its equivalent in hours and minutes.
In Results Limit, enter the maximum number of logs to retrieve. If you are using an aggregation query, you can't apply a result limit.
If Data Privacy is applied, Data Privacy Module: Alert Using Original data is automatically turned on, and data is encrypted. To decrypt query data, disable it.
With Data Privacy, the values for all the configured Data Privacy Module fields are encrypted. For queries that search for specific field values, an incident is not generated. However, for queries that search for all values, an incident is generated with encrypted fields. For example, if the device_name is encrypted under Data Privacy, the query device_name=localhost won't generate an incident. However, the query device_name=* will return incidents with encrypted values.
Select the Search Intervalin minutes. For example, if you set the search interval to two, Logpoint performs the search every two minutes. The search interval maximum is 1440 minutes. The search interval must be a factor of the Query Time-range. If it isn't, then the correct factor is used. For example, for a 2-day or 2880-minute time range, the maximum number of minutes is 1440, or 24 hours, so you can apply a search interval of once a day. Ensuring the search interval is a factor of the Time range improves performance.
You can't apply a search interval to a correlation query.
To ensure all relevant logs are collected before generating an incident, enter a Delay Alert in minutes. Delay Alert should be a multiple of the Search Interval. For example, if the search interval is 5 min, the delay alert should be 5, 10, or 15 minutes. The maximum value for the Delay Alert is 24 hours. You can apply a Delay Alert only to log_ts-based searches.
To ensure the next alert is triggered only by new log events, Enable Flush On Trigger.
To ensure that Logpoint does not create multiple alerts for the same log events during a specific time frame, in Alert Throttling, select the field and the period of time in minutes. When an alert is triggered based on that field, a new alert won't be triggered until the time you set has passed.
Click Criteria. Criteria specifies the exact conditions or thresholds that must be met for the alert to trigger an incident. This is typically based on log count metrics from the query in the Alert Rule. When an alert rule detects a potential threat, Logpoint uses the Alert Rule's criteria together with a device's Risk Values to determine the overall risk severity. For example, if the criteria is set to trigger an alert when the number of failed login attempts exceeds 100 in 5 minutes, an alert is only generated when that happens. Risk Calculation Function determines which severity level to select when comparing the risk level of the threat together with the risk level of the device.
In Condition, select a mathematical function and then the number of logs to apply it to.
In Risk, select how serious the risk level or severity of the detection or threat.
In Risk Calculation Function, select:
Maximum to mark the alert with the greater risk when comparing the threat with the device.
Minimum to mark the alert as having a lower risk when comparing the threat to the device.
Average to find the average between the threat and the device.
Go to or click Metadata.
In ATT&CK Techniques, select the MITRE tactics to categorize the alert. You can select more than one.
In Additional Meta-Data, enter key-value pairs to apply additional categories to the alert. You can't use reserved Jinja placeholders or leave a key or value in a key-value pair blank.
Use Log Source to link a log source to the Alert Rule.
Go to or click Ownership. Users who belong to Incident User Groups assign the Alert rule to a user, user group, or themselves. Assigned users can reassign, comment on, and view the generated incident data. They can also resolve the alert. If you do not belong to an incident user group, the alert will be assigned to you.
To assign the alert to:
An individual user, select them in the Assigned to drop-down.
A group, select the group in Manageable By.
Yourself, make sure nothing is selected or entered in Ownership. Everything should be blank.
To view the details of the incidents triggering the alert in a specific format, click Data Template.
Turn on Apply Jinja Template.
Enter Jinja Syntax code in the text field.
Alert Rules can be exported and imported. If you export an Alert Rule, the ownership is lost. If you import an Alert Rule, you get the ownership.
Click Create Alert.
Share Alert Rules with Other Users
You can share alert rules with different users and give them read, edit, or full permissions. Incidents for each shared user and owner are triggered independently.
Go to Settings >> Knowledge Base from the navigation bar and click Alert Rules.
Select My Rules from the dropdown.
Click the arrow Share to Other Users in the Actions column.
To share
Multiple Alert Rules, select them to the left of the list. Click the MORE dropdown and select Share Selected Alert Rules With Users.
All the alert rules, click Select All. Go to the MORE dropdown and select Share All Alert Rules With Users.
Select a User Group. All the users in the user group are listed in the dropdown.
Select Read, Edit, or Full permissions for the users.
A user with the:
Read permission can use and clone.
Edit permission can use, clone, and edit.
Full permission can use, clone, edit, remove, and share.
Users in the Logpoint Administrator User Group are automatically granted full permissions.
Click Submit.
To unshare an alert rule, follow the same steps as sharing, but click Unshare to Other Users in the Actions column instead.
Using the search query from the Alert Rule
Go to Settings >> Knowledge Base from the navigation bar and click Alert Rules.
Click the Search icon under Actions for the rule.
Transfer Ownership
You transfer alert rule ownership from one user to another when a user who owns the alert rule becomes part of a different User Group and no longer needs to own the same alert rules. Or if a user leaves your organization and is deleted you must delete the shared alert rule or transfer the alert rule’s ownership to another user.
Transfer Ownership of Alert Rules
Go to Settings >> Knowledge Base from the navigation bar and click Alert Rules.
Select My Rules from the dropdown.
Click the right-hand pointer icon (transfer) under the Actions column of the alert rule.
To transfer ownership of:
Multiple alert rules, select them. Click the MORE dropdown and select Transfer Ownership of Selected Rules.
All alert rules, click Select. Click the MORE dropdown and All select Transfer Ownership of All Rules.
Deselect the User(s) from the dropdown.
Click OK.
Transfer Ownership When Deleting a User
Go to Settings >> User Accounts from the navigation bar and click Users.
Deactivate the user by clicking the De-Activate User icon under Actions.
Click Manage De-Activated Users.
Click the Delete icon under Actions.
Click Yes.
To transfer the ownership, select a user from the list of active users in the dropdown and click Submit.
To delete the user and the user’s alert rule without transferring their ownership, click Delete.
Clone Alert Rule
Cloned alert rules are automatically shared with the users in the Logpoint Administrator User Group.
Go to Settings >> Knowledge Base from the navigation bar and click Alert Rules.
Click the Clone Alert Rule (clone) icon under Actions next to the rule.
To clone:
Multiple alert rules, select them. Click the MORE dropdown and select Clone Selected Alert Rules.
All alert rules, click Select. Click the MORE dropdown and Clone All Alert Rules.
Enter a new Name for the cloned rule.
Select Replace Existing? to replace an existing rule with the new one.
Click Clone.
Export & Import Alert Rules
Export Alert Rules from one Logpoint instance or server and then import it into another. You can use Export and Import during migrations to transfer rules to a new instance or in disaster recovery to restore exported rules.
You can only export Alert Rules that are grouped under My Rules. When you import Alert Rules they are also listed under My Rules. When you export alert rules a .pak file is created, so when you import them they are in a .pak file. The configured repos are also included in the pak file.
When importing alert rules, only the repos from the alert rules exported from Logpoint are selected. You can only import alert rules exported from Logpoint with .pak extension. The imported alert rules are automatically shared with the users in the Logpoint Administrator User Group.
Exporting Alert Rules
Go to Settings >> Knowledge Base from the navigation bar and click Alert Rules.
Select My Rules from the dropdown and to export:
One alert rule, select it in the list.
Multiple alert rules, select the alert rules in the list.
all the alert rules, click Select All.
Click EXPORT.
Importing Alert Rules
Go to Settings >> Knowledge Base from the navigation bar and click Alert Rules.
Click IMPORT.
Find the .pak file and click Submit. The imported Alert Rules are listed under My Rules.
Change the Timeframe and/or Repo of the Alert Rule Search
Adjusting the time range and repo of alert rules is crucial for ensuring that alerts remain relevant and practical. For example, to narrow the time range of an alert to focus on a specific window where suspicious activity was detected. By doing so, you can prioritize the most relevant data, ensuring faster threat detection and response.
Changing the repo of an alert rule is essential when log sources change or when a broader or more specific dataset needs to be analyzed.
Important Considerations Before Changing the Timeframe
Shorter time ranges reduce query load and improve performance.
Longer time ranges provide deeper insights but can increase processing time and generate more alerts.
Real-time threats, for example, brute-force attacks or privilege escalation, the ideal immediate detection time is from 5 to 30 minutes.
High-frequency events, for example, failed login attempts, use a shorter time range to prevent excessive alerts and focus on the most recent activity.
Low-frequency events, for example, unauthorized admin access, use a longer time range to capture meaningful patterns.
Active security investigations use dynamic time range adjustments to analyze specific attack windows.
Important Considerations Before Changing the Repo
Repos must store logs that match the monitored event type. For example, an alert for failed login attempts must be assigned to a repo storing authentication logs, like Windows Event Logs, Active Directory logs, or VPN logs.
When an alert rule applies to multiple data sources, select a repo that includes all relevant logs to ensure no critical logs are missed.
For compliance, some alerts must be assigned to specific repos, for example, PCI DSS, GDPR, or ISO 27001.
When an alert is correlated across different log sources, for example, firewall, endpoint, and Logpoint logs, ensure the repo contains the necessary log types.
Large repos with extensive logs can slow down query performance.
Changing the Time Range or Repo
Go to Settings >> Knowledge Base from the navigation bar and click Alert Rules.
Select ALL Rules from the dropdown.
Select either one specific alert rule, multiple alert rules, or all alert rules.
Click the MORE dropdown.
Click Repo/TimeRange.
Select Change Repos and select the repo(s) from the dropdown.
Select Change Time Range and set the time range.
Click Ok.
Edit an Alert Rule
When you edit an Alert Rule, you can change the name, description, query, repos, time range, results limit, delay alert, flush on trigger, criteria, metadata, and notification template. You can also edit how users are notified when the Alert was triggered.
Editing an Alert Rule
Go to Settings >> Knowledge Base from the navigation bar and click Alert Rules.
Click the Name of the alert rule to edit.
Make your changes and click Submit.
Editing an Alert Rule Notification
Go to Settings >> Knowledge Base from the navigation bar and click Alert Rules.
To edit notification for:
A single alert rule, find it and select it. Click the bell icon next to the Alert Rule.
Multiple alert rules, find them and select them. Click the MORE dropdown and select Setup Notifications of Selected Alert Rules.
Click SELECT ALL for all alert rules. Click the MORE dropdown and select Setup Notifications of All Alert Rules.
Make your changes and click Submit.
Manage Alert Rules
Set up an alert rule in advance for future use or activate it only during a specific time period. Deleting an alert rule is permanent, so instead of deleting it, you can deactivate the rule. This allows you to reactivate and reuse it later if needed.
Activating Alert Rules
Go to Settings >> Knowledge Base from the navigation bar and click Alert Rules.
To activate:
A single alert rule, select it. Click the activate icon in Actions.
Multiple alert rules, find them and select them. Click the MORE dropdown and select Activate Selected Alert Rules.
Click SELECT ALL for all alert rules. Click the MORE dropdown and select Activate All Alert Rules.
Deactivating Alert Rules
Go to Settings >> Knowledge Base in the navigation bar and click Alert Rules.
To deactivate:
A single alert rule, select it. Click the deactivate icon in Actions.
Multiple alert rules, find them and select them. Click the MORE dropdown and select Deactivate Selected Alert Rules.
Click SELECT ALL for all alert rules. Click the MORE dropdown and select Deactivate All Alert Rules.
Deleting Alert Rules
Go to Settings >> Knowledge Base in the navigation bar and click Alert Rules.
To delete:
A single alert rule, select it. Click the delete icon in Actions.
Multiple alert rules, find them and select them. Click the MORE dropdown and select Delete Selected Alert Rules.
Click SELECT ALL for all alert rules. Click the MORE dropdown and select Delete All Alert Rules.
Drilldown Alert Rules
Go to Settings >> Knowledge Base in the navigation bar and click Alert Rules.
Select Coverage View.
In the list, find a technique marked in green that has at least 1 rule active.
Click the technique name.
Click the Question mark icon at the top right. You will find the drilldown results.
Click Back to return.
Alert Rules & MITRE ATT&CK Framework
Coverage View arranges and maps Logpoint Alert Rule Detections to the MITRE ATT&CK Framework. Drill down in each tactic and technique to see which Logpoint alert rules detect which MITRE techniques and tactics they map to.
For example, in this image
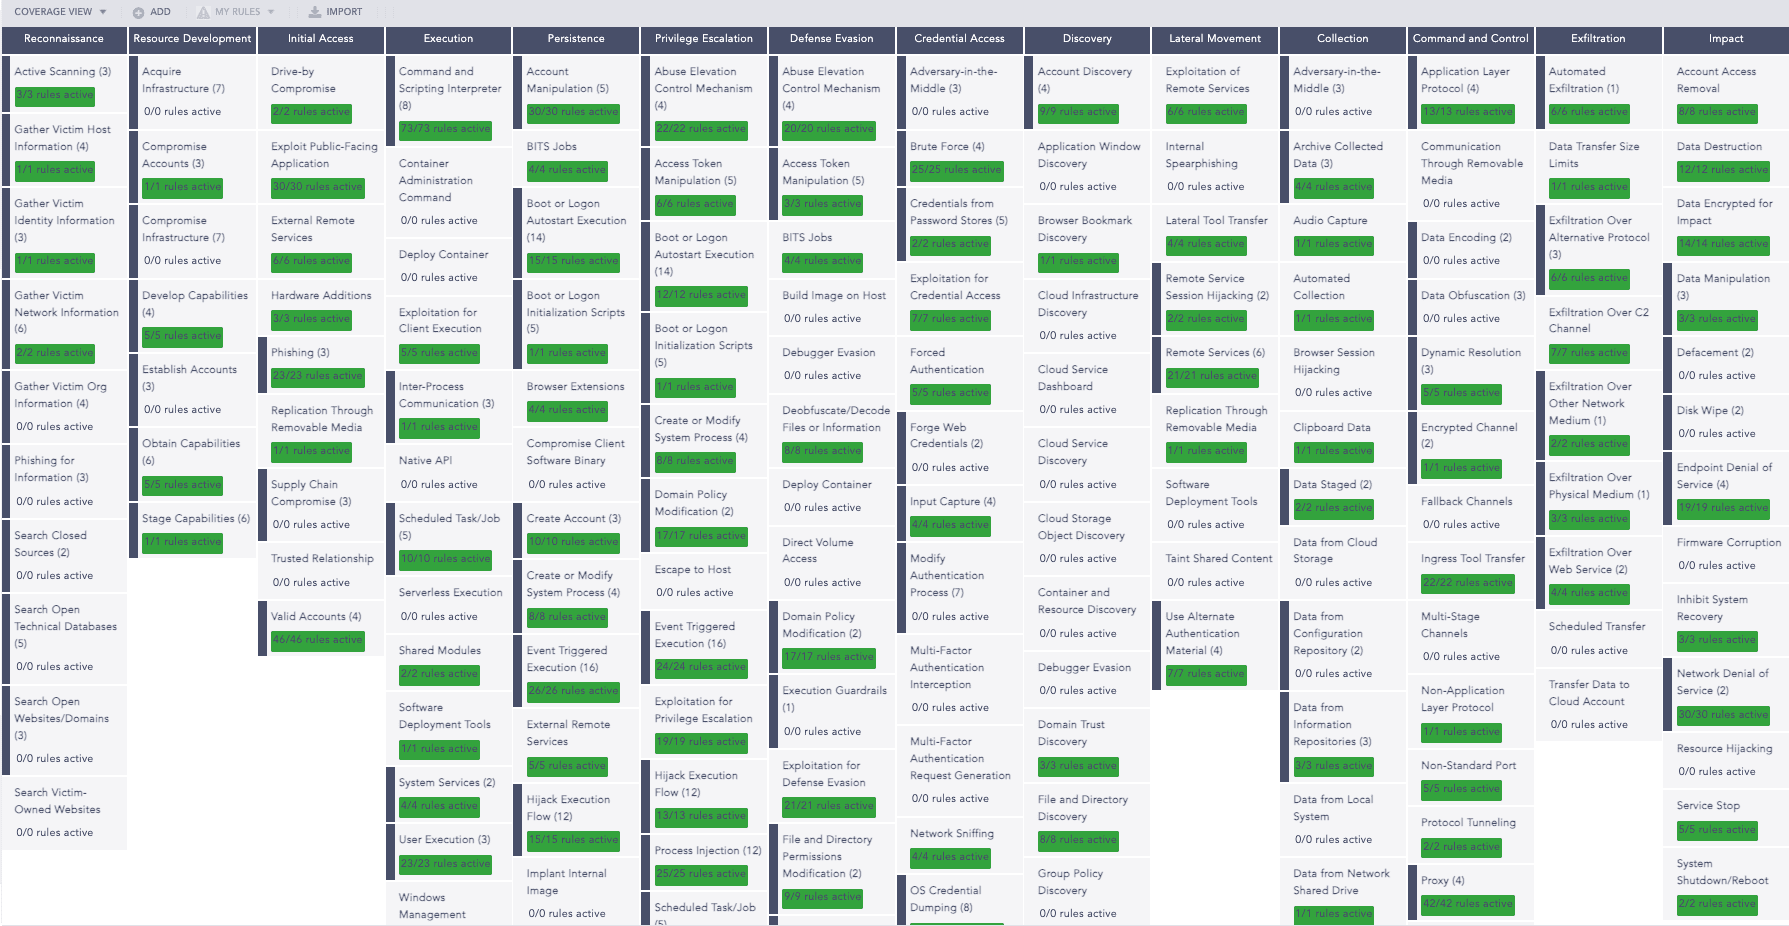
You can see which alert rule is active to protect from Phishing attacks under the Initial Access category. Drill down in each category and technique to see all the alert rules that can detect that specific attack technique.
Was this helpful?