Reports
Reports provide scheduled or on-demand summaries of your security data, helping you analyze trends, demonstrate compliance, and share insights with stakeholders. You can generate reports based on searches, dashboards, or predefined templates, and deliver them automatically to selected recipients. Reports help transform raw log data into structured, actionable information for investigation, auditing, and compliance purposes.
Except for ad hoc reports, all reports can be zipped and emailed. The reports generated contain the first 1000 logs. If your report has more than 1000 logs, use Search Templates in Settings >> Knowledge Base.
Creating Reports
In Logpoint, reports can be created in 3 different ways:
From a Search Query
From Dashboards
From a Report Template
Creating a Report from a Search Query
Go to Search and enter a Search Query.
Click the More dropdown and click Report.
Enter a Name and an Email.
Click Submit.
Creating a Report from Dashboards
Go to Dashboard from the navigation bar and click REPORT.
Enter a Name and an Email.
Click Submit.
Creating a Report from a Report Template
Creating a report from a report template allows you to specify the format and the design of the report. You can select a query from Query Selection, schedule the generation of a report from Scheduling, choose a layout template and table from Choosing a Layout, and personalize components like charts and tables from Report Design.
To generate a report using a report template:
Query Selection
Go to Reports in the navigation bar.
Click Report Templates.
Click ADD.
Enter a name for the Report Template by clicking the write icon.
Enter a valid query in Add Query or click SELECT QUERY to select queries from the lists. If you select Live Searches from the ADVANCED QUERY PICKER, the title of the live search, created from the Dashboard is automatically entered in the header.
If you are using a timechart process command with grouping parameters and it has more than ten values, the report is generated with an error message. The error is displayed so that it does not affect the rendering properties of the graph in the report.
Click ADD.
Enter a header in Panel Header.
Select a Limit for the number of logs. Limit is visible only for non-aggregate commands.
Select one of the COMPONENT OPTIONS. If you select Chart, select the Chart type from the dropdown.
Click Ok.
Scheduling
In SCHEDULING, click ADD.
Select how often to generate the report. If you select Monthly, Logpoint creates a link titled Monthly (Last 30 days) on 1st day, 0th hour. Click the link to open the MONTHLY SCHEDULING.
Select a TIME RANGE, Day, and Hour.
Select a TIME ZONE. The scheduling time and the report results are generated in the selected timezone.
Select a REPO.
Select the EXPORT FORMAT in which to generate the report.
Enter the Email Address and Subject, and select Send email to send the report as an email.
Select the Send compressed report on email to get a compressed report on your email. If you select the HTML format, the report is compressed regardless of the option you select.
To encrypt your report, select Set Password and enter a password. Reports in formats PDF, XLS, DOCX, and CSV are password protected. Password length can be between 5-255 characters.
If Data Privacy Module is enabled in the system, the Data privacy module tab is visible. Select the Generate report with original data to generate decrypted values in the report. Select the Show raw logs to get access to the raw logs in the generated report.
When the Data Privacy Module is enabled, and you select Generate report with the original data, a request message is sent to the users with the Can Grant Access permission. To view requests, go to Settings >> Configurations >> Data Privacy Module >> Pending Request. The scheduled reports are generated only if the request is approved.
Choosing a Layout
Click Layout.
Select a Layout Template.
Enable Include Table of Contents to add a table of contents to the report.
Select a COMPONENT PLACEMENT.
If you select Use Default, Logpoint positions the components in the report automatically.
If you select Personalize, you can choose the placement of the report components. This will open Report Design.
Report Design
The REPORT DESIGN is divided into two sections: STRUCTURE and LAYOUT PREVIEW. All the queries created earlier are listed under STRUCTURE, and the layout of your report can be previewed in the LAYOUT PREVIEW.
In STRUCTURE, click ADD.
Select the component to add to the template.
If you select a PANELS, enter the Position, Area 1 width, and Count. Area 1 width does not appear for Simple Panel.
If you choose a HEADERS, enter the Position, Text, Font, and Color. You can also add a Page Break to the template. In this case, enter a Position.
To add components, click the Add button. You can either add the results of a query or a paragraph.
To add a query, select a query listed under Queries. The Queries field is displayed with only the queries that have not been added to the Layout Preview.
To add a paragraph, click ADD. Enter the Text, Font, and Color.
You can add as many Panels, Headers, and Paragraphs. However, you can add a single query only once. Click the Edit icon to edit and click the Delete icon to delete.
Click Ok.
Report Templates
Report Template stores predefined report templates, including filters, visualization preferences, and layout settings. You can save multiple templates to create, schedule, or email automated reports. The created, used, cloned, and shared report templates are automatically shared with the users in the Logpoint Administrator user group.
Types of Report Templates
My report templates: A personalized space where Logpoint users can create, customize, and manage their own reports tailored to their specific needs.
Used report templates: Reports that Logpoint users have accessed and interacted.
Shared report templates: Reports that are accessible to multiple Logpoint users.
Vendor report templates: The pre-built reports provided by Logpoint
Running a Report Template
Running a report template means generating a report inrefers to generating a report based on a predefined format. Logpoint automatically runs a report template based on the defined scheduling rules, but you can also run it manually. When you run a report manually, it does not change the report’s automatically scheduled time. To send the report as an email attachment, you must configure SMTP.
Run a Template Manually
Go to Reports from the navigation bar and click Report Templates.
Click the Run This Report icon in Actions.
Select the Repos from which the report will extract the log.
Select the Time Zone and Time Range to specify the time period for the report.
Select the report format to be generated in Export Type.
Enter the Email address(es), to send the report as an attachment.
Enter the Password to encrypt the report. Reports in PDF, XLS, DOCX, and CSV formats are password-protected.
Click Submit.
If Data Privacy is enabled, details are under DATA PRIVACY MODULE.
Select Generate report with the original data to decrypt the fields in the report. If Data Privacy is enabled, when you select it, a request message is sent to the users with the Can Grant Access permission to validate and authorize the decryption of these fields. To view the request, go to Settings >> Configurations >> Data Privacy Module >> Pending Request. The report can be viewed or downloaded only after the request is approved.
Select Show raw logs to access the raw logs in the report.
Sharing a Report Template
You can share a report template with all Logpoint users and give them read, edit, or full permissions. Any changes made in the report templates are visible to all the shared users. A user with full permission can also share and delete a shared report template. The report templates are automatically shared with the users in the Logpoint Administrator user group and cannot be unshared.
Share a Report Template
Go to Report >> Report Templates.
Click the Share/Unshare icon in Actions.
To share multiple report templates, select all the templates to share in the list. Click the MORE dropdown and select Share Selected To Users.
To share all the report templates, click the MORE dropdown and select Share All To Users.
Select the user groups to share the report templates.
Select the Read, Edit, or Full permissions for the users. Go to the Permission Group for details on user permissions.
Click Submit
You can unshare a report template by removing the permissions for all the user groups using the same procedure.
Each parameter in a shared report template is categorized into Global parameters and Personalized parameters.
Global parameters can be changed only by users with edit or full permissions. Changes in the global parameters are reflected for all users using the shared report template. The following parameters are global:
The name and the report layout of the report template.
The queries, query order, and query render type of the report template.
You can make changes to a report specifically for yourself through Personalized parameters. You can change:
Scheduling
Data privacy configurations if data privacy is enabled
Repo selection
Email and memory usage for scheduled reports
Password
All users with access to a report template can change Personalized parameters, but the changes made are only applicable to the user who made them.
Deleting a Shared Report Template’s Owner
To delete the owner of a shared report template, you must delete the shared template or transfer the template’s ownership to another user. You must transfer ownership to delete a user whose report template is shared. The transferred template is listed on Report Templates in the owner’s Logpoint.
Deleting a Shared Report Template’s Owner
Go to Settings >> User Accounts and click Users.
Deactivate the user by clicking the De-Activate User icon in Actions.
Click Manage De-Activated Users.
Click the Delete icon in Actions.
Click Yes.
To transfer ownership, select a user from the dropdown, then click Submit.
To delete the user and user’s template without transferring their ownership, click Delete.
Importing and Exporting Report Templates
Import allows you to import report templates from a stored location to Logpoint. Once you import, it is displayed under MY REPORT TEMPLATES. The imported report templates are automatically shared with the users in the Logpoint Administrator user group.
Use export to export a report template and share it with other users, back it up, or migrate it to another Logpoint. When a report template is exported, the password set in the template is not exported. You need to set a password again for the exported template.
Exporting Report Templates
Go to Report >> Report Templates and select the report templates to export.
Click EXPORT.
Save the exported package.
Importing Report Templates
Go to Report >> Report Templates.
Click IMPORT and browse for the required report templates.
Click Upload.
Cloning and Deleting Report Template
When a report template is cloned, the password set in the template is not cloned. You need to set a password again for the cloned template. The cloned report templates are automatically shared with the users in the Logpoint Administrator user group.
Cloning a Report Template
Go to Report >> Report Templates.
Click the Clone Report icon under Actions.
To clone multiple Report Templates, select the templates to clone. Click the MORE dropdown and select Clone Selected Report Templates.
To clone all the Report Templates, click the MORE dropdown and select Clone All Report Templates.
Enter a new Name for the cloned template.
Select Replace Existing? to replace an existing template with the same name.
Click Clone.
Deleting a Report Template
Go to Report >> Report Templates.
Click the Delete icon under Actions.
To delete multiple Report Templates, select the templates to delete. Click the MORE dropdown and select Delete Selected Report Templates.
To delete all the Report Templates, click the MORE dropdown and select Delete All Report Templates.
Click Yes.
Layout Templates
A layout template is used to edit the appearance of your reports. You can create as many layout templates and specify different layouts for different reports. You can import new layout templates into Logpoint or create your own templates.
Importing a layout template
Go to Report >> Layout Templates.
Click IMPORT.
Browse to the layout template.
Click Upload.
Creating a layout template
Go to Report >> Layout Templates.
Click ADD.
Enter a Name for the template.
Select a Font from the dropdown. Select Noto Sans CJK for the Chinese, Japanese, and Korean letters.
Browse the Background Image, Cover Page Image, and Data Page Image to be displayed in the report. The Name, Background Image, Cover Page Image, and Data Page Image are mandatory fields.
The maximum width and height allowed for each of the images are given below:
Background image = 595 * 842 pixel (width * height)
Cover Page Image = 300 * 128 pixel (width * height)
Data Page Image = 160 * 59 pixel (width * height)
Select the Footer Background Color, Footer Text Color, and enter the Footer Text.
Click Submit.
Report Jobs
Report Jobs lists the reports currently being generated with their generation time, current status, and remarks. After a report is successfully generated, it is sent to your inbox. It also lists the reports that have failed to generate with the reasons for their failure. The reason for the failure is displayed under Remarks.
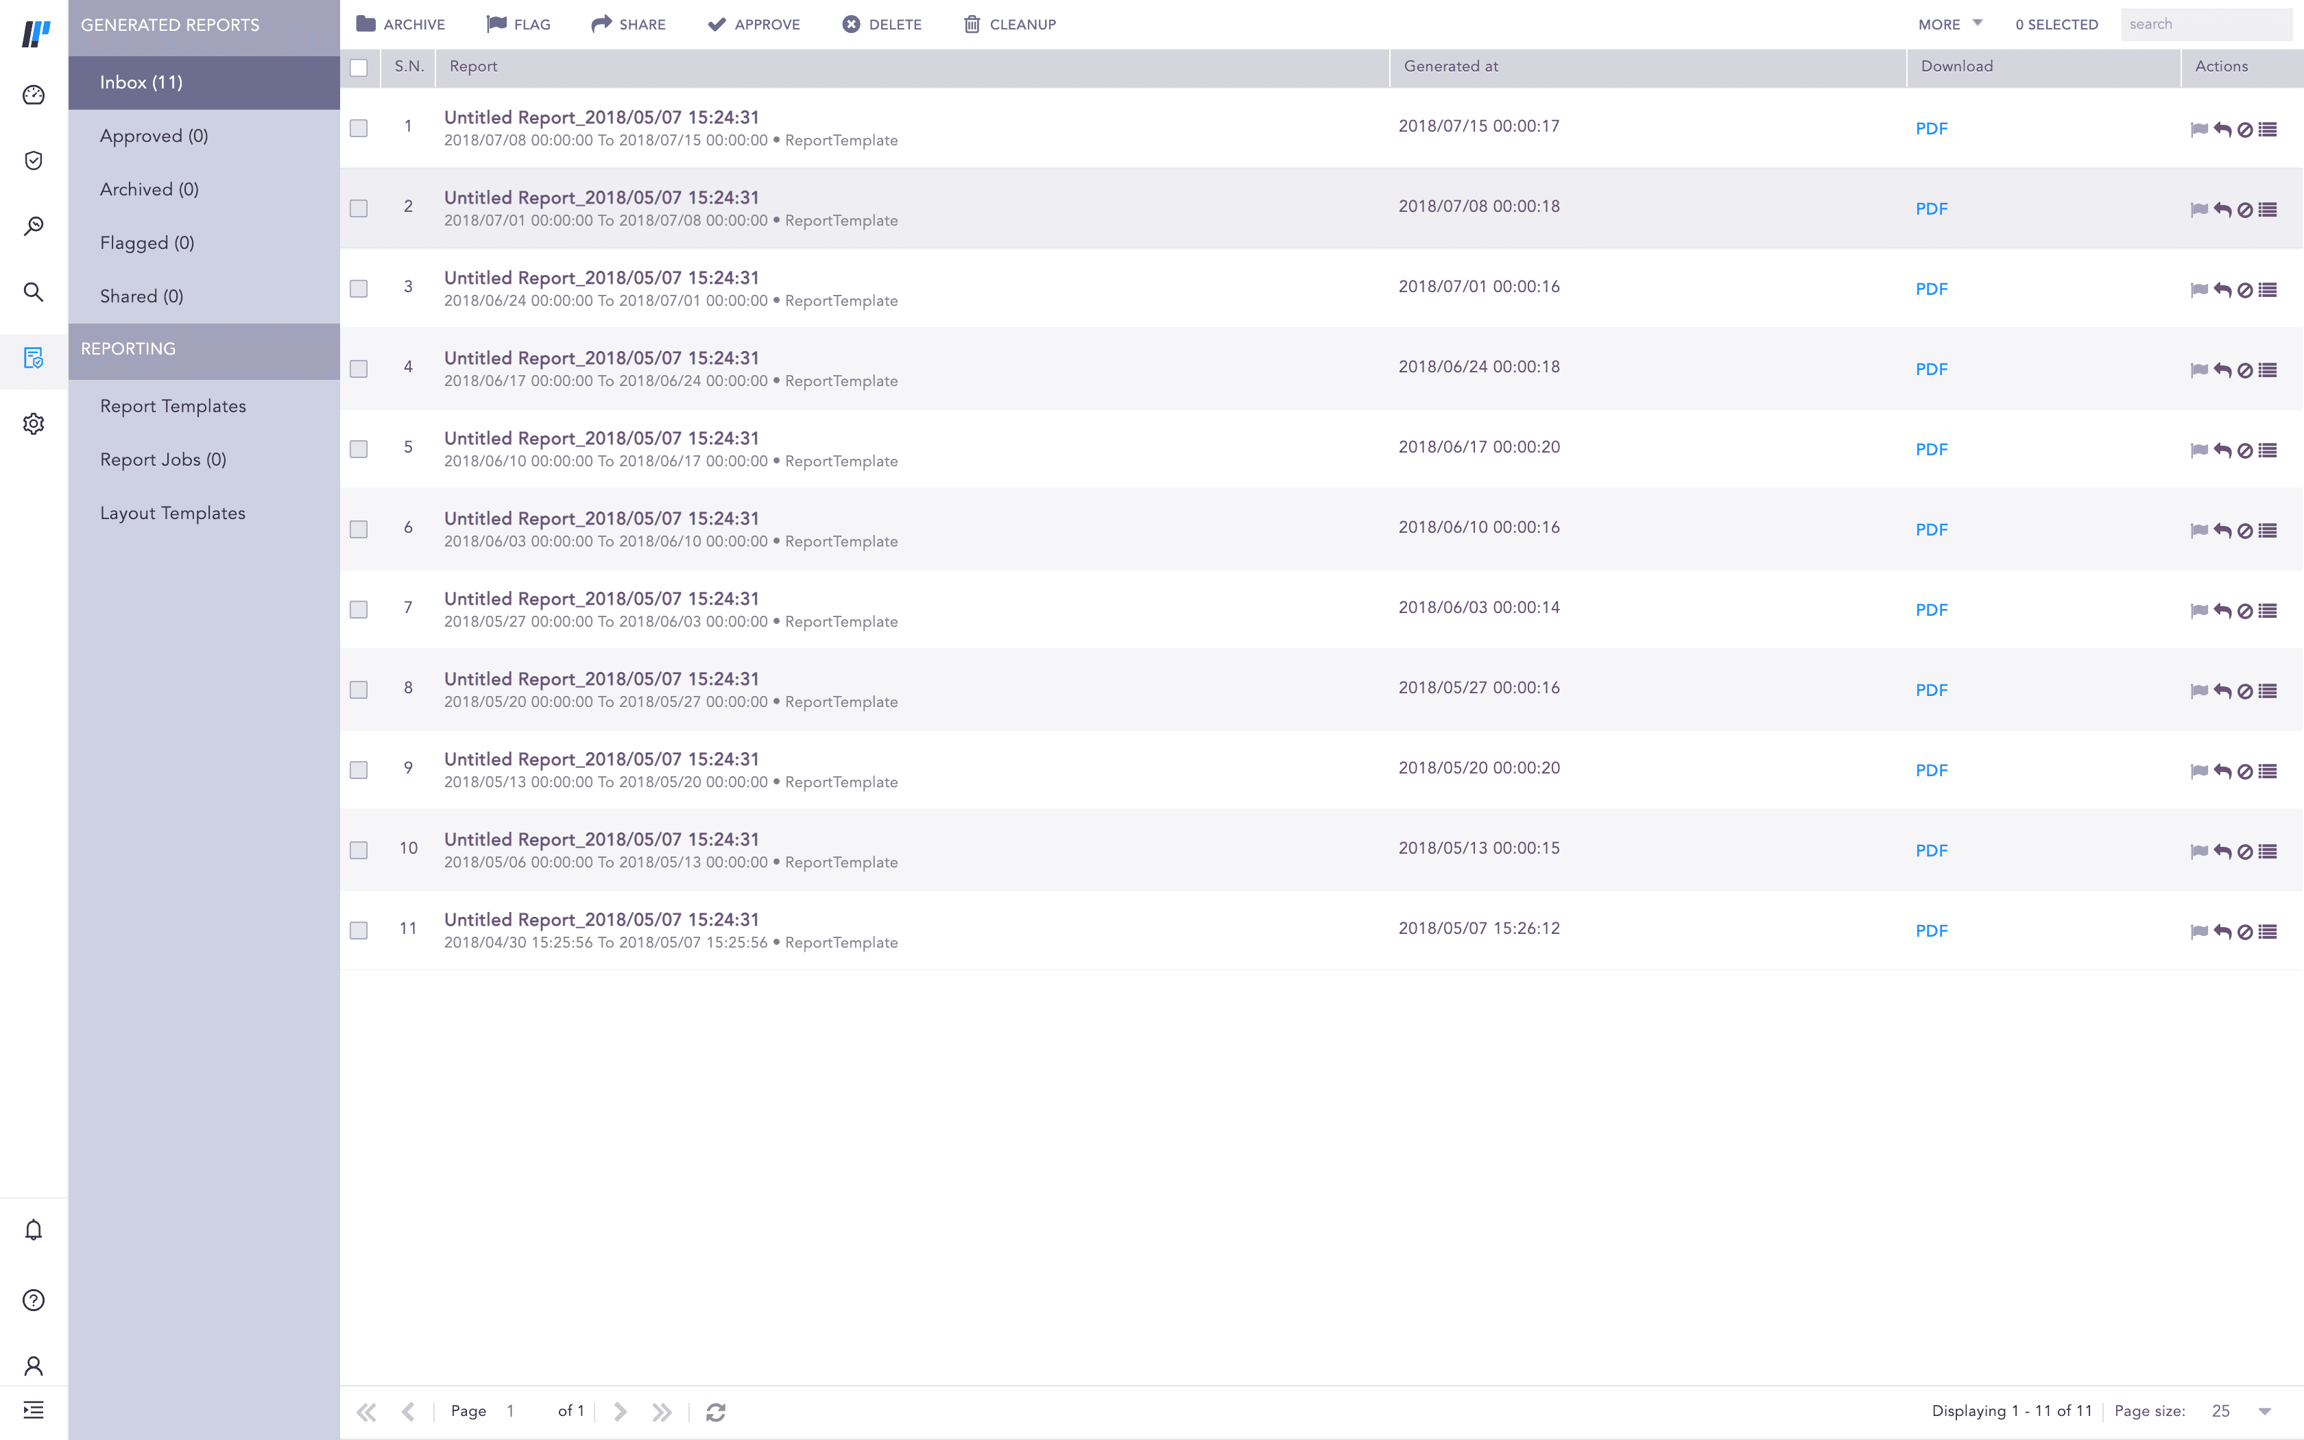
Generated Reports
Generated reports allow you to manage your reports from generated reports, which contain Inbox, Approved, Archived, Flagged, and Shared.
Inbox lists all the successfully generated reports. You can approve, archive, flag, share, or delete a report from the inbox, which is moved into the Approved, Archived, Flagged, or Shared pages or deleted from Logpoint. Important reports must be archived to save the inbox from getting crowded.
Share Report
Other users in Logpoint can view the shared reports. If the shared report is password-protected, you need to input the password to access the shared report. You can also share a report by clicking the Share icon in Actions.
Go to Report >> Inbox.
Select the reports to share.
Click SHARE.
Approve Report
When a generated report is verified, you can push that particular report to Approve. It helps you organize the reports. You can also approve a report by clicking the Approve icon in Actions.
Go to Report >> Inbox.
Select the reports to approve.
Click APPROVE.
Cleanup Reports
Using Cleanup, you can either delete the reports generated before a certain date or delete reports within a specific date range. Go to Cleanup Jobs to see the status of all the initiated cleanups.
Go to Report >> Inbox.
Click CLEANUP.
Select Older than to delete all the reports generated before the provided date.
Select a Date range to delete all reports within a specific time frame. All reports generated from the start date to the end date are deleted.
Was this helpful?
Comment on Report
Go to Report >> Inbox.
Select the Activities icon in Actions.
Enter a Comment and click Submit.