Manage Search and Queries
Manage searches and queries by creating reusable components instead of rewriting the same queries repeatedly. Build macros for common patterns, search templates for parameterized searches, search packages to organize investigations, and lists to filter results.
Macros
Macros are uniquely named shortcuts for longer search queries. They make searches easier to create and reuse by eliminating the need to repeatedly type complex query strings. You can use macros to build new search queries and include them in Search, Dashboards, Reports, Alert Rules, Label Packages, Search Packages, and Search Templates. When you type a macro name in the Search field, Logpoint automatically expands it into the full query.
Macros can be combined with other macros or with custom search expressions, and you can create as many macros as required. When you update a macro, the change is automatically applied everywhere the macro is used, allowing you to maintain and refine queries from a single location.
When you enter or type a macro, you must enclose the macro in backticks, so one is at the beginning, and one is at the end of the macro.
Macro Examples
Example 1: Simple search in macro
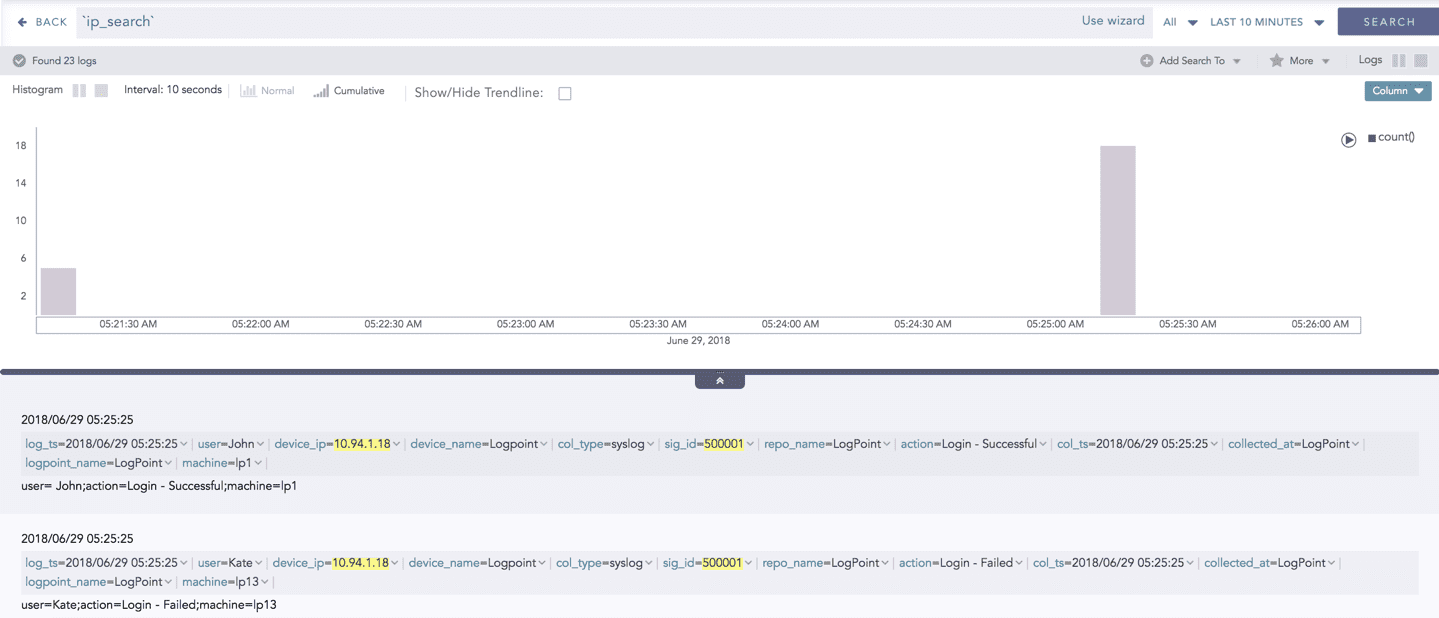
Create a macro named ip_search with the query:
device_ip=10.94.1.18 sig_id=500001In the search query bar, type ip_search and click Search.
Results are all logs with the device_ip as 10.94.1.18 and
sig_idas 500001.
Example 2: Aggregation function in macros
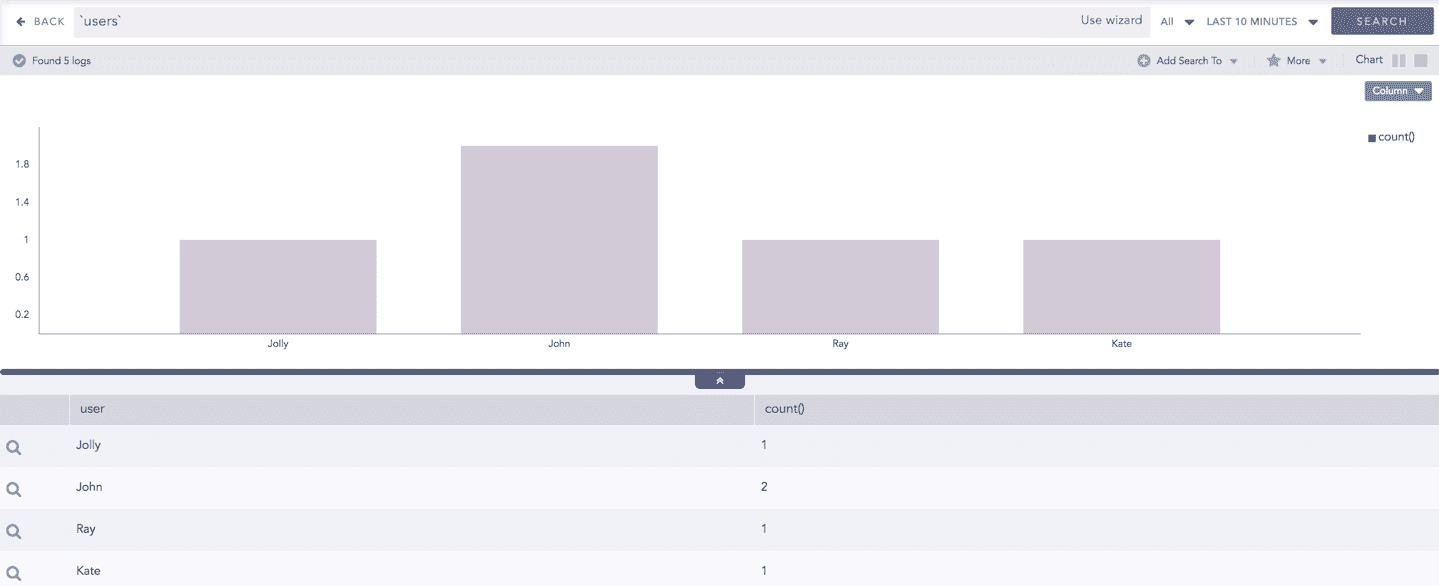
Create a macro named users with the query:
device_ip=10.94.1.18 | chart count() by userIn the search query bar, type users and click Search.
Results are all the logs with the device_ip 10.94.1.18, grouped by user, and returns the count of the log for each user.
Example 3: Evaluation process command and Aggregation function in macros
Create a macro named eval_revenue with the following query:
| process eval("Revenue=unit_sold*Selling_price") | fields unit_sold, Selling_price, RevenueIn the search bar, type eval_addition and click Search.
The Revenue value is calculated by multiplying unit_sold by Selling_price, and the list displays the total revenue.

Example 4: Multiple macros in a single search
In the search query bar, type user=Jolly ip_search eval_revenue and click Search.
The results returned are for the user Jolly. It then searches for logs with device_ip 10.94.1.18 and sig_id 500001, as defined in the ip_search macro. From these logs, the revenue is calculated and listed as defined in the eval_revenue macro.
Adding Macros
Go to Settings >> Knowledge Base from the navigation bar and click Macros.
Click Add.
In Macros, enter a Name for the macro. You can use alpha-numeric and underscores (_).
In Query, enter a valid query. If the query is invalid or doesn't work, you can click the error icon to view details.
Click Submit.
Edit a Macro
Go to Settings >> Knowledge Base in the navigation bar and click Macros.
Click the macro to update or change.
In Macros, enter or update the name and the query.
Click Submit.
Delete Macros
Before deleting a macro, make sure a Dashboard, Alert Rule, Labeling Rule, Incident, or Public URL is not using it.
Go to Settings >> Knowledge Base from the navigation bar and click Macros.
Click the Delete icon under Actions.
In Confirmation, click Yes.
Import Macros
Go to Settings >> Knowledge Base in the navigation bar and click Macros.
Click Import.
Browse to the file to import.
Click Submit.
Export Macros
Go to Settings >> Knowledge Base in the navigation bar and click Macros.
Select the macros to export.
Click Export.
Search Templates
Search Template stores search queries with placeholders. The stored queries are called base queries. The placeholders in the base queries are used as variables, which you can replace with actual search keywords during runtime. You can save multiple base queries in a search template and use them to search queries or create dashboard widgets. The search templates retain the last visualization applied to the widgets. You can drill-down on the search results from the non-edit mode of the widget of the search templates.
My Search Templates contains all the search templates you have created or cloned. The vendor search templates are grouped under Vendor Search Templates and those shared by other users are grouped under Shared Search Templates.
Create a New Search Template
In the navigation bar, click Search.
On the search page, go to Search Templates, and click All search templates.
Click Add.
Enter a Name and Description.
In the Basequery list, enter a name and a query for each base query.
Enclose placeholders or base queries within {{ and }}.
To add a new placeholder or base query field, click the Plus icon .
To remove a placeholder or base query field, click the Minus icon.
In Fields, enter a:
Field to use as a placeholder in any of the base queries. A field is the key in the key-value pair that identifies the value in a normalized log key-value pair. They are the value identifiers, or identifier names, assigned to normalized values.
Display Text for the field.
Default Value.
You can configure multiple Field, Display Text, and Value entries.
Click Submit.
Cloning Search Templates
In the navigation bar, click the Search Templates icon.
Continue with My Search Templates or use the drop-down to select Shared Search Templates or Vendor Search Templates.
Click the Clone icon under Actions of the template.
To clone multiple Search Templates, select the templates. Click the MORE dropdown and choose Clone Selected Templates.
To clone all the Search Templates, click the MORE dropdown and choose Clone All Templates.
Enter a new Name for the cloned template.
Select the Replace Existing? checkbox to replace an existing template with the same name.
Click Clone.
Editing Search Templates
Go to Search Templates from the navigation bar.
Click the Edit icon in Actions of the search template and update the information.
Click Submit.
Deleting Search Templates
Go to Search Templates from the navigation bar.
Click the Delete icon in Actions of the search template.
To delete multiple Search Templates, select the respective templates. Click the MORE dropdown and choose Delete Selected Templates.
To delete all the Search Templates, click the MORE dropdown and choose Delete All Templates.
Click Yes.
Exporting Search Templates
To share a Search Template between Logpoint instances or servers, export the template and then import it to the other instance or server.
Go to Search Templates from the navigation bar.
Select the templates to export.
Click Export.
Save the exported template.
Click Submit.
Importing Search Templates
The imported search templates are automatically shared with the users in the Logpoint Administrator user group.
Go to Search Templates from the navigation bar.
Click Import.
Browse for the template package file and click Upload.
Sharing Search Templates
Sharing search templates enables teams to collaborate on the same set of standardized searches. Make a template available to other users and control their access by assigning read, edit, or full permissions. Updates to a shared search template are automatically reflected for everyone who has access, ensuring consistency across investigations.
Each parameter in a shared search template is categorized into three types:
Global parameters can be changed only by users with Edit or Full permissions. Changes in the global parameters are reflected for all users using the shared search template. The following parameters are global:
The name, description, queries, and field values of the search template.
Title and order of tabs, including tab creation and deletion.
Title, query, dimensions, and positions of widgets, including widget addition and deletion.
Personalized parameters can be changed by all users. However, the changes to the personalized parameters apply only to the users who made them. The following parameters are personalized:
The updateable parameters
Selected repos
Time range
Hybrid parameters can be changed by all users. If the user changing the parameters has the Edit or Full permissions, the changes are reflected for all the users. However, if the user has only the Read permission, the changes are reflected only for the user making the change. The following parameters are hybrid:
Chart types of widgets
Legends and legend labels of widgets
Trend state of widgets
If a user with the Edit or Full permissions changes a hybrid parameter, the changes made by all other users are overridden.
A user with the Full permission can also Share and Delete a shared search template.
Sharing Search Template
Go to Search Templates in the navigation bar.
Click the Share Template icon under Actions of the template to share.
To share multiple Search Templates, select the templates. Click the MORE dropdown and choose Share Selected With Other Users.
To share all the Search Templates, click the MORE dropdown and choose Share All With Other Users.
Select the user groups to share the search templates with.
Select the Read, Edit, or Full permissions for the users.
Click Submit
You can unshare a search template by removing permissions for all user groups in Share Search Template.
Deleting a Shared Search Template’s Owner
While deleting a shared search template’s owner, you must delete the shared template or transfer the template’s ownership to another user. You can do this from Transfer Ownership, which appears when you attempt to delete a user whose template is being shared.
Go to Settings >> User Accounts from the navigation bar and click Users.
Deactivate the user by clicking the Deactivate User icon in Actions.
Click Manage De-Activated Users.
Click the Delete icon in Actions.
Click Yes.
To transfer the ownership, select a user from the drop-down and click Submit. The transferred template is listed in the Search Templates page in the owner’s system.
To delete the user and the user’s template without transferring their ownership, click Delete.
View Existing Search Templates
In the navigation bar, click the Search Templates icon.
My Templates are listed by default. Or the templates you created. You can also filter the list according to
Shared Search Templates to view the Templates shared with you.
Vendor Search Templates to view Integration-specific templates.
3. Click the Name of the template.
Logpoint forwards you to the Search Template View where you can access the dashboards of the search template.
Manage Search Templates
Adding a Dashboard
You must add at least one dashboard to use the Search Template View features.
Click the Plus icon at the top.
Enter the name of the dashboard.
Click Ok.
Adding a Widget
Click Add Widget.
Enter a Name for the widget.
In the Query field, enter the name of a base query within {{ and }}.
Enter a Description and a Time-range for the widget.
Click Auto Arrange to arrange the widgets in a presentable form automatically.
Creating a Report
Click Report at the top of the dashboard.
Enter the Report Name and an Email address.
Click Submit. You will receive the report in PDF format.
Updating Parameters
Enter the new values for the variables in the panel to the right.
Click Override widget time range to select a time-range. The time-range you provide in this field takes precedence over the one provided for individual widgets.
Select the Repos in which to perform the search.
Click Update.
After clicking Update, the widgets continuously retrieve their respective logs. The widgets show updated values only after you click Update. Click Back to redirect to the list view of the search templates.
Click the Stop button to stop the widgets from retrieving additional logs. Doing this pauses the visualization of all the widgets. You can only see the already received log results.
Search Packages
Search Packages are collections of saved searches that let you rerun the same searches without re-entering them. They group related searches so you can organize them logically and quickly run the required one.
There are three types of Search Packages:
My Packages Searches that you create and organize yourself. This is the default view.
Vendor Packages Integration-specific packages provided by Logpoint. You can’t edit these packages directly, but you can clone them and modify the clone. Modified clones appear under My Packages.
Shared Packages Packages shared between you and other users. These can include:
Packages you created and shared yourself
Vendor packages that you or another user cloned and modified
In addition to sharing packages with other Logpoint users or importing them into another Logpoint server or instance, you can share Search Packages with people in your organization through the Public API. This is useful when colleagues don’t have access to Logpoint.
Adding a Search Package
Go to Settings >> Knowledge Base from the navigation bar and click Search Packages.
Click Add.
Enter a Name and a Description for the search package.
Click Submit.
Click Add.
In the Saved Search Information, enter a Name, an Identifier, and select a Package.
Enter a Query. Click Decode to convert the URL encoded search string to Logpoint search query format.
Click Submit.
Click the My Packages dropdown at the top-left corner of the panel and select the Vendor Packages to access the Vendor Search Packages page. Similary, click the My Packages dropdown at the top-right corner of the panel and select the Shared Packages to access the Shared Search Packages page.
Editing a Search Package
Go to Settings >> Knowledge Base in the navigation bar and click Search Packages.
Click the Name of the package to edit.
Update the information.
Click Submit.
Exporting a Search Package
You can only export the packages in My Packages.
Go to Settings >> Knowledge Base in the navigation bar and click Search Packages.
Click the package to export.
Click Export and save the exported package.
Importing a Search Package
Go to Settings >> Knowledge Base in the navigation bar and click Search Packages.
Click Import.
Browse for the search package file and click Upload.
Sharing Search Packages with other users
Go to Settings >> Knowledge Base in the navigation bar and click Search Packages.
Click the Share Package With Logpoint icon under Actions of the concerned package.
To share multiple Search Packages, select the packages. Click the MORE dropdown, choose Share Selected To Users, and click Yes.
To share all the Search Packages, click the MORE dropdown, choose Share All To Users, and click Yes.
Click the Shared Packages link in the dropdown on the top-left corner to view the packages shared by other users. You can unshare a search package using the same method.
Cloning Search Packages
Go to Settings >> Knowledge Base in the navigation bar and click Search Packages.
Click Clone Package under Actions for the package.
To clone multiple Search Packages, select the concerned packages. Click the MORE dropdown, choose Clone Selected Packages, and click Yes.
To clone all the Search Packages, click the MORE dropdown, choose Clone All Packages, and click Yes.
Enter a new Name for the cloned package.
Select the Replace Existing? checkbox to replace an existing package with the same name.
Click Clone.
Deleting Search Packages
Go to Settings >> Knowledge Base in the navigation bar and click Search Packages.
Click the Delete icon under Actions of the concerned package.
To delete multiple Search Packages, select the packages. Click the MORE dropdown and choose Delete Selected Packages.
Click Yes.
Saved Searches
Saved Searches store individual search queries so you can reuse them later. Selecting a saved search automatically loads the query into the search bar and runs it, displaying the corresponding results.
Cloning Saved Searches
Go to Settings >> Knowledge Base in the navigation bar and click Search Packages.
Click the Manage Saved Searches icon under the Actions column of the search package.
Click the Clone icon under Actions for the saved search.
To clone multiple saved searches, select the respective searches. Click the MORE dropdown, choose Clone Selected Saved Searches and click Yes.
To clone all the saved searches, click the MORE dropdown, choose Clone All Saved Searches, and click Yes.
Enter new names for the cloned searches.
Check the Replace Existing? checkbox to replace an existing package with the same name.
Click Clone.
Registering from a Public API
Go to Settings >> Knowledge Base in the navigation bar and click Search Packages.
Click the Manage Saved Searches icon under the Actions column of the search package
Select the Click to register from public api icon under the Actions of the saved search.
To register multiple saved searches from a public API, select the concerned searches. Click the MORE dropdown and choose Add Selected to Public API.
To clone all the saved searches, click the MORE dropdown and choose Add All to Public API.
You can unregister a saved search from the public API using the same method.
Searching a Saved Search
Go to Settings >> Knowledge Base in the navigation bar and click Search Packages.
Click the Manage Saved Searches icon under Actions of the search package
Click the Search icon under Actions of the saved search.
Deleting a Saved Search
Go to Settings >> Knowledge Base in the navigation bar and click Search Packages.
Click the Manage Saved Searches icon under Actions of the search package.
Click the Delete icon under Actions of the saved search.
To delete multiple saved searches, select the searches. Click the MORE dropdown and choose Delete Selected.
To delete all the saved searches, click the MORE dropdown and choose Delete All.
Click Yes.
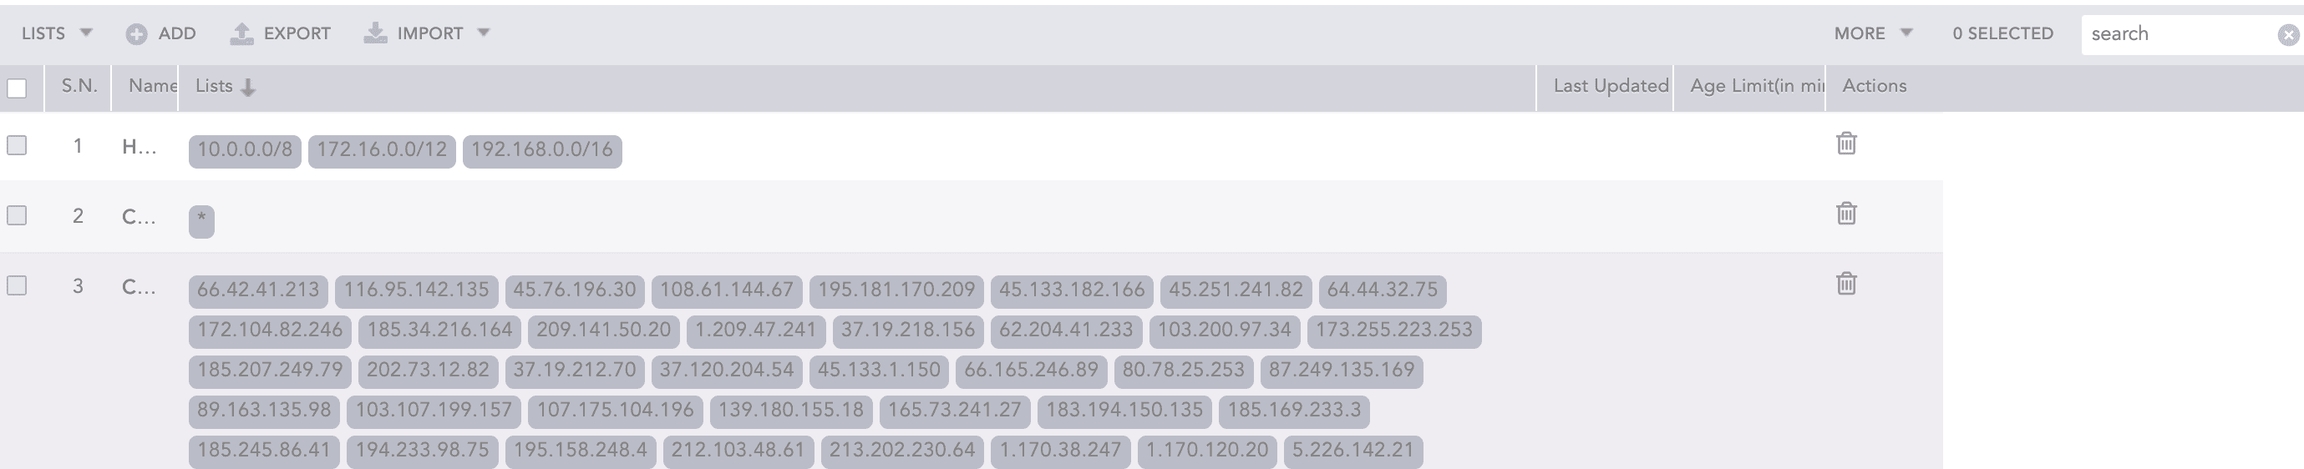
Lists
Lists are collections of values that can be used as criteria in search query to filter search results. For example, you can search all logs generated from the Sales team by creating a list SALES_USER with a username of all sales members and using the query user in SALES_USER in Search.
Logpoint supports Static List and Dynamic List.
Static Lists
Static List is a collection of pre-defined values that doesn’t change unless you add or remove values from it.
For example, you can create a list IP_BLACKLIST and add all the blacklisted IPs in it. You can check logs for the blocked IP Address using the device_ip query in IP_BLACKLIST in Search.
To display the age limit or last updated columns, click MORE >> Columns and select Age Limit(in minutes) or Last Updated.
Adding a Static List
Go to Settings >> Knowledge Base from the navigation bar and click Lists and Tables.
Select Lists.
Click ADD.
Select Static List and enter a Name.
Enter List of Values. Ensure no tab characters (t) are included in the values, as they are not supported in Logpoint search and will prevent results from being displayed. You can also select the Vendor-provided lists from the Also Include From Vendor table.
Click Submit.
Editing a Static List
Go to Settings >> Knowledge Base from the navigation bar and click Lists and Tables.
Click the Name of the list to edit.
Update the information and click Submit.
Dynamic List
Dynamic List stores the values that can be updated using the toList process command. For example, to list all the users in Logpoint, create a dynamic list USERS and execute the toList process command to add values in the List. To execute the process command to update the list values whenever new users log into the system.
Adding a Dynamic List
Go to Settings >> Knowledge Base from the navigation bar and click Lists and Tables.
Select Lists.
Click ADD.
Select Dynamic List.
Enter Name and Age Limit. It is the time after which the table data is deleted. To keep the data forever, set the age limit to 0.
Click Submit.
Adding Values to a Dynamic List
The previously added list is initially empty. Use the toList process command to add field values from the search result into the list.
Syntax:
This process command takes two arguments: list name and field name. It prompts an error message if you provide more than two arguments or an incorrect list name.
If data privacy is enabled, you cannot use the toList commands with encrypted fields unless you have full access to them.
Example:
The query above adds the device_ip values from the search results to the device_ip_list list.

If you execute the same process command with a different field name, it adds the values of the field to the existing list.
For example, if you execute the query device_ip=* | process toList(device_ip_list, device_ip), then execute device_ip=* | process toList(device_ip_list, device_name), device_name is added in the list device_ip_list.
Data Expiry in Dynamic List
In a dynamic list with an Age Limit, each item inherits the list’s expiry time. For example, if the list’s expiry time is set to 3 hours, any item added to the list will automatically expire after 3 hours. If an item is updated, its expiry time resets, and the item will expire 3 hours after the last update.
In contrast, a list without an Age Limit considers all items as permanent, giving them an expiry time of 0. To delete these items, you must set an Age Limit for the list and then update the item. Once the item exceeds the new expiry time, it will be removed.
Importing / Exporting a List
To export a list, select the list and click EXPORT.
Importing a List
Click IMPORT and select the exported .pak file.
Browse to the .pak file.
Click Submit.
The imported dynamic list does not include Lists and Last Updated.
Importing a CSV/TXT List
The imported CSV/TXT should contain only list values. Values in CSV and TXT files must be separated by a comma (,) and (/n), respectively.
Click Import and select CSV/TXT.
Enter a Name for the list.
Click Browse.
Browse to the .csv or .txt file.
Click Submit.
Deleting a List
Go to Settings >> Knowledge Base from the navigation bar and click Lists and Tables.
Click the Delete icon under Actions.
To delete multiple lists, select the lists, click MORE and choose Delete Selected.
To delete all the lists, click MORE and choose Delete All.
Click Yes.
Was this helpful?